
1. Giriş
The PROEL MQ6 is a compact 6-channel mixer designed for various sound reinforcement applications. It offers a high input density, essential features, and superior audio quality in a durable, ultra-rugged case. This manual provides detailed instructions for the proper setup, operation, and maintenance of your MQ6 mixer.
2. Güvenlik Bilgileri
- Güç Kaynağı: Yalnızca belirtilen güç adaptörünü kullanın. Voltajın düşük olduğundan emin olun.tage yerel elektrik kaynağınıza uygundur.
- Nem: Do not expose the unit to rain or moisture. Avoid placing liquids near the mixer.
- Havalandırma: Yeterli havalandırma sağlayın. Havalandırma açıklıklarını kapatmayın.
- Sıcaklık: Cihazı radyatörler, ısıtma petekleri, sobalar veya ısı üreten diğer cihazlar gibi ısı kaynaklarından uzak tutun.
- Servis: Bu ürüne kendiniz servis vermeye çalışmayın. Tüm servis işlemleri için kalifiye servis personeline başvurun.
- Kablolar: Elektrik kablolarını, özellikle fişlerde, prizlerde ve cihazdan çıktıkları noktalarda, üzerine basılmaktan veya sıkışmaktan koruyun.
- Temizlik: Sadece kuru bezle temizleyin.
3. Ürün Bittiview
The PROEL MQ6 is a 6-channel compact mixer featuring 2 mono MIC/LINE inputs, 2 stereo LINE inputs, 3-band EQ on mono channels, 2-band EQ on stereo channels, and electronically balanced main outputs.

Şekil 3.1: Üst view of the PROEL MQ6 Compact 6-Channel Mixer, showing all controls and inputs.

Şekil 3.2: Açısal view of the PROEL MQ6 mixer, highlighting the compact design and control layout.
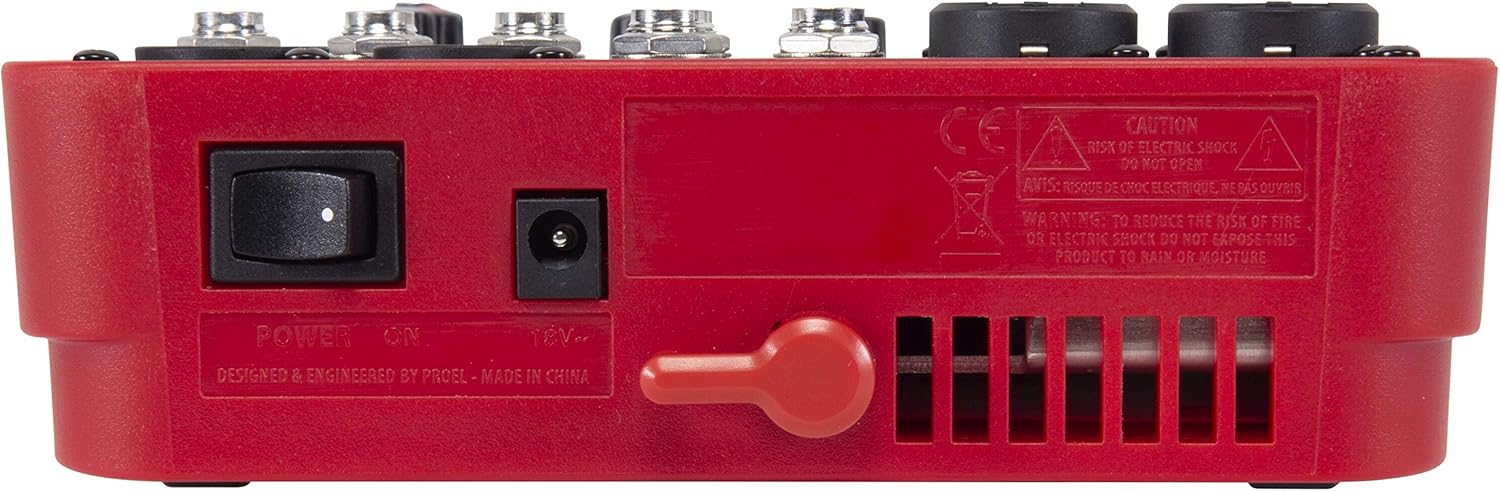
Şekil 3.3: Arka view of the PROEL MQ6 mixer, showing the power switch and DC input.
Ürün Özellikleri:
- 2 Mono MIC/LINE inputs with XLR/TRS combo jacks.
- 2 Stereo LINE inputs (3/4, 5/6) with TRS jacks.
- 3-Band EQ on mono channels for precise tone shaping.
- 2-Band EQ on stereo channels.
- Low-noise, high-headroom microphone preamps.
- Electronically balanced XLR MAIN MIX outputs.
- Phantom Power (+48V) for condenser microphones.
- Headphone output with dedicated level control.
PROEL MQ Series Overview Video
Bu videoview of the PROEL MQ Series compact mixers. Please note that some features shown, such as digital effects, compressors, and USB connectivity, are available on other models within the MQ series (e.g., MQ6FX, MQ12USB, MQ16USB) and not on the MQ6 model specifically.
4. Kurulum
4.1 Paketin Açılması ve Muayene
Carefully unpack the mixer and check for any signs of damage. Ensure all components listed in the packaging are present. If any items are missing or damaged, contact your dealer immediately.
4.2 Güç Bağlantısı
- Mikserin güç düğmesinin KAPALI konumda olduğundan emin olun.
- Connect the provided power adapter to the DC input jack on the rear of the mixer.
- Güç adaptörünü uygun bir AC elektrik prizine takın.
4.3 Giriş Bağlantıları
The MQ6 features two types of input channels:
- Mono MIC/LINE Inputs (Channels 1-2): Use XLR cables for microphones or 1/4" TRS cables for line-level instruments (e.g., keyboards, guitars with preampS).
- Stereo LINE Inputs (Channels 3/4, 5/6): Use 1/4" TRS cables for stereo line-level sources. If connecting a mono source, use the L/MONO input.
4.4 Çıkış Bağlantıları
- MAIN MIX Outputs: Ana hoparlörlerinizi veya güç kaynağınızı bağlayın. amplifier to the XLR MAIN MIX L and R outputs. These outputs are electronically balanced.
- TELEFON Çıkışı: Connect your headphones to the 1/4" PHONES jack for monitoring.
5. Kullanım Talimatları
5.1 Açma/Kapatma
- Before powering on, ensure all channel GAIN and MIX level knobs are set to their minimum position.
- Turn on the mixer using the power switch on the rear panel.
- When powering off, first turn down all output levels, then switch off the mixer.
5.2 Kanal Kontrolleri (Mono Kanallar 1-2)
- MIC/LINE Input: Combo jack for XLR microphones or 1/4" TRS line-level sources.
- LO CUT (75 Hz): Engages a high-pass filter at 75 Hz to remove unwanted low-frequency rumble.
- KAZANÇ: Adjusts the input sensitivity for the connected microphone or line source. Set this to achieve a strong signal without clipping (indicated by the PEAK LED).
- HI (12 kHz): Adjusts the high-frequency (treble) content of the channel.
- LOW (80 Hz): Adjusts the low-frequency (bass) content of the channel.
- Tepe LED'i: Giriş sinyali çok yüksek olduğunda yanar ve olası kırpılmayı gösterir. Bu LED sık sık yanıyorsa GAIN değerini azaltın.
- Seviye Düğmesi: Controls the channel's contribution to the main mix.
5.3 Channel Controls (Stereo Channels 3/4, 5/6)
- L/MONO, R LINE Inputs: 1/4" TRS jacks for stereo line-level sources. Use L/MONO for mono sources.
- HI (12 kHz): Adjusts the high-frequency (treble) content of the channel.
- LOW (80 Hz): Adjusts the low-frequency (bass) content of the channel.
- Seviye Düğmesi: Controls the channel's contribution to the main mix.
5.4 Main Mix Section
- PHANTOM POWER ON/OFF: Activates +48V phantom power for condenser microphones connected to the XLR inputs. Ensure condenser microphones are connected before activating phantom power.
- Seviye Ölçerler: Displays the output level of the main mix. Aim for levels around 0 dB to avoid clipping.
- MIX Level Knob: Controls the overall output volume of the main mix.
- TELEFONLAR Seviye Ayar Düğmesi: Kulaklık çıkışının ses seviyesini ayarlar.
6. Bakım
- Temizlik: Use a soft, dry cloth to clean the mixer's surface. Do not use abrasive cleaners, solvents, or waxes.
- Depolamak: Mikseri uzun süre kullanılmadığı zamanlarda kuru ve tozsuz bir ortamda saklayın.
- Kablo Bakımı: Regularly inspect all cables for damage. Replace frayed or damaged cables to prevent electrical hazards and ensure optimal performance.
- Havalandırma: Ensure the ventilation slots are clear of dust and debris to prevent overheating.
7. Sorun Giderme
| Sorun | Olası Neden | Çözüm |
|---|---|---|
| Ses çıkışı yok |
|
|
| Bozuk ses |
|
|
| No microphone signal |
|
|
| uğultu veya gürültü |
|
|
8. Özellikler
| Özellik | Detay |
|---|---|
| Marka | PROEL |
| Örnek | MQ6 |
| Kanal Sayısı | 6 |
| Ses girişleri | 2 x MIC/LINE (XLR/TRS Combo), 2 x Stereo LINE (TRS) |
| Bağlantı Teknolojisi | XLR, TRS |
| EQ (Mono Channels) | 3-Band (HI, LOW, LO CUT) |
| EQ (Stereo Channels) | 2-Band (HI, LOW) |
| Hayali güç | +48V |
| Ana Çıkışlar | XLR (Electronically Balanced) |
| Kulaklık Çıkışı | 1/4" TRS |
9. Garanti
PROEL offers its customers a minimum of 24 (twenty-four) months warranty from the date of purchase for sound systems products. Please retain your proof of purchase for warranty claims. For detailed warranty terms and conditions, please refer to the official PROEL websiteye gidin veya müşteri desteğiyle iletişime geçin.
10. Destek
For technical assistance, product inquiries, or service requests, please visit the official PROEL website or contact your authorized PROEL dealer. You may also find additional resources and FAQs on their support pages.