
1. Giriş
This manual provides essential instructions for the installation, operation, and maintenance of your EPEVER 80A MPPT Solar Charge Controller. This device is designed to manage the power flow from your solar panels to your battery bank, ensuring efficient charging and protecting your batteries from overcharge and over-discharge. It supports 12V, 24V, 36V, and 48V battery systems automatically and is compatible with various lead-acid battery types including Sealed, AGM, Gel, and Flooded batteries.
2. Güvenlik Bilgileri
Kurulum ve çalıştırmadan önce lütfen tüm talimatları ve uyarıları dikkatlice okuyun. Bu talimatlara uyulmaması elektrik çarpmasına, yangına veya ciddi yaralanmalara neden olabilir.
- Ensure all wiring is correctly polarized and securely connected. Incorrect wiring can damage the controller and other components.
- Always disconnect the battery first, then the solar panel, before performing any maintenance or disconnection. Reconnect in reverse order: solar panel first, then battery.
- Kontrol ünitesini iyi havalandırılan bir alana, yanıcı maddelerden ve aşındırıcı gazlardan uzak bir yere kurun.
- The controller is designed for indoor use. Protect it from direct sunlight, high temperatures, and moisture.
- Use appropriate circuit breakers or fuses for both the solar panel and battery circuits to prevent overcurrent.
- This device is a common negative ground controller. Ensure proper grounding.
- Do not attempt to disassemble or repair the controller yourself. Contact qualified service personnel.
3. Ürün Bittiview
3.1 Temel Özellikler
- Otomatik sistem hacmitage identification: 12V/24V/36V/48V DC.
- Ultra hızlı izleme hızına sahip ( %99.5'e varan verimlilik) gelişmiş MPPT teknolojisi.
- Maximum DC/DC transfer efficiency up to 98.7%.
- Automatic control system to limit charging power and current.
- Real-time energy recording and statistical functions.
- Pil sıcaklığı telafisi fonksiyonu.
- Isolated RS-485 communication interface with MODBUS protocol.
- Support for parallel operation of up to 8 units to expand system capacity.
- Compatible with Sealed, AGM, Gel, and Flooded lead-acid batteries.
3.2 Fiziksel Boyutlar

Şekil 3.2.1: Physical dimensions of the EPEVER 80A MPPT Solar Charge Controller. The controller measures approximately 394mm (L) x 240mm (W) x 134mm (H).
The controller has a robust design with integrated heat sinks for efficient thermal management. The overall dimensions are approximately 394mm in length, 240mm in width, and 134mm in height. The mounting holes are designed for secure installation.
3.3 Bileşen Tanımlama
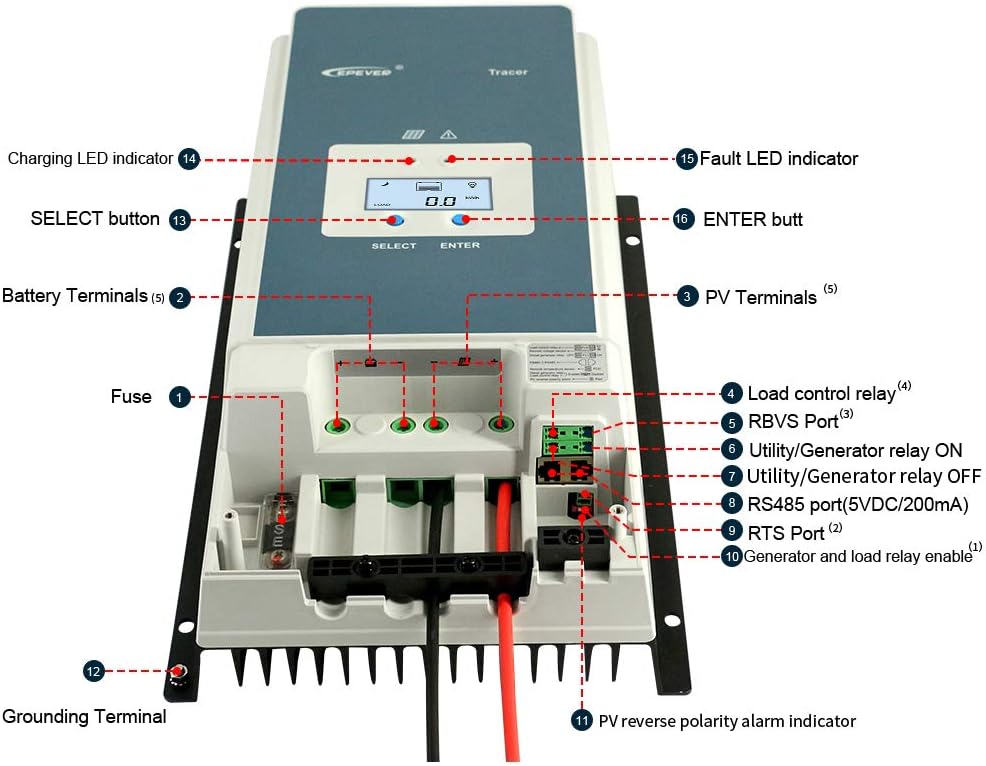
Şekil 3.3.1: Ön view of the EPEVER 80A MPPT Solar Charge Controller with labeled components.
- Sigorta: Akü devresi için aşırı akım koruması.
- Akü Terminalleri: Akü grubuna bağlayın.
- PV Terminalleri: Güneş paneli dizisine bağlayın.
- Load Control Relay: Output for connecting DC loads (if applicable).
- RBVS Bağlantı Noktası: Uzaktan Pil Hacmitage Sensör bağlantı noktası.
- Utility/Generator Relay ON: Control signal for external utility/generator.
- Utility/Generator Relay OFF: Control signal for external utility/generator.
- RS485 Port (5VDC/200mA): Communication port for remote monitoring or parallel connection.
- RTS Bağlantı Noktası: Uzaktan Sıcaklık Sensörü bağlantı noktası.
- Generator and Load Relay Enable: Control input for generator and load relays.
- PV Reverse Polarity Alarm Indicator: Fotovoltaik panelin ters kutupluluğunu gösteren LED göstergesi.
- Topraklama Terminali: Sistem topraklaması için.
- SEÇ Düğmesi: Used to navigate menu options.
- Şarj LED Göstergesi: Şarj durumunu gösterir.
- Fault LED Indicator: Indicates system faults.
- GİRİŞ Düğmesi: Seçimleri onaylamak için kullanılır.
3.4 Ekran Arayüzü

Şekil 3.4.1: Example screens of the LCD display showing various system parameters.
The integrated LCD provides real-time monitoring of system parameters such as PV voltage, şarj akımı, pil hacmitage, load status, and temperature. Use the "SELECT" and "ENTER" buttons to navigate through the display screens and adjust settings.
4. Kurulum ve Yükleme
Güneş enerjisi şarj kontrol cihazınızın güvenli ve verimli çalışması için doğru kurulum çok önemlidir. Lütfen bu adımları dikkatlice izleyin.
4.1 Kontrolörün Montajı
- Choose a vertical mounting location that is well-ventilated and protected from direct sunlight, high temperatures, and moisture.
- Ensure there is sufficient clearance around the controller for heat dissipation, especially above and below the heat sink fins.
- Mount the controller securely using appropriate fasteners for the mounting surface.
4.2 Kablo Bağlantıları
Önemli: Always connect the battery first, then the solar panel. Disconnect in the reverse order: solar panel first, then battery. Ensure all connections are tight and secure to prevent loose connections and overheating.

Şekil 4.2.1: Standard connection diagram for the EPEVER 80A MPPT Solar Charge Controller with a single battery, PV panel, and AC load via an inverter.
- Pili bağlayın: Connect the positive and negative terminals of the battery bank to the controller's battery terminals. Observe correct polarity. Use recommended cable size (e.g., 16mm² / 6AWG).
- Güneş Panelini Bağlayın: Connect the positive and negative terminals of the solar panel array to the controller's PV terminals. Ensure the PV open circuit voltage 150VDC'yi aşmaz.
- Yükü bağlayın (İsteğe bağlı): If using the load control feature, connect your DC load to the controller's load terminals.
- Uzaktan Sıcaklık Sensörünü (RTS) Bağlayın: Plug the RTS cable into the RTS port. This ensures accurate battery temperature compensation.
- Connect Remote Battery Voltage Sensor (RBVS) (Optional): Plug the RBVS cable into the RBVS port for more accurate battery voltage ölçümü.
- Topraklama: Connect the grounding terminal of the controller to an earth ground.
4.3 Paralel Bağlantı (Opsiyonel)
The EPEVER 80A MPPT controller supports parallel operation of up to 8 units to increase system capacity. This requires an RS485 communication cable and proper configuration.
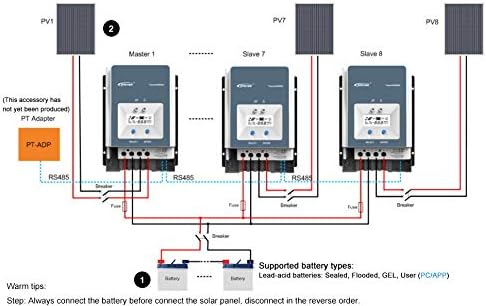
Şekil 4.3.1: Diagram illustrating the parallel connection of multiple EPEVER MPPT controllers to a single battery bank.
For parallel connection, ensure all controllers are connected to the same battery bank and configured correctly via the RS485 communication port. Refer to the advanced user manual for detailed instructions on parallel setup and master/slave configuration.
4.4 Pil Tipi Seçimi
The controller supports various lead-acid battery types. It is crucial to select the correct battery type in the controller's settings to ensure optimal charging and battery longevity.
- Mühürlü: For sealed lead-acid batteries.
- Genel Kurul: Emici Cam Elyaf (AGM) piller için.
- Jel: For Gel cell batteries.
- Sular altında: For flooded (wet cell) lead-acid batteries.
- Kullanıcı: Allows for custom charging parameters for specific battery types (e.g., non-standard lead-acid or user-defined settings). Note: This controller is not designed for Lithium batteries.
Refer to your battery manufacturer's specifications for recommended charging voltages and select the corresponding type in the controller's menu. Incorrect battery type selection can damage your batteries.
5. Operasyon
5.1 İlk Güçlendirme
After all connections are made and verified, the controller will power on automatically. The LCD display will show the current system status. The Charging LED indicator will illuminate when charging is active.
5.2 Monitoring System Status
Use the "SELECT" button to cycle through various display screens, showing parameters such as:
- PV Hacmitage (V) and Current (A)
- Pil Hacmitage (V) and Charging Current (A)
- Yük Hacmitage (V) and Current (A)
- Battery Temperature (°C)
- Total Charged Energy (kWh)
- Total Discharged Energy (kWh)
5.3 Parametre Ayarları
To enter the parameter setting mode, press and hold the "ENTER" button for a few seconds. Use the "SELECT" button to navigate through parameters and the "ENTER" button to confirm changes. Parameters that can be adjusted include:
- Pil Türü
- Şarj Hacmitage Setpoints (Float, Boost, Equalization)
- Load Control Mode (e.g., always on, dusk to dawn, timer)
- LCD arka ışık süresi
- Sıcaklık telafi katsayısı
Refer to the detailed programming guide for specific values and advanced settings.
6. Bakım
Düzenli bakım, şarj kontrol cihazınızın uzun ömürlü olmasını ve en iyi performansı göstermesini sağlar.
- Bağlantıları Kontrol Edin: Periodically inspect all wiring connections for tightness, corrosion, or damage. Tighten any loose connections.
- Kontrol Ünitesini Temizleyin: Keep the controller clean and free of dust and debris. Use a dry cloth to wipe the exterior. Ensure the heat sink fins are not obstructed.
- Hasarı Kontrol Edin: Cihazda herhangi bir fiziksel hasar olup olmadığını kontrol edin.asing, kablolar veya terminaller.
- Performansı İzle: Regularly check the display for normal operation and compare readings with expected values.
- Akü Bakımı: Follow your battery manufacturer's maintenance guidelines.
7. Sorun Giderme
Bu bölümde sık karşılaşılan sorunlar ve olası çözümleri özetlenmiştir. Sorun devam ederse, müşteri desteğiyle iletişime geçin.
7.1 Common Protections and Indicators
The controller includes several protection mechanisms. The Fault LED indicator will illuminate or flash to indicate a fault condition.
- PV Over Current/Power: The solar input power or current exceeds the controller's rated limits. The controller will automatically limit the charging. Check PV array size.
- PV Kısa Devre: A short circuit in the solar panel wiring. Disconnect PV, check wiring, and reconnect.
- PV Ters Kutupluluk: Solar panel connected with incorrect polarity. Disconnect PV, correct wiring, and reconnect. The PV reverse polarity alarm indicator will be active.
- Gece Ters Şarjı: Current flowing from battery to PV at night. This is usually prevented by the controller; if it occurs, check PV wiring.
- Pil Aşırı Hacmitage: pil hacmitage exceeds the overcharge protection setting. The controller will stop charging.
- Pil Aşırı Deşarjı: pil hacmitage drops below the over-discharge protection setting. The load output will be disconnected.
- Pil Aşırı Isınması: Battery temperature is too high. Charging current will be reduced or stopped. Ensure proper battery ventilation.
- Kontrol ünitesi aşırı ısınıyor: Internal temperature of the controller is too high. Charging current will be reduced. Ensure adequate ventilation around the controller.
- TVS Yüksek Sestage Geçici Olaylar: Internal protection against voltage sivri.
7.2 Genel Sorun Giderme Adımları
- Ekran Yok/Güç Yok: Check battery connections and fuse. Ensure battery voltage is within the operating range (8V~68V).
- Şarj Yok: Check PV connections, ensure solar panels are receiving sunlight, and verify PV voltage is sufficient (above battery voltage). Check for PV short circuit or reverse polarity.
- Düşük Şarj Akımı: Check PV array size, shading, and battery state of charge. Ensure battery type settings are correct.
- Yük Çalışmıyor: Check load connections, ensure battery voltage is above over-discharge protection, and verify load control settings.
8. Özellikler
| Parametre | Değer |
|---|---|
| Sistem Hacmitage | 12V / 24V / 36V / 48V DC Auto |
| Anma Şarj Akımı | 80A |
| Maksimum PV Giriş Gücü | 1000W (12V), 2000W (24V), 3000W (36V), 4000W (48V) |
| Maks. PV Açık Devre Hacmitage | 150VDC |
| Pil Tipi Seçimi | Lead-acid (Gel, Sealed, AGM, Flooded) and User |
| Topraklama | Common Negative Ground |
| Pil Giriş Hacmitage Aralık | 8V ~ 68V |
| Sıcaklık Telafisi | -3mV/℃/2V (Varsayılan) |
| Önerilen Kablo Boyutu | 16 mm² (6AWG) |
| Boyutlar (U x G x Y) | 394mm × 236mm × 119mm |
| Ağırlık | 4.5kg (9.92 lbs) |
| İletişim | Isolated RS-485 (5VDC/200mA) with MODBUS protocol |
| Maksimum Verimlilik | %98.7 |
9. Garanti ve Destek
EPEVER products are designed for reliability and performance. This product comes with a standard manufacturer's warranty against defects in materials and workmanship. Please refer to the warranty card included with your product or visit the official EPEVER webAyrıntılı garanti şartları ve koşulları için siteyi ziyaret edin.
For technical support, troubleshooting assistance, or warranty claims, please contact EPEVER customer service through their official website or the contact information provided in your product packaging. When contacting support, please have your product model number and purchase date available.
Webalan: www.epever.com (ExampBağlantı, gerçek bağlantı değişebilir)