
1. Giriş
This manual provides essential information for the safe and effective operation of your Skyking MECO-G R-2025THz Digital Auto-Ranging Clamp Meter. This True RMS meter is designed for measuring AC current up to 1000A, voltage, resistance, frequency, and temperature. Please read this manual thoroughly before use and retain it for future reference.
2. Güvenlik Bilgileri
To ensure safe operation and avoid damage to the meter, observe the following safety precautions:
- Always adhere to safety regulations as per GB4793-1 and IEC 61010-1. This meter is rated for CAT III 600V and CAT II 1000V.
- Her fonksiyon için belirtilen maksimum giriş değerlerini aşmayın.
- Ensure test leads are properly connected to the correct input terminals before making any measurements.
- Inspect the meter, test leads, and accessories for any damage before each use. Do not use if damaged.
- Never attempt to measure current on circuits with voltage exceeding the meter's rating.
- Canlı elektrik devreleriyle çalışırken son derece dikkatli olun.
3. Ürün Bittiview
The Skyking MECO-G R-2025THz is a compact and versatile digital clamp meter. Key components include:
- Mevcut Clamp Çene: For non-contact AC current measurement. Features a 45mm jaw opening.
- Döner Fonksiyon Kadranı: Selects measurement functions (OFF, 1000A~, 600A~, 60A~, V, mV, Ω, Hz/Duty, Temp).
- LCD Ekran: 3 digits, 6000 counts, True RMS readings. Includes backlight for low-light conditions.
- Fonksiyon Düğmeleri: Includes buttons for Hz/Duty, Range, and Select.
- Giriş Terminalleri: Dedicated ports for 'V', 'COM', and 'Hz/°C°F Ω' test lead connections.
- Tetiklemek: Located on the side for opening the clamp çene.
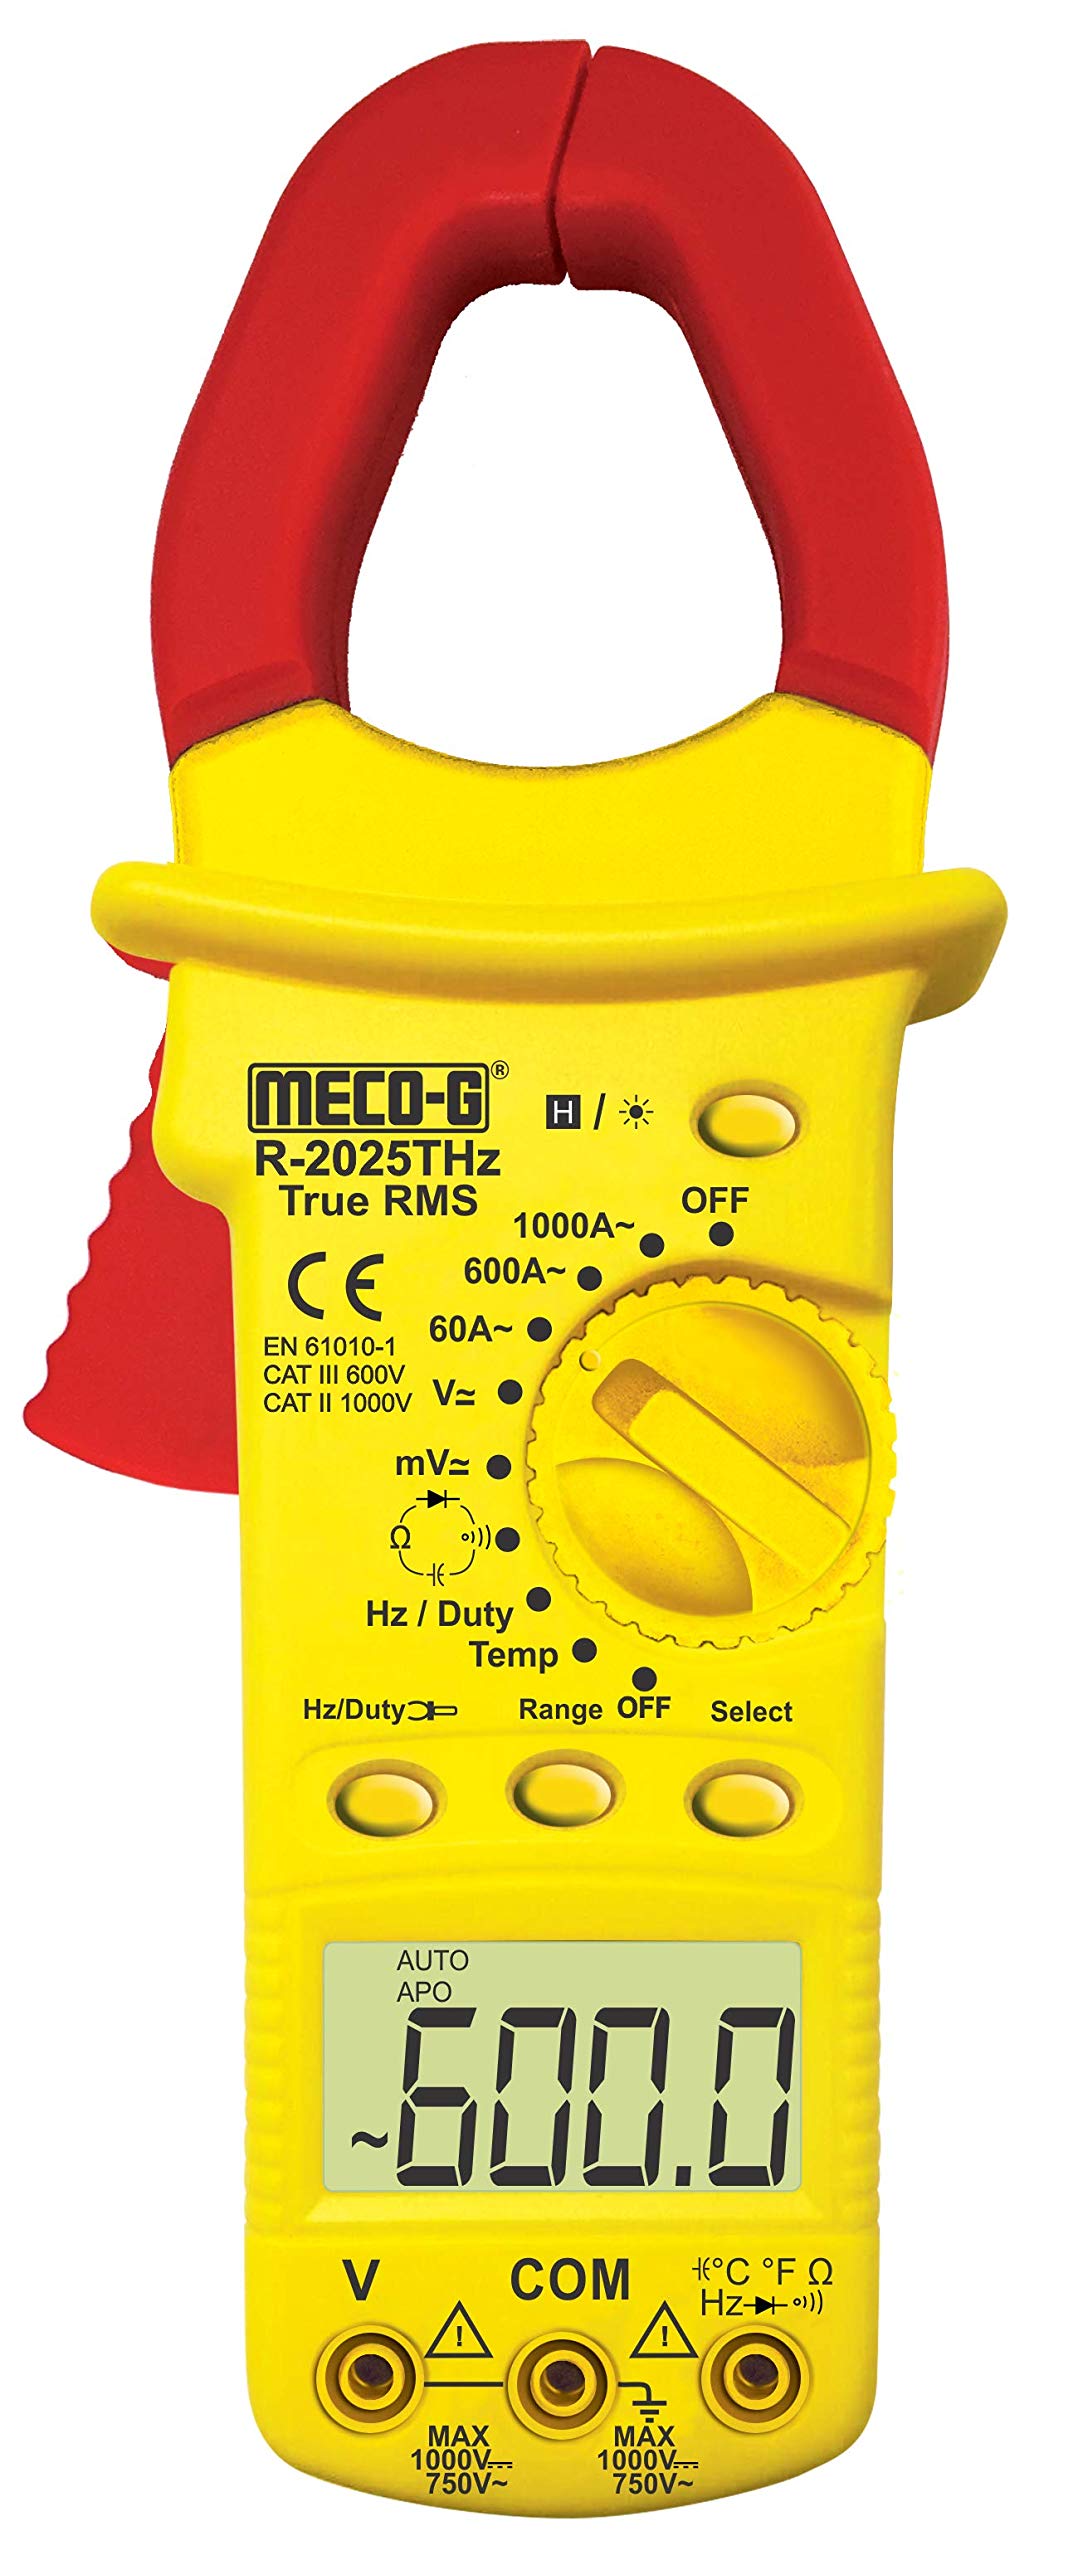
This image displays the main components of the clamp meter, including the current clamp, function selector dial, LCD display, and input jacks for test leads.
4. Kurulum
cl'yi kullanmadan önceamp meter, perform the following setup steps:
4.1. Pil Kurulumu
- Sayacın KAPALI olduğundan emin olun.
- Ölçüm cihazının arkasındaki pil bölmesi kapağını bulun.
- Tutma vidasını/vidalarını sökün ve kapağı çıkarın.
- Insert the required batteries (not included) according to the polarity indicators inside the compartment.
- Pil kapağını yerine takın ve vida(lar) ile sabitleyin.
4.2. Test Uçlarını Bağlama
cilt içintage, resistance, frequency, and temperature measurements, connect the test leads as follows:
- Insert the red test lead into the 'V' or 'Hz/°C°F Ω' input terminal.
- Siyah test kablosunu 'COM' (ortak) giriş terminaline takın.
5. Kullanım Talimatları
Follow these steps for various measurement functions:
5.1. Güç Açma/Kapatma
Rotate the function dial from the 'OFF' position to the desired measurement function to turn the meter ON. Rotate back to 'OFF' to power down. The meter features an Auto Power-Off function after 15 minutes of inactivity.
5.2. AC Current Measurement (1000A, 600A, 60A)
- Rotate the function dial to the '1000A~', '600A~', or '60A~' position.
- cl'yi açmak için tetiğe basınamp çene.
- Devrenin yalnızca bir iletkenini cl ile çevreleyinamp Çene. Çenenin tamamen kapalı olduğundan emin olun.
- LCD ekranda AC akım değerini okuyun.
5.3. Cilttage Measurement (V, mV)
- Test uçlarını Bölüm 4.2'te açıklandığı gibi bağlayın.
- Rotate the function dial to the 'V' or 'mV' position.
- Test problarını devrede istenilen test noktalarına değdirin.
- Cildi okutage value on the LCD display. Use the 'Select' button to switch between AC and DC voltage varsa.
5.4. Direnç Ölçümü (Ω)
- Test uçlarını Bölüm 4.2'te açıklandığı gibi bağlayın.
- Rotate the function dial to the 'Ω' position.
- Test edilecek devrenin veya bileşenin enerjisinin kesildiğinden emin olun.
- Touch the test probes across the component or circuit to measure resistance.
- LCD ekranda direnç değerini okuyun.
5.5. Frequency / Duty Cycle Measurement (Hz/Duty)
- Test uçlarını Bölüm 4.2'te açıklandığı gibi bağlayın.
- Rotate the function dial to the 'Hz/Duty' position.
- Touch the test probes to the desired test points.
- Press the 'Hz/Duty' button to toggle between frequency and duty cycle measurements.
- LCD ekrandaki değeri okuyun.
5.6. Temperature Measurement (Temp)
- Connect the K-Type Thermocouple leads (included) to the 'V' and 'COM' input terminals, observing polarity.
- Rotate the function dial to the 'Temp' position.
- Termokupl probunu sıcaklığın ölçüleceği noktaya yerleştirin.
- Read the temperature value on the LCD display. Use the 'Select' button to switch between Celsius (°C) and Fahrenheit (°F).
5.7. Veri Saklama Fonksiyonu
Press the 'Hold' button (if available, or 'Select' button may serve this function) to freeze the current reading on the display. Press it again to release the hold function.
5.8. Arka Aydınlatma Fonksiyonu
Press the 'Back Light' button (if available, or 'Select' button may serve this function) to illuminate the LCD display for better visibility in dark environments. Press it again to turn off the backlight.
6. Bakım
Doğru bakım, klasiğinizin uzun ömürlü olmasını ve doğruluğunu sağlar.amp metre:
- Temizlik: Sayaçtan silin casing ile reklamamp bezle silin. Aşındırıcı temizleyiciler veya çözücüler kullanmayın.
- Pil Değişimi: When the low battery indicator appears on the display, replace the batteries promptly to ensure accurate readings. Refer to Section 4.1 for battery installation.
- Depolamak: If the meter is not used for an extended period, remove the batteries to prevent leakage. Store the meter in a dry environment, within the specified storage temperature range of -10°C to 50°C (14°F to 122°F).
7. Sorun Giderme
Eğer cihazınızla ilgili sorunlarla karşılaşırsanızamp Ölçüm cihazı ile ilgili yaygın sorunlar ve çözümler için aşağıdaki bilgilere bakın:
- Görüntü yok: Check if the meter is turned ON. Verify battery installation and ensure batteries are not depleted. Replace batteries if necessary.
- Yanlış Okumalar: Ensure test leads are correctly connected. Verify that the correct measurement function and range are selected. Check for any damage to the test leads or meter.
- Meter Turns Off Automatically: This is a normal function (Auto Power-Off) designed to conserve battery life. The meter will turn off after 15 minutes of inactivity. Rotate the function dial to turn it back on.
8. Özellikler
| Özellik | Şartname |
|---|---|
| Görüntülemek | 3 Digits, 6000 Counts Trms |
| Otomatik Kapanma | 15 dakika boşta |
| Çalışma Sıcaklığı ve Nem | 0°C ~ 40°C (32°F ~ 104°F) & ≤ 80% RH |
| Depolama Sıcaklığı ve Nem | -10 ° C ~ 50 ° C (14 ° F ~ 122 ° F) |
| Güvenlik Yönetmelikleri | GB4793-1, IEC 61010-1, CAT II 600V, CAT III 1000V |
| Düşük Pil Göstergesi | Battery icon displayed |
| Çene Açma | 45mm |
| Boyutlar (U x G x Y) | 140 x 70 x 35mm (Approx.) |
| Ağırlık | 180gms. Approx (With Battery) |
| Malzeme | Metal |
| Güç Kaynağı | Pil ile çalışır (Piller dahil değildir) |
| Model Numarası | R-2025THz |
9. Garanti ve Destek
Garanti bilgileri veya teknik destek için lütfen satın alma sırasında sağlanan belgelere bakın veya satıcınızla iletişime geçin. Satın alma belgenizi saklayın.


