
1. Giriş
This manual provides essential information for the safe and effective use of the KEYENCE LV-N11P Digital Laser Sensor Amplifier. Please read this manual thoroughly before operating the product to ensure correct installation, operation, and maintenance. Retain this manual for future reference.
2. Güvenlik Bilgileri
Personel yaralanmalarını ve ekipman hasarını önlemek için lütfen aşağıdaki güvenlik önlemlerine daima uyun.
- Güç Kaynağı: Güç kaynağı hacmini sağlayıntage is within the specified range of 10-30 VDC. Incorrect voltagzarara yol açabilir.
- Kablolama: Perform all wiring with the power supply turned off to prevent electric shock or damage to the unit.
- Çevre: Do not install the unit in locations subject to excessive dust, moisture, corrosive gases, or extreme temperatures.
- Lazer Güvenliği: This product is a laser device. Avoid direct exposure to the laser beam. Refer to relevant laser safety standards.
- Değişiklikler: Do not attempt to disassemble, repair, or modify the unit. Unauthorized modifications can lead to malfunction and void the warranty.
3. Ürün Bittiview
The KEYENCE LV-N11P is a compact digital laser sensor amplifier designed for precise detection applications. It operates on a 10-30 VDC power supply and functions as a main unit for laser sensing systems.

Image: The KEYENCE LV-N11P Digital Laser Sensor Amplifier main unit, showcasinKompakt tasarımıyla dikkat çekiyor.
Temel Özellikler:
- Digital display for easy configuration and monitoring.
- Geniş çalışma hacmitage aralığı: 10-30 VDC.
- Designed as a main unit for laser sensor systems.
- Compact and robust construction for industrial environments.

Image: The LV-N11P sensor amplifier shown with its integrated cable, ready for connection.
4. Kurulum ve Kurulum
4.1 Montaj
The LV-N11P is designed for freestanding mounting. Ensure a stable and vibration-free surface for optimal performance. Use appropriate fasteners (not included) to secure the unit.
4.2 Kablolama
Before wiring, ensure the power supply is disconnected. Refer to the wiring diagram on the unit label and below for correct connections.
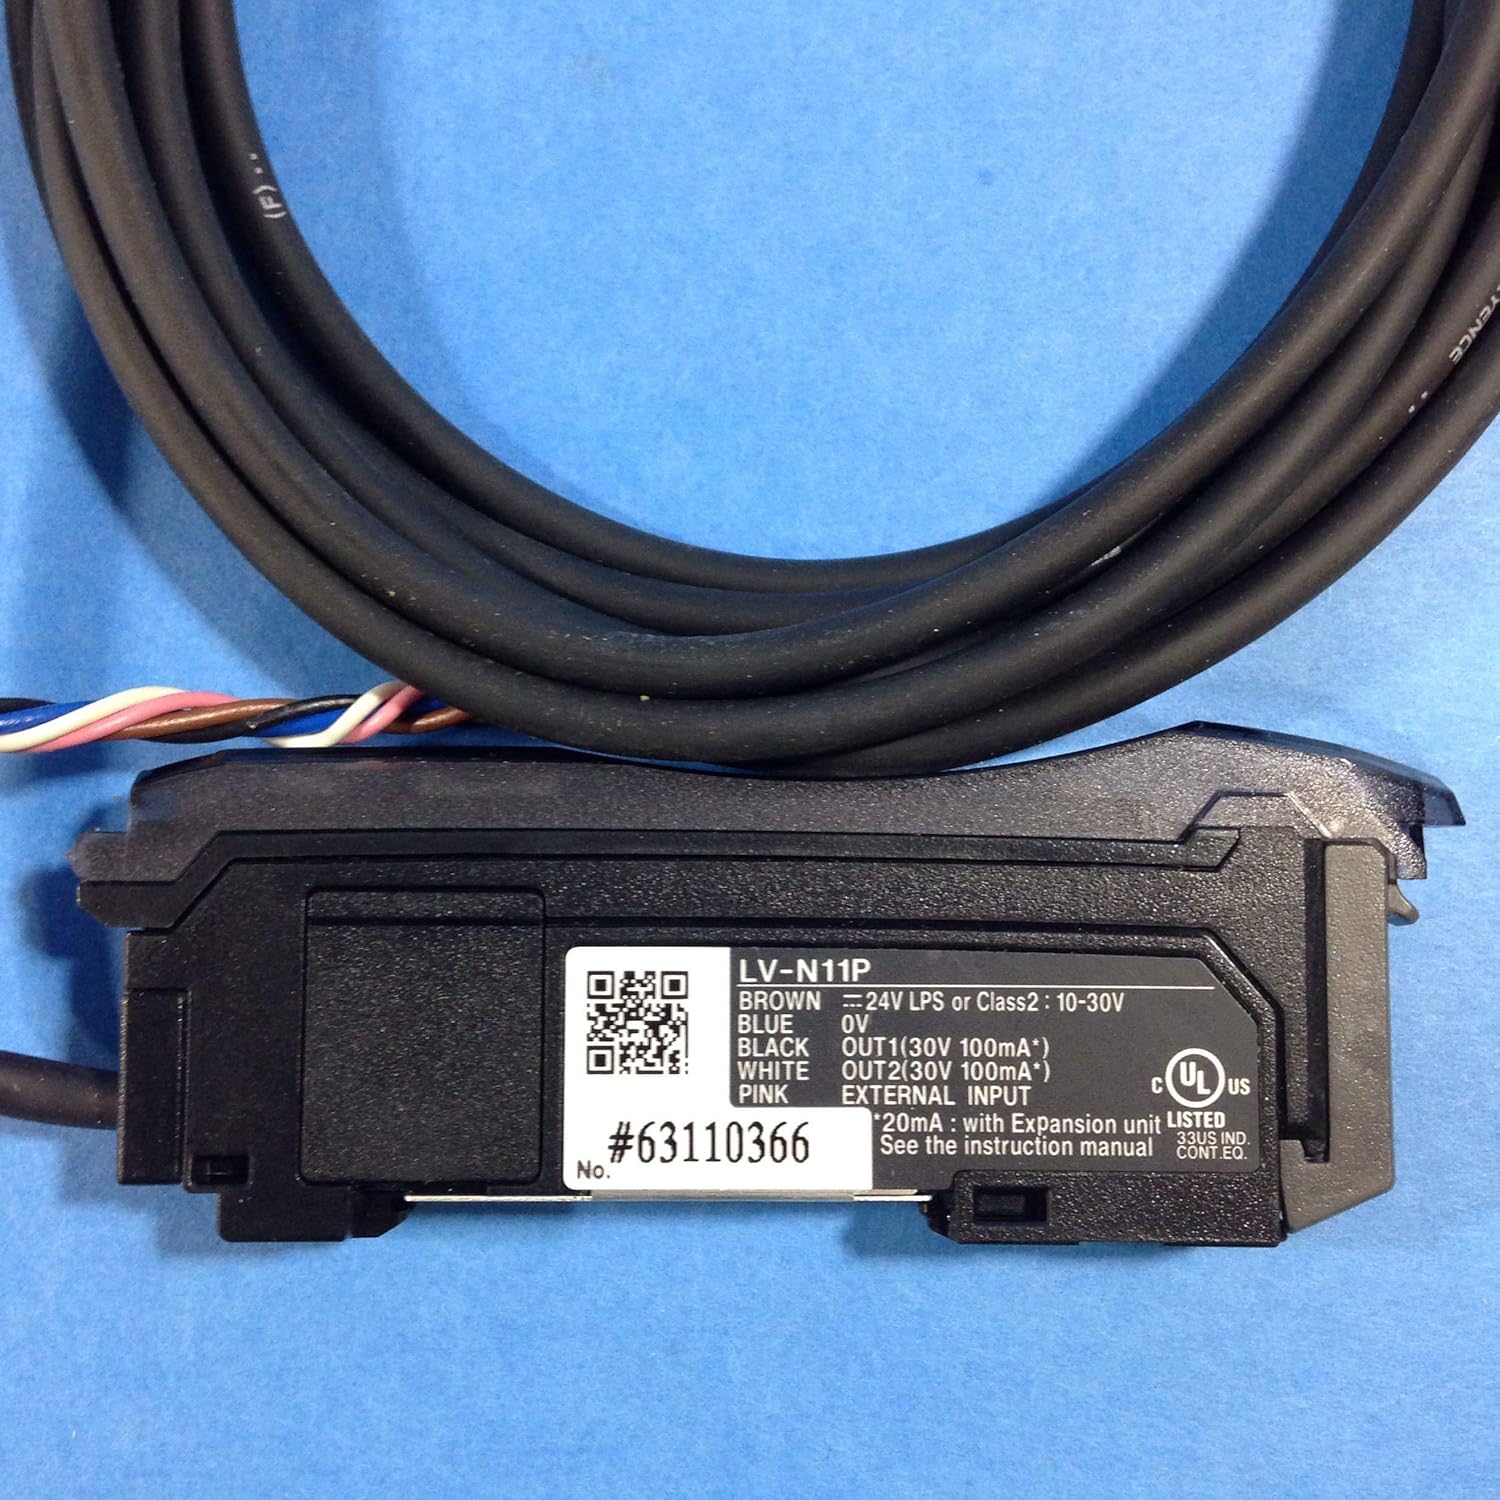
Image: Close-up of the LV-N11P label, detailing wiring connections and basic specifications.
- Kahverengi Tel: Connect to +24V LPS or Class2: 10-30V DC power supply.
- Mavi Tel: Connect to 0V (Ground).
- Siyah Tel: Connect to OUT1 (30V 100mA*).
- Beyaz Tel: Connect to OUT2 (30V 100mA*).
- Pembe Tel: Connect to External Input.
- *Note: Max 20mA with expansion unit LV-N10.
5. Kullanım Talimatları
Once properly installed and wired, the LV-N11P is ready for operation. Specific operating procedures will depend on the connected laser sensor head and the application. Generally, follow these steps:
- Güç Açık: Apply power to the unit. The digital display should illuminate.
- Başlangıç konfigürasyonu: Use the control buttons (if present) to navigate through the menu and set parameters such as detection mode, threshold, and output logic. Refer to the detailed programming guide for specific menu structures.
- Target Alignment: Position the laser sensor head to align with the target object. Monitor the stability indicator on the ampcankurtaran.
- İnce ayar: Adjust sensitivity or threshold settings to achieve reliable detection for your specific application.
- Test İşlemi: Verify the output response by presenting and removing the target object.
6. Bakım
The KEYENCE LV-N11P is designed for long-term, reliable operation with minimal maintenance. However, periodic checks can help ensure optimal performance.
- Temizlik: Cihazı temiz tutun ve tozdan ve kirden arındırın. Temizlik için yumuşak, kuru bir bez kullanın. Aşındırıcı temizleyiciler veya çözücüler kullanmayın.
- Kablo Denetimi: Periodically inspect the cables for any signs of damage, fraying, or loose connections.
- Çevre Kontrolü: Ensure the operating environment remains within specified conditions (temperature, humidity, vibration).
- İşlevsellik Testi: Regularly test the sensor's detection capabilities to confirm it is operating within expected parameters.
7. Sorun Giderme
If you encounter issues with your LV-N11P, refer to the table below for common problems and their solutions.
| Sorun | Olası Neden | Çözüm |
|---|---|---|
| Ünite açılmıyor. | Güç kaynağı yok; yanlış kablolama; arızalı güç kaynağı. | Check power connections (Brown to +V, Blue to 0V). Verify power supply voltage (10-30 VDC). |
| Sensor does not detect target. | Incorrect sensitivity/threshold setting; misaligned sensor head; dirty lens; target too far/close. | Adjust sensitivity. Realign sensor head. Clean sensor lens. Ensure target is within detection range. |
| Output is always ON/OFF. | Incorrect output logic setting; sensor saturated/blocked. | Check output logic (NO/NC). Adjust threshold. Ensure sensor is not continuously blocked or clear. |
| Aralıklı algılama. | Unstable mounting; electrical noise; fluctuating target position. | Securely mount the unit. Shield cables from noise sources. Stabilize target presentation. |
8. Özellikler
Detailed technical specifications for the KEYENCE LV-N11P Digital Laser Sensor Ampkaldırıcı:
| Parametre | Değer |
|---|---|
| Model Numarası | LV-N11P |
| Güç Kaynağı | 10-30 VDC |
| Tip | Digital Laser Sensor Amplifier (Main Unit) |
| Çıktılar | OUT1 (30V 100mA*), OUT2 (30V 100mA*) |
| Harici Giriş | Yes (Pink wire) |
| Boyutlar (U x G x Y) | 3.15 x 0.39 x 1.18 inç |
| Ağırlık | 2.08 ons |
| Montaj Tipi | Solo |
| Üretici | KEYENCE CORP |
*Note: Max 20mA with expansion unit LV-N10. Specifications are subject to change without notice.
9. Garanti ve Destek
For information regarding product warranty, technical support, or service, please contact your local KEYENCE representative or visit the official KEYENCE website. Ensure you have the model number (LV-N11P) and any relevant purchase details available when seeking support.
KEYENCE Official Webalan: www.keyence.com