
1. Giriş
The Optex ORT 8930-HD is a digital terrestrial receiver designed to receive free-to-air digital programs broadcast in MPEG2/MPEG4 format, compatible with DVB-T2 and HEVC/H.265 standards. This device connects to your television via HDMI or SCART. It features a USB input for future software updates, multimedia file playback (photos, music, videos), and direct recording to an external USB storage device (not included).
This manual provides detailed instructions for the proper installation, operation, and maintenance of your Optex ORT 8930-HD receiver. Please read it thoroughly before use to ensure optimal performance and to prevent damage.
2. Güvenlik Bilgileri
- Aşırı ısınmayı önlemek için cihazın çevresinde uygun havalandırma olduğundan emin olun.
- Do not expose the receiver to rain, moisture, or extreme temperatures.
- Cihazı radyatör veya soba gibi ısı kaynaklarının yakınına yerleştirmekten kaçının.
- Yalnızca üniteyle birlikte verilen güç adaptörünü kullanın.
- C'yi açmayınasing; tüm servis işlemlerini kalifiye personele yaptırın.
- Şimşekli fırtınalar sırasında veya uzun süre kullanılmadığında elektrik fişini prizden çıkarın.
3. Paket İçeriği
Paketin içinde tüm öğelerin mevcut olduğundan emin olun:
- 1 x Optex ORT 8930-HD Digital Receiver
- 1 x Uzaktan Kumanda
- 1 x Kullanım Kılavuzu
4. Ürün Bittiview
4.1 Ön Panel

Resim 1: Ön view of the Optex ORT 8930-HD receiver, showing the display, USB port, and control buttons.
The front panel includes a digital display for channel numbers, a USB 2.0 port for external storage, and basic control buttons (CH+, CH-, Power).
4.2 Arka Panel
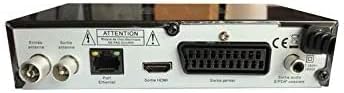
Resim 2: Arka view of the Optex ORT 8930-HD receiver, displaying various connectivity ports.
The rear panel provides the following connections:
- Antenna In/Out: IEC 9.52 mm connectors for terrestrial antenna.
- HDMI Çıkışı: For connecting to an HD television.
- SCART Connector: For connecting to older televisions.
- S/PDIF Coaxial Audio: Dijital ses çıkışı.
- Güç Girişi: For the external power adapter.
4.3 Uzaktan Kumanda

Resim 3: The remote control unit for the Optex ORT 8930-HD receiver.
The remote control allows full operation of the receiver, including power, channel selection, volume, menu navigation, recording functions, and multimedia playback controls.
5. Kurulum
5.1 Antenin Bağlanması
- Connect your terrestrial antenna cable to the "Antenna In" port on the rear panel of the receiver.
- If you wish to loop the antenna signal to another device, connect a coaxial cable from the "Antenna Out" port to the input of the next device.
5.2 Televizyonunuza Bağlanma
Aşağıdaki bağlantı yöntemlerinden birini seçin:
- HDMI (HD için önerilir): Connect an HDMI cable from the "HDMI Output" port on the receiver to an available HDMI input on your television.
- SKART: Connect a SCART cable from the "SCART Connector" on the receiver to the SCART input on your television.
5.3 Güç Bağlantısı
- Connect the power adapter to the power input port on the receiver.
- Güç adaptörünü uygun bir duvar prizine takın.
5.4 Initial Channel Scan
- Televizyonunuzu açın ve bağlantınıza uygun doğru giriş kaynağını (HDMI veya SCART) seçin.
- Power on the Optex ORT 8930-HD receiver.
- The first-time setup wizard should appear. Follow the on-screen instructions to perform an automatic channel search. This will scan for all available digital terrestrial channels in your area.
- If the wizard does not appear, navigate to the "Menu" > "Installation" > "Automatic Search" using the remote control.
6. Kullanım Talimatları
6.1 Temel İşlemler
- Güç Açma/Kapatma: Basın GÜÇ uzaktan kumandadaki veya ön paneldeki düğmesine basın.
- Kanal Seçimi: Kullanın ÇİN+ / Ç- Düğmeleri kullanabilir veya sayısal tuş takımını kullanarak kanal numarasını doğrudan girebilirsiniz.
- Ses Kontrolü: Kullanın HACİM+ / cilt düğmeler.
- Sesini kapatmak: Basın SESSİZ Sesi geçici olarak susturmak için kullanılan düğme.
6.2 Kanal Yönetimi
- Automatic/Manual Search: üzerinden erişim Menü > Kurulum to rescan for channels.
- LCN İşlevi: The Logical Channel Numbering (LCN) function automatically sorts channels into a logical order. This can usually be enabled/disabled in the installation menu.
- Favoriler Listesi: Create personalized lists of your preferred channels for quick access. Refer to the on-screen menu for instructions on adding and managing favorite channels.
6.3 Kayıt ve Oynatma
To use recording and multimedia playback features, connect a USB storage device (e.g., USB flash drive or external hard drive) to the USB port on the front panel.
- USB Kaydı: Basın KAYIT button on the remote control to start recording the current program. Press DURMAK Kaydı bitirmek için
- Timeshift Function: This allows you to pause live TV and resume watching later. Activate Timeshift via the remote control (usually a dedicated button or through the menu).
- Multimedya Oynatma: Access the multimedia player via the Menü. You can browse and play music, photo, and video files stored on your connected USB device.
6.4 Elektronik Program Rehberi (EPG)
Basın EPG için uzaktan kumandadaki düğmeye view the Electronic Program Guide, which displays program schedules for upcoming broadcasts.
6.5 Ebeveyn Kilidi
Set up a parental lock to restrict access to certain channels or programs. This feature is typically found in the Menü > Sistem Ayarları > Ebeveyn Denetimi bölüm.
6.6 Zamanlayıcı İşlevi
The timer function allows you to schedule the receiver to turn on/off or record a specific program at a set time. Access this feature through the Menü.
6.7 Software Update via USB
Üreticinin periyodik olarak kontrol edin website for available software updates. Download the update file to a USB drive and follow the instructions in the Menü > Sistem Ayarları > Yazılım Güncellemesi section to install it.
7. Bakım
- Temizlik: Alıcının dış yüzeyini temizlemek için yumuşak, kuru bir bez kullanın. Sıvı veya aerosol temizleyiciler kullanmayın.
- Havalandırma: Ensure that the ventilation slots on the device are not blocked to prevent overheating.
- Yazılım: Keep the receiver's software updated to ensure optimal performance and access to the latest features.
8. Sorun Giderme
| Sorun | Olası Neden | Çözüm |
|---|---|---|
| Güç yok | Güç kablosu bağlantısı kesildi; elektrik prizi arızalı. | Güç kablosu bağlantısını kontrol edin; farklı bir priz deneyin. |
| No signal / No channels | Antenna not connected; incorrect input source on TV; no channel scan performed. | Check antenna connection; select correct TV input; perform an automatic channel scan. |
| Uzaktan kumanda çalışmıyor | Batteries depleted; obstruction between remote and receiver. | Replace batteries; ensure clear line of sight to the receiver's IR sensor. |
| USB kaydı çalışmıyor. | USB device not connected or formatted incorrectly; insufficient storage space. | Ensure USB device is properly connected; format USB device (FAT32/NTFS); check available space. |
| Cihaz donuyor veya yanıt vermez hale geliyor. | Geçici yazılım hatası. | Disconnect power for a few seconds, then reconnect. If problem persists, check for software updates. |
9. Özellikler
| Özellik | Detay |
|---|---|
| Örnek | ORT 8930-HD |
| Marka | Optex |
| Tuner Türü | Karasal (DVB-T2) |
| Video Kod Çözme | HEVC/H.265, MPEG-2.5 |
| Bağlantı | 1x HDMI, 1x SCART, 1x USB 2.0, 1x S/PDIF Coaxial Audio, Antenna In/Out |
| Kanal Kapasitesi | Over 1000 channels |
| Kayıt | External USB media (PVR function) |
| Multimedya Oynatma | Music, Photos, Videos |
| Özel Özellikler | Timeshift, EPG, Parental Lock, Favorite List, Multi-language Menu, LCN, 5V Antenna Power, Timer Function, Dolby Digital+ compatible |
| Ses Çıkışı Modu | [SOM] |
| Hoparlör Çevresel Ses Yapılandırması | 5.1 |
| Güç Çıkışı | 5 Watt |
| Ürün Ağırlığı | 600 gr |
10. Garanti ve Destek
Specific warranty information is not provided within this manual. Please refer to the warranty card included with your purchase, contact your retailer, or visit the official Optex webAyrıntılı garanti şartları ve koşulları için siteyi ziyaret edin.
For technical support or service inquiries, please contact your local Optex distributor or the customer service department as indicated on the product packaging or manufacturer's webalan.


