
Trail Tech 922-122
Trail Tech Voyager Pro GPS Kit User Manual
Model: 922-122
Brand: Trail Tech
giriiş
The Trail Tech Voyager Pro is a comprehensive GPS unit designed for powersports, offering advanced navigation, digital gauge displays, and unique buddy tracking capabilities. This manual provides detailed instructions for the installation, operation, and maintenance of your Voyager Pro to ensure optimal performance and longevity.
Güvenlik Bilgileri
Always prioritize safety when operating your vehicle and using the Voyager Pro. Read all instructions carefully before installation and use. Ensure the unit is securely mounted and all cables are routed safely away from moving parts or heat sources. Do not attempt to operate the device or adjust settings while operating your vehicle. Always be aware of your surroundings and local regulations.
Kutuda Neler Var?
Verify that all components listed below are present in your package. If any items are missing or damaged, please contact Trail Tech customer support.

Resim: Üzeriview of the components included in the Trail Tech Voyager Pro Snow Kit. This includes the main head unit, the docking station, a bar mount for installation, a Cylinder Head Temperature (CHT) sensor, two Water Temperature sensors (22mm and 19mm), a tachometer sensor, and the main power wire.
- Head Unit (Voyager Pro GPS)
- Yerleştirme İstasyonu
- 19mm Radiator Hose Coolant Temp Sensor
- 25mm Radiator Hose Coolant Temp Sensor
- 14mm Cylinder Head Temp Sensor
- Mıknatıs Kiti
- Tekerlek Sensörü
- Güç kablosu
- Ateşleme Sensörü
- Mounting Hardware (Bar Mount)
- Buddy Tracking Antenna
Kurulum ve Yükleme
Proper installation is crucial for the performance and durability of your Voyager Pro. Follow these steps carefully.
1. Mounting the Head Unit and Dock
Secure the docking station to your vehicle's handlebars or a suitable flat surface using the provided mounting hardware. Ensure the mount is stable and the unit will not obstruct your view or vehicle controls. The head unit slides into the dock and locks securely.

Image: The rear of the Voyager Pro docking station, showing the connection points for the power lead and sensors. This dock provides a secure and quick-release mounting solution for the main unit.
2. Gücü Bağlama
The Voyager Pro requires a 12V DC power source. Connect the red wire of the power lead to a switched 12V positive source on your vehicle (e.g., ignition switch), and the black wire to a reliable ground point. Ensure connections are secure and protected from the elements.
3. Sensör Kurulumu
- Sıcaklık Sensörleri: Install the appropriate radiator hose or cylinder head temperature sensor according to your vehicle's specifications. Ensure a tight seal to prevent leaks.
- Tekerlek Sensörü: Mount the wheel sensor to a non-rotating part of your vehicle, ensuring it aligns with the magnet kit installed on the wheel. Adjust the gap between the sensor and magnet as per instructions for accurate speed readings.
- Ignition Sensor: Connect the ignition sensor to a spark plug wire or coil to obtain RPM readings. Follow specific vehicle instructions for optimal placement.
4. Buddy Tracking Antenna
Attach the buddy tracking antenna to the designated port on the docking station. Position the antenna vertically and clear of obstructions for optimal signal reception and transmission.
Kullanım Talimatları
Familiarize yourself with the Voyager Pro's interface and features for an enhanced riding experience.
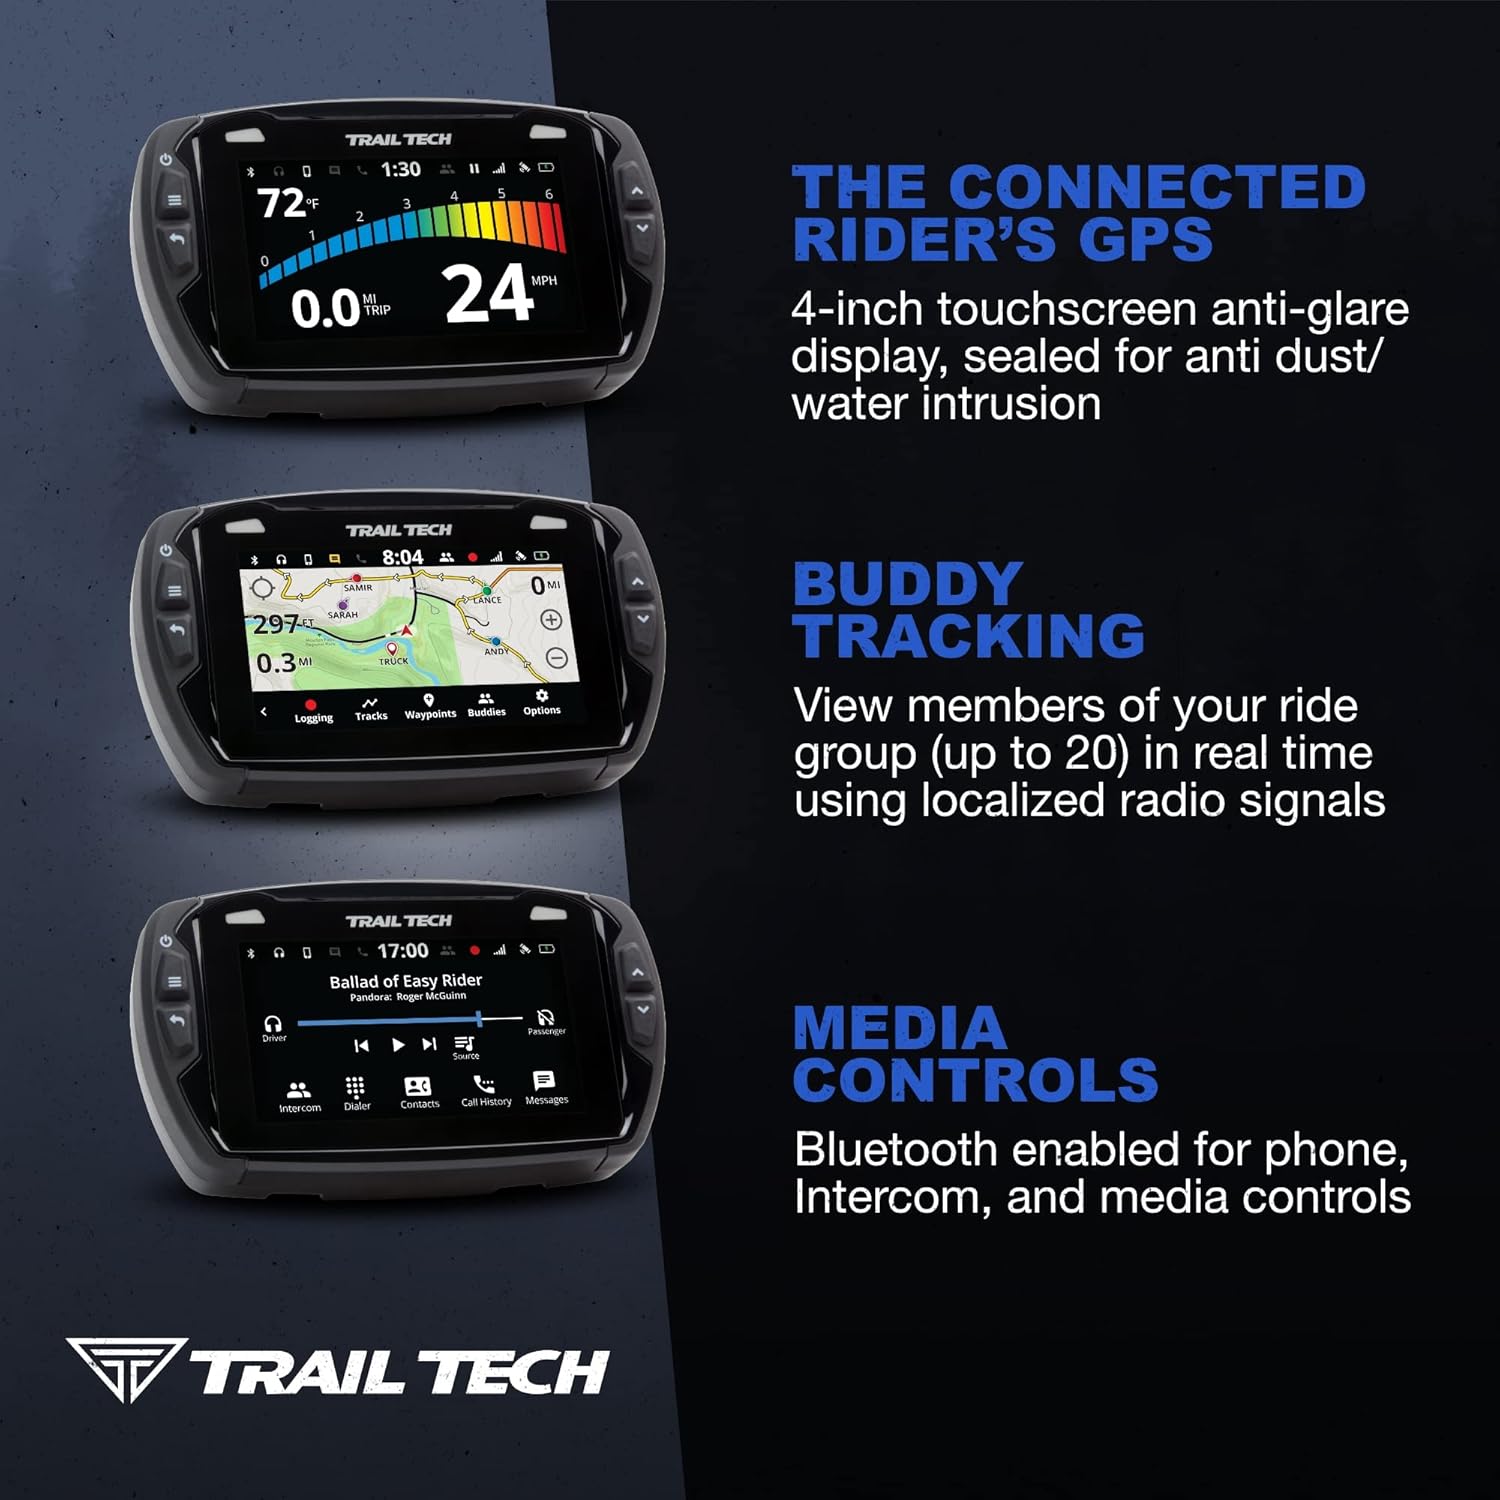
Image: A composite image displaying three key functionalities of the Voyager Pro: the digital gauge screen showing speed and temperature, the map screen with real-time buddy tracking, and the media control interface for Bluetooth-connected devices.
1. Açma/Kapama
Press and hold the power button (located on the left side) to turn the unit on or off. The unit will automatically power on when the vehicle's ignition is switched on, provided it is correctly wired.
2. Gezinme ve Arayüz
The Voyager Pro features a 4-inch TFT LCD touchscreen. Navigate menus and interact with features by tapping or swiping. Physical buttons on the sides provide quick access to common functions like zoom, menu, and back.
3. GPS Features (Maps, Tracks, Waypoints)
- Haritalar: The unit comes pre-loaded with North American maps, including topography lines and hill shading. Other regional maps can be downloaded and installed via the Micro SD card.
- Parçalar: Record your riding paths or load GPX tracks from external sources. Tracks can be viewed on the map screen and saved for future reference.
- Ara noktalar: Mark specific locations of interest (e.g., camp, fuel stops) as waypoints. These can be named and navigated to.
4. Buddy Tracking
The Buddy Tracking feature allows you to view up to 20 other riders in your group on the map screen in real-time, using localized radio signals (no cell service required). This enhances group safety and coordination.

Image: The Voyager Pro's map display showing various "buddies" (Chris, Huong, Melinda, Emili, Ricky) marked with their names and current positions, along with elevation and temperature readings. This illustrates the real-time buddy tracking feature.
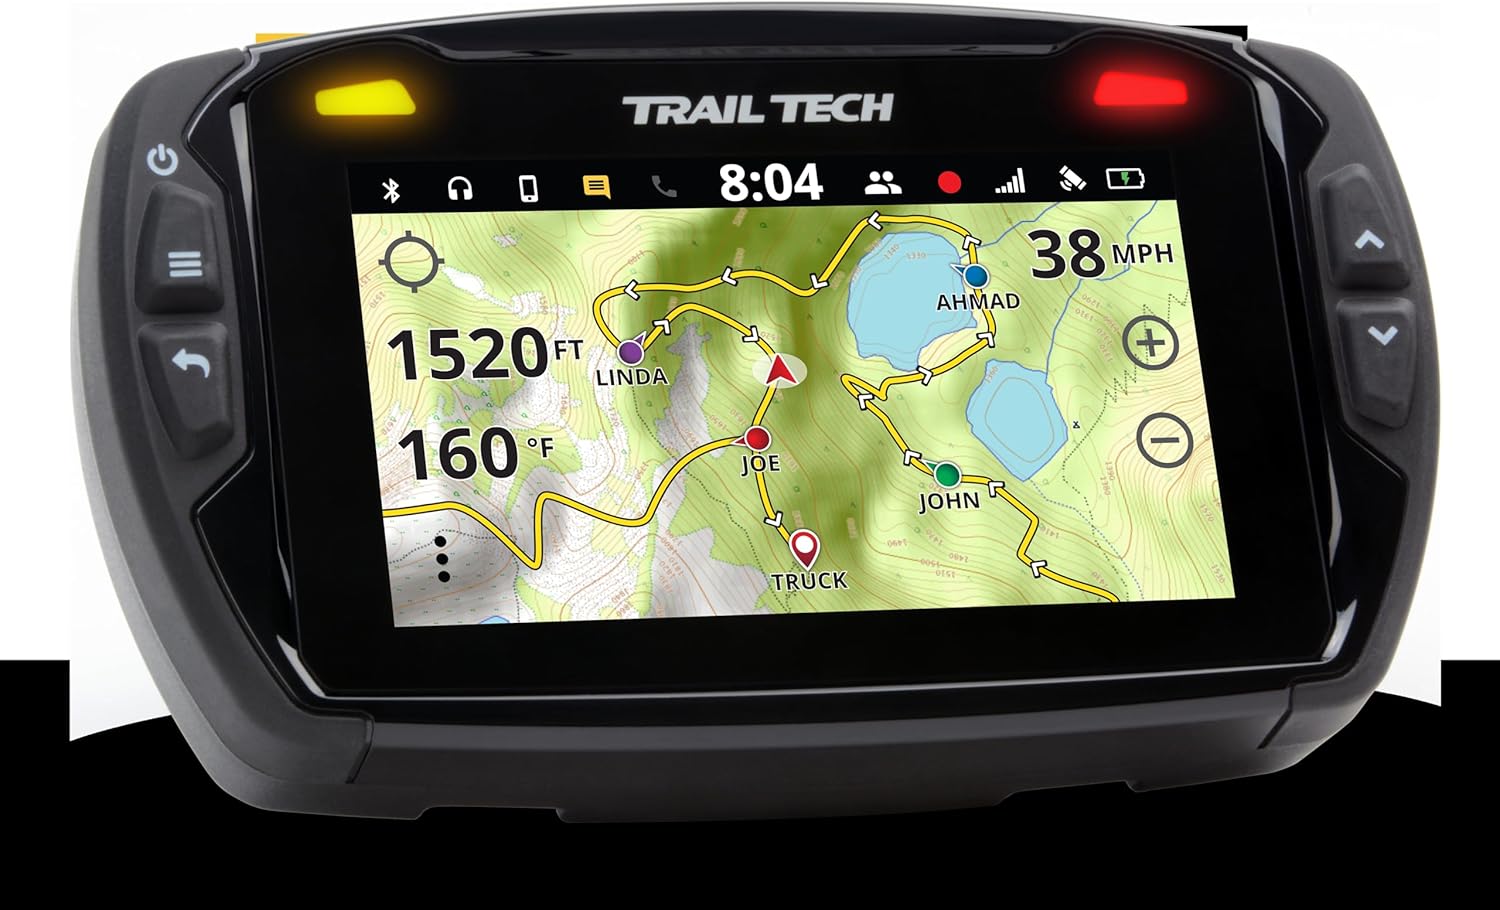
Resim: Başka bir view of the Voyager Pro's map screen, demonstrating the buddy tracking feature with different rider names (Ahmad, Linda, Joe, John, Truck) and their locations on the trail, alongside current speed and temperature data.
Use the emergency beacon function to alert your group members if you require assistance.
5. Bluetooth Bağlantısı
Pair your Bluetooth headset, intercom, or phone with the Voyager Pro. This allows for hands-free communication, media playback from your phone or Micro SD card, and control over music and calls directly from the unit.
6. Dijital Gösterge Ekranı
The Voyager Pro displays vital vehicle data, including engine temperature, RPM, battery voltage, speed, and distance. Customize the display to show the information most relevant to your ride.
Bakım
Regular maintenance ensures the longevity and reliability of your Voyager Pro.
1. Temizlik
Ekranı ve cihazın dış yüzeyini yumuşak bir bezle temizleyin.amp bez. Ekrana veya ekrana zarar verebilecek aşındırıcı temizleyicilerden veya çözücülerden kaçının.asing. The unit is sealed and rated IP67 for anti-dust/water intrusion, but avoid high-pressure washing directly on the unit.
2. Pil doldurma
The internal Li-Ion battery charges when the unit is connected to the vehicle's 12V power system and the vehicle is running. A full charge typically takes 3-8 hours of continuous charging. The battery provides approximately 1 hour of typical use or 45 minutes with 100% backlight. For charging off-vehicle, an optional AC adapter (sold separately) is required, as the unit does not include a wall charger.
3. Yazılım Güncellemeleri
Periodically check the Trail Tech website for software updates. Updates can improve performance, add features, and fix bugs. Follow the instructions provided on the website for updating your unit via the Micro SD card.
Sorun giderme
If you encounter issues with your Voyager Pro, refer to the following common problems and solutions.
| Sorun | Olası Neden / Çözüm |
|---|---|
| Ünite açılmıyor. | Check 12V power connection and ground. Ensure vehicle ignition is on. Internal battery may be fully depleted; allow time for charging. |
| GPS sinyali alınamadı. | Ünitenin net olduğundan emin olun. view of the sky. Move away from tall buildings or dense tree cover. Allow several minutes for initial satellite acquisition. |
| Inaccurate speed/RPM readings. | Verify sensor installation and calibration. Check magnet-to-sensor gap for wheel sensor. Ensure ignition sensor is correctly attached to spark plug wire/coil. |
| Buddy tracking not working. | Ensure buddy tracking antenna is properly connected and unobstructed. Verify all units are within range and on the same frequency/group settings. |
| Pil ömrü kısa. | Reduce backlight brightness. Ensure unit is receiving consistent 12V power from the vehicle for charging. Battery life is rated for 1 hour typical use, 45 minutes at 100% backlight. |
Özellikler
Key technical specifications for the Trail Tech Voyager Pro GPS Kit.

Image: The physical dimensions of the Voyager Pro unit, indicating a width of 5.6 inches and a height of 3.5 inches, providing a visual reference for its size.
- Modeli: 922-122
- Ekran: 4 inç TFT LCD Dokunmatik Ekran
- Boyutlar: Yaklaşık 5.6 x 3.5 inç
- Ağırlık: Yaklaşık 1.5 pound
- Güç Gereksinimi: 12V doğru akım
- Dahili Pil: 3.7V 3100 mAh Li-İyon
- Tipik Pil Ömrü: 1 hour (45 minutes at 100% backlight)
- Pil Şarj Süresi: 3-8 hours (via vehicle power)
- Bağlantı: Bluetooth
- Harita türü: North America (downloadable other regions)
- Giriş Koruması: IP67 (toz ve suya dayanıklı)
- Özel Özellikler: Buddy Tracking (up to 20 riders), Digital Gauge (Speed, Temp, RPM, Volt), Handsfree Bluetooth
Garanti ve Destek
For warranty information and technical support, please refer to the official Trail Tech webSitelerini ziyaret edin veya doğrudan müşteri hizmetleri departmanıyla iletişime geçin. Garanti talepleri için satın alma belgenizi saklayın.
Trail Tech Contact Information:
- Webalan: www.trailtech.net
- Telefon: Başvurun webGüncel iletişim numaraları için siteyi ziyaret edin.
İlgili belgeler922-122


Ask a question about this manual
Ask about setup, troubleshooting, compatibility, parts, safety, or missing instructions. Manuals+ will review the question and use this page’s manual context to help answer it.