
1. Giriş
This manual provides detailed instructions for the installation, operation, maintenance, and troubleshooting of your FSP 400W Micro ATX Power Supply (Model FSP400-60GHS(85)-R1). This power supply unit is designed for compact small form factor PC systems, offering 400 watts of power output with 80 Plus Bronze certification for high efficiency. It is compatible with Intel and AMD CPU systems and standard PC configurations.
Please read this manual thoroughly before installation and operation to ensure proper usage and to prevent damage to the unit or other components.
2. Güvenlik Bilgileri
UYARI: Güç kaynakları yüksek voltaj içerir.tage bileşenleri. Güç kaynağını açmayın.asing. İçeride kullanıcı tarafından onarılabilecek parça bulunmamaktadır. c'yi açmakasing will void the warranty and poses a risk of electric shock.
- Kurulum veya bakım öncesinde güç kaynağının AC güç prizinden çıkarıldığından emin olun.
- Güç kaynağını iyi havalandırılan bir alana kurun.
- Do not operate the power supply in high humidity or extreme temperature environments.
- Yalnızca güç kaynağıyla birlikte verilen kabloları kullanın.
- Sistemi açmadan önce tüm kabloların güvenli bir şekilde bağlandığından emin olun.
- This product is designed for use in personal computers. Do not use it for any other purpose.
3. Paket İçeriği
Aşağıda listelenen tüm öğelerin paketinizde mevcut olduğundan emin olun:
- FSP 400W Micro ATX Power Supply (FSP400-60GHS(85)-R1)
- AC Güç Kablosu
- SFX to PS2 Bracket
- Kullanıcı Kılavuzu
- Mounting Screws (typically included with PC cases, but sometimes with PSUs)

Figure 3.1: Package Contents. Shows the power supply unit, user manual, various power cables, an AC power cord, and an SFX to PS2 adapter bracket.
4. Ürün Bittiview
The FSP400-60GHS(85)-R1 is a compact power supply designed for small form factor systems. Key features include an 80mm cooling fan with thermal sensing technology and an energy-saving 1-watt standby mode.
4.1 Fiziksel Yerleşim Planı

Şekil 4.1: Açısal view of the FSP 400W Micro ATX Power Supply, highlighting the fan grille, power switch, and AC power input.

Şekil 4.2: Arka view of the power supply, detailing the main power switch and the AC power input socket.

Şekil 4.3: Üst view of the power supply, showing the protective grille over the 80mm cooling fan.
4.2 Çıkış Konnektörleri
The power supply includes various connectors to power your system components:
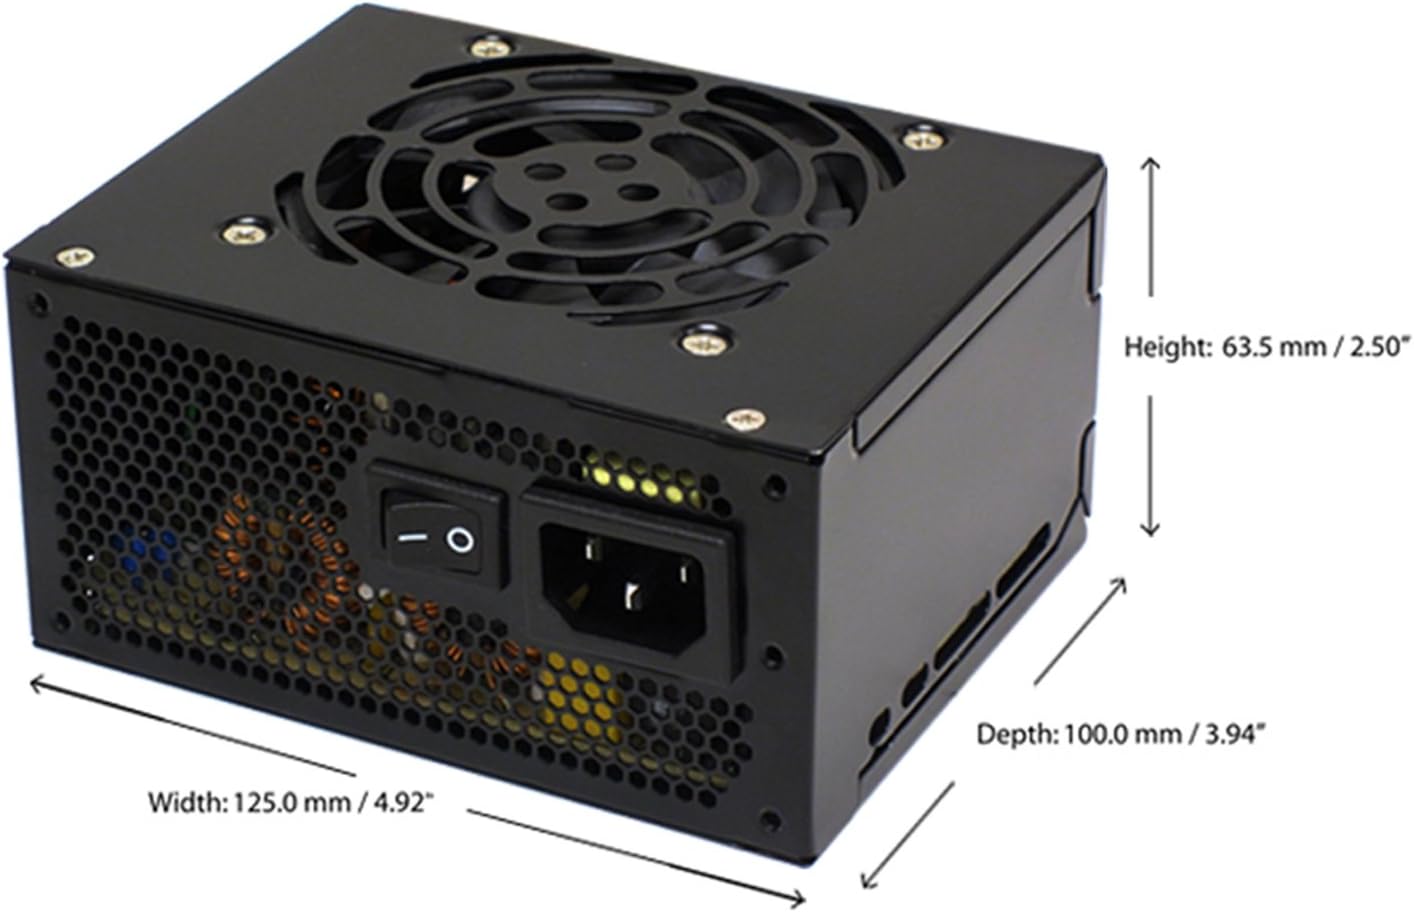
Figure 4.4: Diagram illustrating the types and quantities of output connectors available on the FSP400-60GHS(85)-R1 power supply.
- Main 24 Pin (1): For motherboard power.
- P4 | EPS 4+4 Pin (1): For CPU power.
- PCI-E 8 Pin (6+2) (1): Grafik kartları için.
- Molex 4 Pin (3): For older peripherals and fans.
- Serial ATA 15 Pin (3): For SATA hard drives and SSDs.
- FDD 4 Pin (1): For floppy disk drives or other legacy devices.
5. Kurulum ve Kurulum
Before beginning installation, ensure your computer system is powered off and disconnected from the AC power outlet. It is recommended to wear an anti-static wrist strap to prevent electrostatic discharge (ESD) damage to components.
5.1 Güç Kaynağının Kurulumu
- Davayı Hazırlayın: Open your computer case. Identify the power supply mounting area.
- PSU'nun montajı:
- For SFX cases: Insert the FSP400-60GHS(85)-R1 directly into the SFX power supply bay and secure it with screws.
- For standard ATX cases: Attach the included SFX to PS2 bracket to the power supply. Then, mount the power supply with the bracket into the ATX power supply bay and secure it with screws.

Figure 5.1: The FSP 400W Micro ATX Power Supply shown with the SFX to PS2 adapter bracket installed, ready for mounting in a standard ATX case.

Figure 5.2: Illustration demonstrating how the SFX power supply fits into a PS2 (ATX) case using the provided adapter bracket.
5.2 Bağlantı Kabloları
Connect the appropriate cables to your motherboard and components. Refer to your motherboard and component manuals for specific connection points.
- Anakart Gücü: Connect the 24-pin ATX connector to the corresponding socket on your motherboard.
- CPU Gücü: Connect the 4+4-pin EPS/ATX 12V connector to the CPU power socket on your motherboard.
- Ekran Kartı Gücü: If your graphics card requires external power, connect the 6+2-pin PCI-E connector(s) to the graphics card.
- Depolama Aygıtları: Connect SATA power connectors to your SATA hard drives, SSDs, and optical drives.
- Çevre Birimleri: Use Molex 4-pin connectors for case fans or other legacy peripherals as needed.
- Kablo yönetimi: Route cables neatly to ensure proper airflow within the case.
Tüm iç bağlantılar yapıldıktan sonra bilgisayar kasasını kapatın.
5.3 Harici Bağlantı
- Connect the AC power cord to the power supply's AC inlet.
- AC güç kablosunun diğer ucunu topraklı bir duvar prizine veya aşırı gerilim koruyucusuna takın.
- Ensure the power switch on the back of the power supply is in the "OFF" (O) position before plugging it in.
6. Kullanım Talimatları
6.1 Sisteminizin Çalıştırılması
- After all connections are secure, flip the power switch on the back of the power supply to the "ON" (I) position.
- Sistemi başlatmak için bilgisayar kasasındaki güç düğmesine basın.
6.2 Thermal Control System
The FSP400-60GHS(85)-R1 features an 80mm cooling fan with thermal sensing technology. This system automatically adjusts the fan speed based on the internal temperature of the power supply, optimizing cooling performance while minimizing noise.
6.3 Energy Saver Standby Mode
This power supply is designed with an energy-saving 1-watt standby mode, reducing power consumption when the system is in a low-power state or turned off but still connected to AC power.
7. Bakım
Doğru bakım, güç kaynağınızın uzun ömürlü olmasını ve optimum performans göstermesini sağlar.
- Temizlik: Periodically clean the exterior of the power supply and its fan grille to prevent dust buildup. Use a soft, dry cloth or compressed air. Ensure the power supply is disconnected from AC power before cleaning.
- Havalandırma: Ensure that the power supply's fan and ventilation openings are not obstructed. Good airflow is crucial for cooling.
- Kablo Bütünlüğü: Tüm güç kablolarını düzenli olarak aşınma, yıpranma veya hasar belirtileri açısından kontrol edin. Hasarlı kabloları derhal değiştirin.
Do not attempt to open the power supply unit for internal cleaning or repair. This will void the warranty and can be dangerous.
8. Sorun Giderme
Güç kaynağınızla ilgili sorunlarla karşılaşırsanız, aşağıdaki yaygın sorunlar ve çözümlere bakın:
8.1 No Power to System
- AC güç kaynağını kontrol edin: Ensure the AC power cord is securely plugged into both the power supply and a working wall outlet.
- Güç düğmesi: Verify that the power switch on the back of the power supply is in the "ON" (I) position.
- Dahili Bağlantılar: Confirm that the 24-pin ATX and 4+4-pin EPS/ATX 12V connectors are firmly seated in the motherboard.
- Kısa devre: Disconnect all peripheral power cables (SATA, Molex, PCI-E) and attempt to power on. If the system powers on, a short circuit may exist in one of the connected components or cables. Reconnect them one by one to identify the faulty component.
8.2 System Instability or Random Shutdowns
- Aşırı yük: Sisteminizin güç gereksinimlerinin, güç kaynağının 400W kapasitesini aşmadığından emin olun.
- Havalandırma: Check for proper airflow within the case and ensure the power supply's fan is not obstructed. Overheating can cause instability.
- Kablo Bağlantıları: Re-check all power connections to ensure they are secure. Loose connections can lead to intermittent power delivery.
8.3 Aşırı Fan Gürültüsü
- Toz Oluşumu: Clean the fan grille and fan blades with compressed air.
- Engelleme: Ensure no cables or foreign objects are interfering with the fan's rotation.
- Çalışma Ortamı: High ambient temperatures can cause the thermal control system to increase fan speed. Ensure adequate room ventilation.
If troubleshooting steps do not resolve the issue, contact FSP customer support or your retailer for assistance.
9. Özellikler
Detailed technical specifications for the FSP400-60GHS(85)-R1 power supply:
| Model Adı | FSP 400W Micro ATX Power Supply |
| Model Numarası | FSP400-60GHS(85)-R1 |
| Marka | FSP |
| Çıkış Watttage | 400 Watt |
| 80 Plus Sertifikası | 80 Artı Bronz |
| Form Faktörü | Micro ATX (SFX with PS2 bracket) |
| Soğutma Yöntemi | Air (80mm fan with thermal control) |
| Güç Kaynağı Tasarımı | Modüler Olmayan |
| Giriş Voltage | 100 - 265 Volts (AC) |
| Boyutlar (U x G x Y) | 4.9 x 3.9 x 2.5 inç (125.0 x 100.0 x 63.5 mm) |
| Ürün Ağırlığı | 2.31 Pound |
| Uyumlu Cihazlar | Personal Computer (AMD/Intel CPU systems) |
| Bağlayıcılar | Main 24 Pin (1), P4 | EPS 4+4 Pin (1), PCI-E 8 Pin (6+2) (1), Molex 4 Pin (3), Serial ATA 15 Pin (3), FDD 4 Pin (1) |
| Çevresel uyum | RoHS, Lead-Free, Green Product (G.P) |

Figure 9.1: Physical dimensions of the FSP 400W Micro ATX Power Supply.

Figure 9.2: Illustrative diagram showing typical cable lengths for the power supply connectors.
10. Garanti Bilgileri
The FSP 400W Micro ATX Power Supply (FSP400-60GHS(85)-R1) is covered by a 3 yıllık üretici garantisi. This warranty guarantees the quality and performance of the product for the specified period from the date of purchase.
The warranty covers defects in materials and workmanship under normal use. It does not cover damage resulting from improper installation, accidents, misuse, abuse, natural disasters, or unauthorized modifications or repairs. Opening the power supply casing, garantiyi geçersiz kılacaktır.
For warranty claims or service, please retain your proof of purchase and contact FSP customer support.
11. Müşteri Desteği
If you require further assistance, have questions, or need to report an issue that cannot be resolved using the troubleshooting guide, please contact FSP customer support.
- FSP Webalan: Visit the official FSP webÜrün bilgileri, sıkça sorulan sorular ve destek kaynakları için site.
- İletişim Bilgileri: Refer to the FSP website or your product packaging for the most current customer service contact details (phone, email, or support portal).
When contacting support, please have your product model number (FSP400-60GHS(85)-R1) and proof of purchase readily available.
