
1. Giriş
This manual provides essential information for the safe and efficient operation of your Rigol DS1104Z-S Plus 100 MHz Digital Oscilloscope. Please read this manual thoroughly before using the instrument to ensure proper functionality and to prevent damage. The Rigol DS1104Z-S Plus is a 4-channel digital storage oscilloscope designed for precise signal analysis with a 100 MHz bandwidth and a 1 GSa/s real-time samporanı.
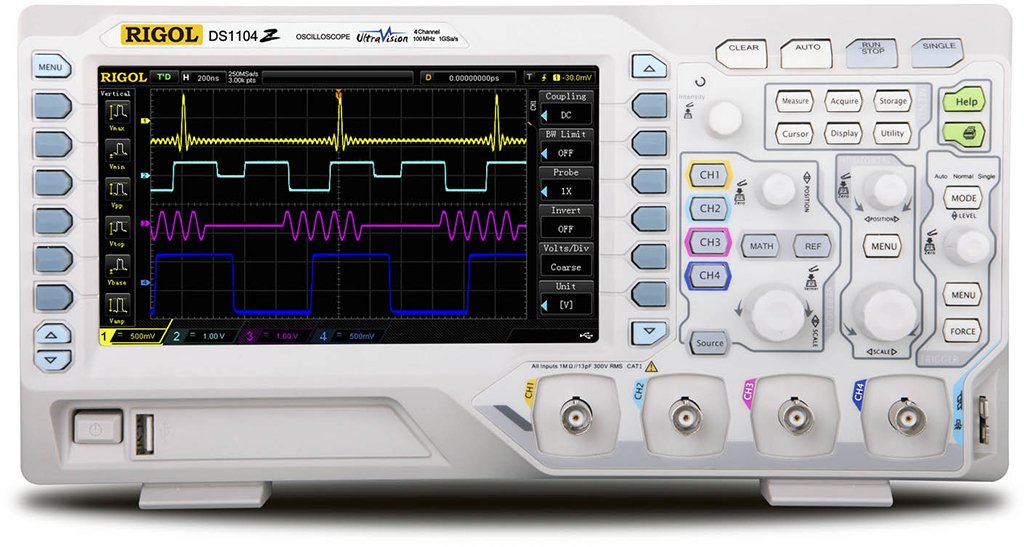
Figure 1: Rigol DS1104Z-S Plus Digital Oscilloscope. This image shows the front panel of the oscilloscope with its display, control knobs, and input channels.
2. Güvenlik Bilgileri
Yaralanmaları ve aletin hasar görmesini önlemek için her zaman aşağıdaki güvenlik önlemlerine uyun:
- Güç Kaynağı: Cihazı yalnızca belirtilen voltaj değerine sahip bir güç kaynağına bağlayın.tage ve frekans.
- Topraklama: Ensure the instrument is properly grounded to prevent electric shock.
- Havalandırma: Havalandırma açıklıklarını kapatmayın. Cihazın etrafında yeterli hava akışı olduğundan emin olun.
- Çevre: Operate the oscilloscope in a dry, well-ventilated area, away from direct sunlight, high temperatures, and excessive dust.
- Problar: Use only probes designed for the specified voltage ve frekans derecelendirmeleri.
- Servis: Refer all servicing to qualified service personnel. Do not attempt to repair the instrument yourself.
- Temizlik: Temizlemeden önce elektrik bağlantısını kesin. Yumuşak, kuru bir bez kullanın.amp bezle silin. Aşındırıcı temizleyiciler veya çözücüler kullanmayın.
3. Paket İçeriği
Paketinizin aşağıdaki öğeleri içerdiğini doğrulayın:
- Rigol DS1104Z-S Plus Digital Oscilloscope
- Güç Kablosu
- Passive Probes (4 units)
- USB kablosu
- Hızlı rehber
- Resource CD (User Manual, Programming Manual, Software)
4. Ürün Bittiview
The Rigol DS1104Z-S Plus features a user-friendly interface and robust design for various measurement applications.
4.1 Ön Panel
The front panel includes the display, control knobs, function buttons, and input connectors for channels 1-4.
- Ekran Görüntüsü: Shows waveforms, measurement results, and menu options.
- Dikey Kontroller: ses seviyesini ayarlatage per division and position for each channel.
- Yatay Kontroller: Adjust time per division and horizontal position.
- Tetik Kontrolleri: Tetikleme seviyesini, modunu ve türünü ayarlayın.
- Fonksiyon Düğmeleri: Access various menus such as Acquire, Measure, Storage, Utility, etc.
- Kanal Girişleri (CH1-CH4): BNC connectors for probe connection.
4.2 Arka Panel
The rear panel provides power input, USB host/device ports, and LAN port for connectivity.
- AC Güç Girişi: Güç kablosunu bağlamak için.
- USB Ana Bilgisayar Bağlantı Noktası: USB depolama aygıtlarını bağlamak için.
- USB Aygıt Bağlantı Noktası: For connecting to a PC.
- LAN Bağlantı Noktası: Ağ bağlantısı ve uzaktan kontrol için.
5. Kurulum
5.1 Güç Bağlantısı
- Arka paneldeki güç anahtarının KAPALI konumunda olduğundan emin olun.
- Verilen güç kablosunu osiloskobun arka panelindeki AC güç girişine bağlayın.
- Güç kablosunun diğer ucunu topraklı bir AC elektrik prizine takın.
5.2 Prob Bağlantısı
- Connect the BNC connector of a passive probe to one of the input channels (CH1, CH2, CH3, or CH4) on the front panel.
- Connect the probe's ground clip to the circuit's ground reference.
- Set the attenuation ratio on the probe to match the setting on the oscilloscope (e.g., 1X or 10X).
5.3 İlk Güç Açma
- Arka paneldeki güç düğmesini AÇIK konumuna getirin.
- The oscilloscope will perform a self-test and display the Rigol logo.
- After startup, the default waveform display will appear.
6. Kullanım Talimatları
This section covers basic operations for acquiring and analyzing waveforms.
6.1 Temel Dalga Formu Görüntüleme
- Dikey Ölçek (VOLT/BÖLÜM): Use the vertical scale knob for the active channel to adjust the voltaghassasiyet.
- Dikey pozisyon: Dikey konum düğmesini kullanarak dalga biçimini ekranda yukarı veya aşağı hareket ettirebilirsiniz.
- Yatay Ölçek (SANİYE/BÖLÜM): Use the horizontal scale knob to adjust the time base.
- Yatay Pozisyon: Use the horizontal position knob to shift the waveform left or right.
6.2 Tetikleme
Triggering stabilizes repetitive waveforms and captures single-shot events.
- Tetikleme Seviyesi: Adjust the trigger level knob to set the voltage point at which the trigger occurs.
- Trigger Menu: Basın Trigger Menu button to configure trigger type (Edge, Pulse, Video, etc.), source, and slope.
- Tetikleme Modu: Select between Auto, Normal, and Single modes.
6.3 Ölçüm Fonksiyonları
Osiloskop çeşitli otomatik ölçüm fonksiyonları sunmaktadır.
- Basın Ölçüm button to display the measurement menu.
- Select desired measurements such as Vpp, Vmax, Vmin, Freq, Period, Rise Time, etc.
- The results will be displayed on the screen.
6.4 Veri Kaydetme
Waveforms and settings can be saved to internal memory or a USB storage device.
- Basın Depolamak düğme.
- Select the storage type (Waveform, Setup, Image) and destination (Internal, USB).
- Follow the on-screen prompts to save the data.
7. Bakım
7.1 Temizlik
To maintain the instrument's appearance and performance:
- Temizlemeden önce elektrik kablosunu çıkarın.
- Yumuşak bir bez kullanınampened with mild detergent and water to clean the exterior.
- Aşındırıcı temizleyiciler, çözücüler veya sert kimyasallar kullanmayın.
- Ensure no liquid enters the instrument.
7.2 Kalibrasyon
The oscilloscope is factory calibrated. For optimal performance, periodic calibration by qualified service personnel is recommended, typically every 1-2 years, depending on usage.
7.3 Depolama
When not in use for extended periods, store the oscilloscope in a dry, dust-free environment within the specified operating temperature range.
8. Sorun Giderme
This section lists common problems and their solutions. If the problem persists, contact Rigol customer support.
| Sorun | Olası Neden | Çözüm |
|---|---|---|
| Güç açıldıktan sonra görüntü yok | Power cord not connected; Power switch off; Faulty power outlet | Check power cord connection; Ensure power switch is ON; Test power outlet with another device |
| Dalga formu görüntülenmiyor. | Probe not connected; Incorrect channel settings; Trigger level incorrect; Input signal too small/large | Connect probe to active channel; Adjust vertical scale and position; Adjust trigger level; Check input signal source |
| Kararsız dalga formu | Incorrect trigger settings; Noisy signal | Adjust trigger level and mode; Check signal source for noise; Use averaging acquisition mode |
| Cannot save data to USB | USB drive not formatted correctly; USB drive full; USB drive faulty | Format USB drive to FAT32; Delete unnecessary files; Try a different USB drive |
9. Özellikler
Key technical specifications for the Rigol DS1104Z-S Plus Digital Oscilloscope:
- Bant Genişliği: 100 MHz
- Kanallar: 4 Analog Kanal
- Gerçek zamanlı Sample Oranı: 1 GSa/s'ye kadar
- Bellek Derinliği: 12 Mpts (Standard), 24 Mpts (Optional)
- Dalga Formu Yakalama Oranı: 30,000 wfms/s'ye kadar
- Görüntülemek: 7-inch TFT LCD (800x480 resolution)
- Dikey Hassasiyet: 1 mV/div ila 10 V/div
- Time Base Range: 2 ns/div - 50 s/div
- Tetikleyici Türleri: Edge, Pulse, Video, Slope, Alternate, Runt, Window, Delay, Setup/Hold, Nth Edge
- Arayüz: USB Host, USB Device, LAN, Pass/Fail, Trigger Out
- Güç Kaynağı: Kablolu Elektrik
- Ürün Ağırlığı: 1 Kilogram
- Uyumluluk: CE
10. Garanti ve Destek
Rigol Technologies provides a standard warranty for its products. For detailed warranty terms and conditions, please refer to the warranty card included with your product or visit the official Rigol website. For technical support, service, or inquiries, please contact your local Rigol distributor or Rigol customer service. Contact information can typically be found on the Rigol website or in the documentation provided with your oscilloscope.
Resmi Webalan: www.rigol.com


