
1. Giriş
Welcome to the Philco Electronic Bread Maker user manual. This appliance is designed to simplify the bread-making process, allowing you to create a variety of delicious breads, cakes, jams, and more with minimal effort. Please read this manual carefully before using the appliance to ensure safe and efficient operation and to fully understand its features.
2. Önemli Güvenlik Talimatları
Elektrikli aletleri kullanırken yangın, elektrik çarpması ve kişilerin yaralanma riskini azaltmak için her zaman aşağıdakiler de dahil olmak üzere temel güvenlik önlemlerine uyulmalıdır:
- Sıcak yüzeylere dokunmayın. Kulp veya düğmeleri kullanın.
- Elektrik çarpmasına karşı korunmak için kabloyu, fişleri veya cihazı suya veya başka bir sıvıya daldırmayın.
- Herhangi bir cihazın çocuklar tarafından veya çocukların yakınında kullanılması durumunda yakın gözetim gereklidir.
- Kullanılmadığında ve temizlemeden önce fişini prizden çekin. Parçaları takıp çıkarmadan önce soğumasını bekleyin.
- Kablo veya fişi hasarlı olan veya cihaz arızalandıktan veya herhangi bir şekilde hasar gördükten sonra hiçbir cihazı çalıştırmayın.
- Cihaz üreticisi tarafından önerilmeyen aksesuar aparatlarının kullanımı yaralanmalara sebep olabilir.
- Açık havada kullanmayınız.
- Kablonun masa veya tezgah kenarından sarkmasına veya sıcak yüzeylere temas etmesine izin vermeyin.
- Sıcak gazlı veya elektrikli ocakların üzerine veya yakınına, ya da ısıtılmış fırına koymayın.
- Sıcak yağ veya diğer sıcak sıvılar içeren bir cihazı hareket ettirirken son derece dikkatli olunmalıdır.
- Bağlantıyı kesmek için, herhangi bir kontrol düğmesini "kapalı" konumuna getirin, ardından fişi duvar prizinden çıkarın.
- Cihazı kullanım amacı dışında kullanmayınız.

Image: Safety certification logos (INMETRO OCP 0040 and SGS) indicating compliance with safety standards.
3. Ürün Bittiview
Familiarize yourself with the components of your Philco Electronic Bread Maker.
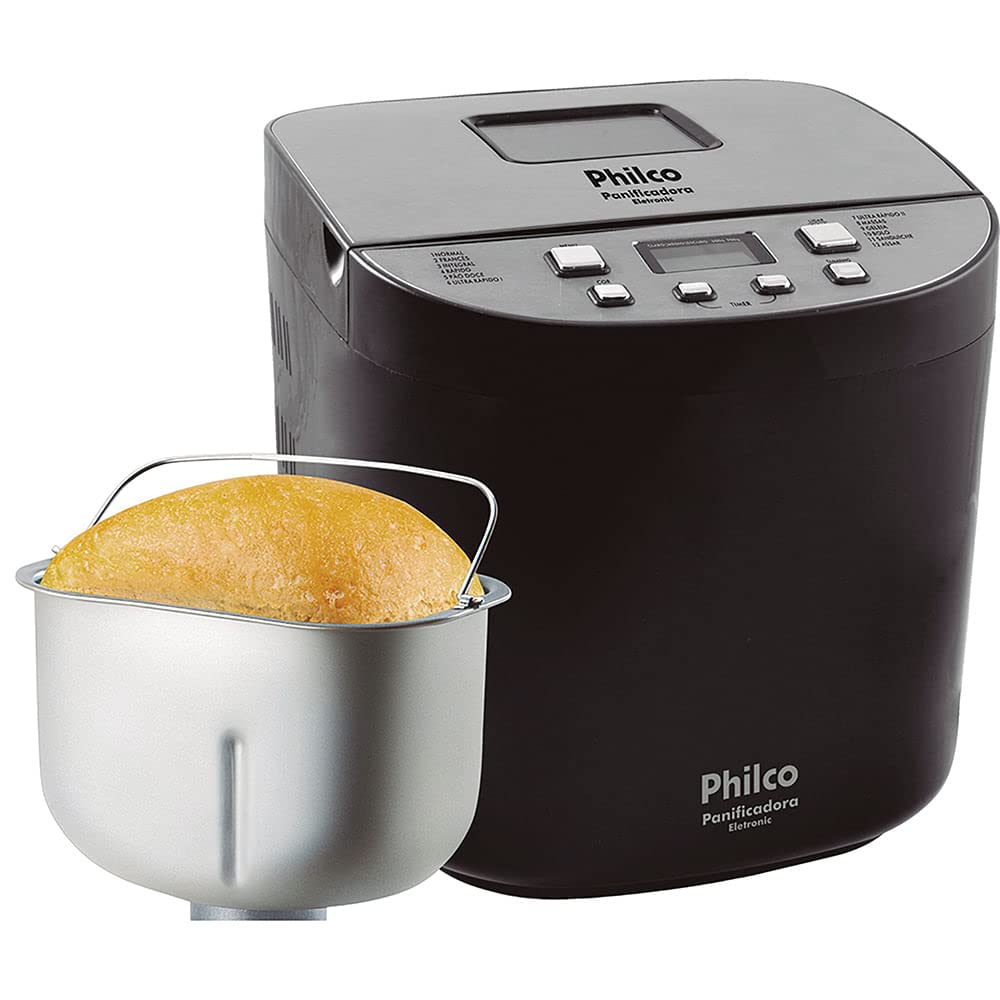
Resim: Ön view of the Philco Electronic Bread Maker, showing the main unit, control panel, and viewpencere.
Kontrol Paneli
The control panel allows you to select programs, adjust settings, and start/stop the bread maker.
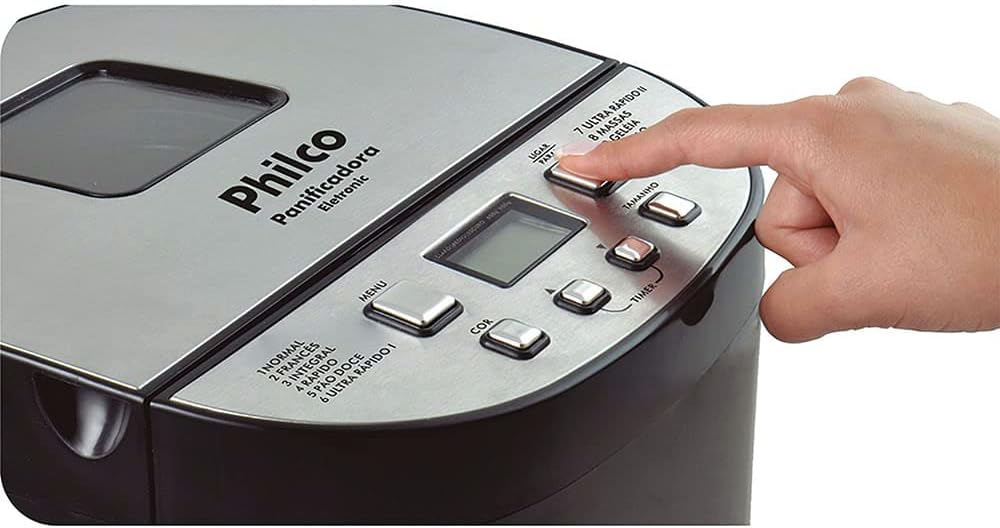
Image: Close-up of the bread maker's control panel, highlighting buttons for MENU, COLOR, TIMER, SIZE, and POWER, along with the digital display.
- MENÜ Düğmesi: Selects one of the 12 available programs.
- RENK Düğmesi: Adjusts the crust color (Light, Medium, Dark).
- TIMER Buttons (+/-): Sets the delay timer for deferred baking.
- BEDEN Düğmesi: Selects the loaf size (450g, 600g, 900g, 1200g).
- Güç düğmesi: Seçilen programı başlatır veya durdurur.
- LCD Ekran: Program numarasını, kalan süreyi ve seçilen ayarları gösterir.
4. Kurulum ve İlk Kullanım
4.1 Paketin açılması
Carefully remove the bread maker and all accessories from the packaging. Retain the packaging for future storage or transport. Check that all parts are present and undamaged.
4.2 İlk Temizlik
Before first use, clean the bread pan, kneading paddle, and measuring accessories with warm, soapy water. Rinse thoroughly and dry completely. Wipe the exterior of the appliance with a damp Kumaş.
4.3 Yerleştirme
Ekmek yapma makinesini sağlam, düz, ısıya dayanıklı bir yüzeye, doğrudan güneş ışığından ve ısı kaynaklarından uzak bir yere yerleştirin. Cihazın etrafında yeterli havalandırma olduğundan emin olun.
5. Kullanım Talimatları
5.1 Malzemelerin Eklenmesi
Her zaman önce sıvı malzemeleri, ardından kuru malzemeleri ekleyin. Maya en son eklenmeli ve unun üstünde, sıvılardan ve tuzdan uzakta, küçük bir çukura yerleştirilmelidir.

Image: A hand pouring dry ingredients, likely flour, into the bread maker's non-stick pan.
5.2 Program Seçimi
Basın MENÜ button repeatedly to cycle through the 12 available programs. The selected program number will be displayed on the LCD screen.
Mevcut Programlar:
- NORMAL: For basic bread recipes.
- FRANSIZCA: For light bread with a crispy crust.
- TAM BUĞDAY: For whole wheat bread, typically requiring a longer kneading time.
- ANİ: For quick bread baking, suitable for smaller loaves.
- SWEET BREAD: For breads with high sugar and fat content.
- ULTRA FAST I: For very quick baking of smaller loaves.
- ULTRA FAST II: For very quick baking of larger loaves.
- HAMUR: Prepares dough for rolls, pizza, or pastries without baking.
- REÇEL: Ev yapımı reçel ve marmelat yapmak için.
- KEK: For baking cakes and quick breads.
- SANDVİÇ: For light, fluffy sandwich bread.
- PİŞİRMEK: Hazır hamurları pişirmek veya pişirme süresini uzatmak için.
5.3 Crust Color Selection
After selecting a program, press the RENK button to choose your desired crust color: Light, Medium, or Dark.
5.4 Loaf Size Selection
Basın BOYUT button to select the desired loaf weight: 450g, 600g, 900g, or 1200g. Ensure your recipe quantities match the selected loaf size.
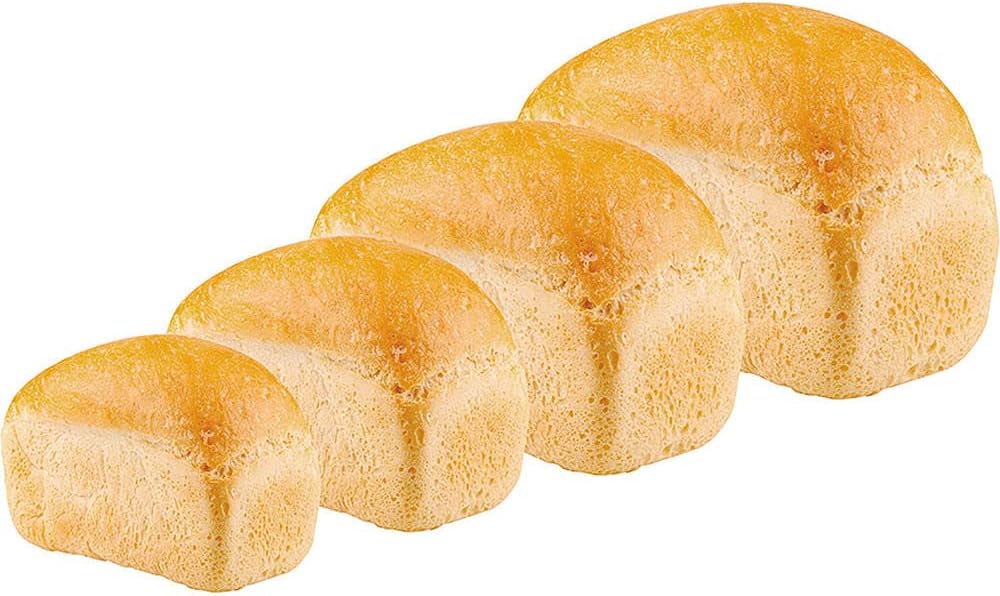
Image: Four baked loaves of bread, demonstrating the different size options available from the bread maker.
5.5 Gecikme Zamanlayıcı Fonksiyonu
The timer function allows you to delay the start of the baking process by up to 13 hours. After selecting the program, crust color, and loaf size, use the ZAMANLAYICI buttons (+/-) to set the desired delay time. The display will show the total time until the bread is ready.
5.6 Sıcak Tutma Fonksiyonu
After the baking cycle is complete, the bread maker will automatically switch to a 60-minute keep-warm function. This keeps your bread warm until you are ready to remove it.
5.7 Başlatma ve Durdurma
Basın GÜÇ button to start the selected program. To stop a program, press and hold the GÜÇ birkaç saniyeliğine düğmesine basın.
5.8 Removing the Bread
Once the program is complete and the keep-warm cycle has finished (or you have manually stopped it), unplug the appliance. Carefully remove the bread pan using oven mitts, as it will be hot. Invert the pan to release the bread. If the kneading paddle remains in the bread, remove it carefully with a non-metallic utensil.

Image: A hand carefully lifting a freshly baked loaf of bread out of the bread maker's non-stick pan using the pan's handle.
6. Bakım ve Onarım
6.1 Ekmek Kalıbı ve Yoğurma Küreğinin Temizlenmesi
After each use, allow the bread pan and kneading paddle to cool completely. Fill the pan with warm, soapy water and let it soak for 10-15 minutes to loosen any stuck-on dough. Use a soft sponge or cloth to clean. Do not use abrasive cleaners or metal utensils, as this can damage the non-stick coating. Rinse and dry thoroughly.
6.2 Dış Cephenin Temizlenmesi
Ekmek makinesinin dışını yumuşak bir bezle silin.amp cloth. Do not immerse the appliance in water or spray it with liquids. Ensure no water enters the ventilation openings.
6.3 Depolama
Ensure the appliance is clean, dry, and completely cool before storing. Store it in a dry place, away from direct sunlight and out of reach of children.
7. Sorun Giderme
Ekmek makinenizde sorun yaşıyorsanız, aşağıdaki yaygın sorunlara ve çözümlere bakın:
| Sorun | Olası Neden | Çözüm |
|---|---|---|
| Ekmek kabarmıyor | Son kullanma tarihi geçmiş maya, yanlış su sıcaklığı, çok fazla tuz/şeker. | Check yeast expiration, use lukewarm water, ensure correct ingredient measurements. |
| Ekmek çok yoğun | Too much flour, not enough liquid, incorrect program. | Measure ingredients precisely, ensure proper liquid-to-flour ratio, select appropriate program. |
| Ekmeğin içine sıkışmış yoğurma küreği | Sık rastlanan bir durum. | Ekmeğin biraz soğumasını bekleyin, ardından metal olmayan bir alet kullanarak küreği dikkatlice çıkarın. |
| Cihaz açılmıyor | Fişe takılı değil, güç çıkışıtage, arızalı priz. | Check power cord connection, test outlet with another appliance, ensure power supply. |
| Duman veya yanık kokusu | Food residue on heating element, internal malfunction. | Unplug immediately. Allow to cool and clean thoroughly. If problem persists, contact support. |
8. Özellikler
| Özellik | Şartname |
|---|---|
| Örnek | Eletronic 12 Programs 700W (Part No. 054301004) |
| Marka | FİLKO |
| Güç | 700W |
| Cilttage | 110V |
| Program Sayısı | 12 |
| Somun Boyutları | 450g, 600g, 900g, 1200g |
| Kabuk Renkleri | Açık, Orta, Koyu |
| Alarmı ertele | 13 saate kadar |
| Sıcak Tutma Fonksiyonu | 60 dakikadır. |
| Malzeme | Paslanmaz Çelik (dış) |
| Renk | Siyah |
| Ürün Ağırlığı | 5.66 kg (5660 gram) |
| ASIN | B076HVLX2G |
9. Garanti ve Destek
Your Philco Electronic Bread Maker is covered by a manufacturer's warranty. Please refer to the warranty card included with your purchase for specific terms and conditions. For technical support, service, or replacement parts, please contact Philco customer service through their official website veya ürün dokümantasyonunuzda sağlanan iletişim bilgileri.


