
1. Giriş
Thank you for choosing the RIDGID HyperDrive Brushless 18V 2-1/8 in. Brad Nailer. This cordless tool is designed to provide the power and performance of a pneumatic nailer without the need for a compressor, hose, or gas cartridge. It offers a faster setup and enhanced maneuverability for various fastening applications. This manual provides essential information for the safe and effective operation, maintenance, and troubleshooting of your brad nailer.
The HyperDrive technology ensures consistent driving power for 18-Gauge nails ranging from 5/8 in. to 2-1/8 in. For optimal performance and longevity, please read and understand all instructions before use.
2. Genel Güvenlik Bilgileri
Elektrikli aletleri kullanırken yangın, elektrik çarpması ve kişisel yaralanma riskini azaltmak için temel güvenlik önlemlerine her zaman uyun. Bu kılavuzu ileride başvurmak üzere saklayın.
- Tüm talimatları okuyunuz: Aletin kullanımı ve güvenlik talimatlarını öğrenin.
- Göz Koruması Kullanın: Her zaman ANSI Z87.1 standardına uygun, yan koruyuculu güvenlik gözlükleri takın.
- İşitme Koruması Kullanın: Elektrikli aletlerden kaynaklanan gürültüye uzun süre maruz kalmak işitme kaybına neden olabilir.
- Uygun şekilde giyinin: Hareketli parçalara takılabilecek bol kıyafetler, takılar veya uzun saçlar giymeyin.
- Çalışma Alanını Temiz Tutun: Dağınık alanlar kazalara davetiye çıkarır.
- Sıkı Tutun: Çalışma sırasında aleti her zaman iki elinizle sıkıca tutun.
- Gücü Kesin: Remove the battery pack before making adjustments, changing accessories, or storing the tool.
- Kazara Çalıştırmayı Önleyin: Pil takımını takmadan önce anahtarın KAPALI konumda olduğundan emin olun.
- Doğru Aracı Kullanın: Küçük bir aleti veya aparatı, ağır hizmet tipi bir aletin işini yapmaya zorlamayın.
- Kullanmadan Önce Aleti Kontrol Edin: Hareketli parçalarda yanlış hizalama veya tutukluk olup olmadığını, parçalarda kırılma olup olmadığını ve aletin çalışmasını etkileyebilecek diğer koşulları kontrol edin.
3. Ürün Bittiview
The RIDGID HyperDrive Brad Nailer is engineered for efficiency and durability. Below are key components and features of the tool.

Şekil 1: Etraflı view of the RIDGID HyperDrive Brushless 18V 2-1/8 in. Brad Nailer. This image displays the complete tool, highlighting its ergonomic design and the magazine for brad nails.

Şekil 2: Taraf view of the brad nailer, illustrating the nail magazine and the general profile of the tool. The magazine holds the 18-Gauge brad nails.

Şekil 3: Close-up of the firing mode selector switch, located near the trigger. This switch allows the user to select between sequential and contact actuation modes for different applications.

Şekil 4: Ayrıntılı view of the nosepiece and depth adjustment dial. The depth adjustment allows for precise control over how deep the nail is driven into the material.

Şekil 5: Arka view of the brad nailer, showcasing the 'HyperDrive 18 Ga Brad' branding and the robust construction of the tool's housing.
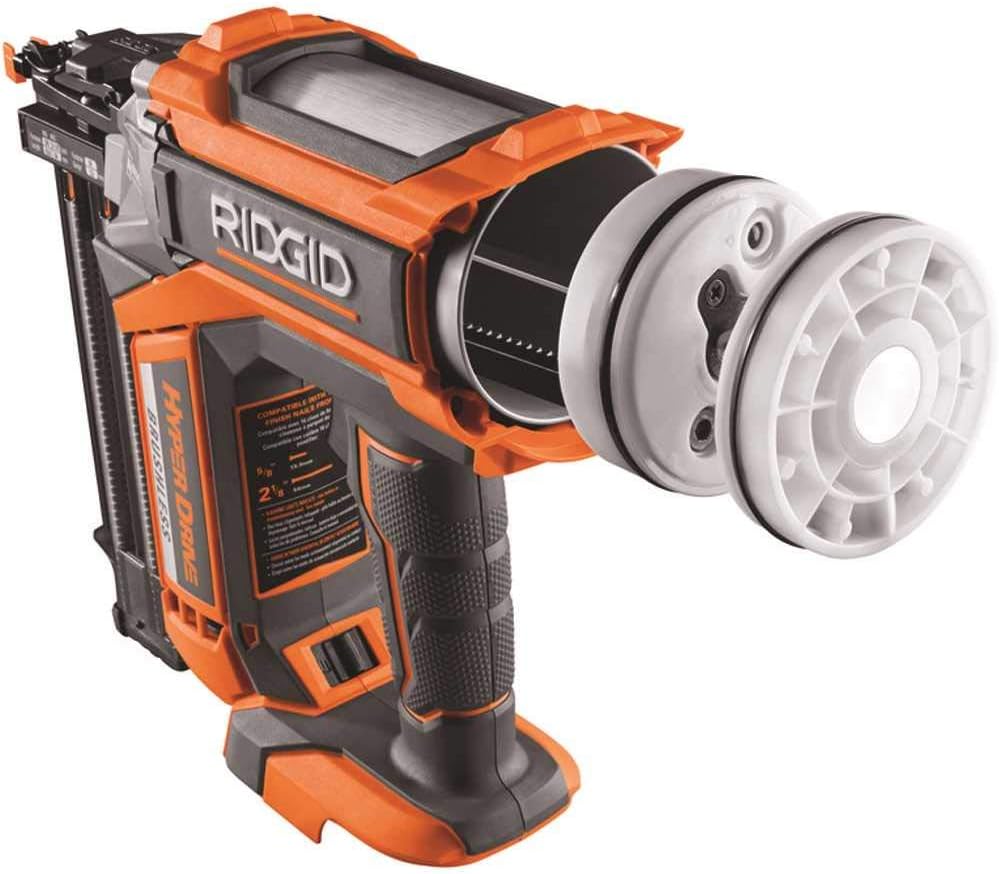
Şekil 6: bir patladı view illustrating the internal piston and driver mechanism of the HyperDrive system. This shows the core components responsible for driving nails.

Şekil 7: Close-up of the integrated LED light, which illuminates the work surface, and the nosepiece area. The LED enhances visibility in dimly lit conditions.
4. Kurulum
4.1 Pil Kurulumu
- Ensure the tool's trigger is locked or the power switch is in the OFF position.
- Align the 18V Lithium Ion battery pack with the battery port on the tool's base.
- Pil takımını yerine güvenli bir şekilde oturana kadar yuvaya kaydırın.
- Çıkarmak için pil çıkarma düğmesine basın ve pil takımını dışarı doğru kaydırın.
4.2 Bağlantı Elemanlarının Yüklenmesi
- Pil takımını aletten çıkarın.
- Pull back the pusher assembly at the rear of the magazine until it locks.
- Insert a strip of 18-Gauge brad nails (5/8 in. to 2-1/8 in. length) into the magazine slot. Ensure the nails are oriented correctly with the points facing forward.
- Release the pusher assembly, allowing it to slide forward and hold the nails in place.
- Çivilerin düzgün bir şekilde yerleştirildiğinden ve şarjör içinde serbestçe hareket ettiğinden emin olun.
5. Çalıştırma
5.1 Açma/Kapatma
The tool is powered on when a charged battery is inserted and the trigger is engaged. There is no separate power button. Always remove the battery when not in use or when performing maintenance.
5.2 Ateşleme Modunun Seçilmesi
Your brad nailer features a mode selector switch (refer to Figure 3) to choose between two firing modes:
- Sequential Actuation Mode: Requires the nosepiece to be depressed against the workpiece, followed by pulling the trigger to drive a single nail. This mode offers precise nail placement.
- Kontak Çalıştırma Modu: Allows for rapid firing. Hold the trigger, then depress the nosepiece against the workpiece to drive a nail. Each time the nosepiece is depressed, a nail will be driven.
Select the appropriate mode based on your application and safety requirements.
5.3 Tahrik Derinliğinin Ayarlanması
The depth adjustment dial (refer to Figure 4) allows you to control how far the nail head sits below or flush with the material surface.
- Rotate the dial clockwise to increase the depth of drive (nails driven deeper).
- Rotate the dial counter-clockwise to decrease the depth of drive (nails driven shallower).
Test the depth setting on a scrap piece of material before fastening your final workpiece.
5.4 Driving Nails
- Ensure the battery is charged and installed, and nails are loaded.
- Select the desired firing mode and adjust the depth of drive.
- Place the nosepiece firmly against the workpiece where the nail is to be driven.
- Engage the trigger according to the selected firing mode.
- After driving, lift the tool from the workpiece.
6. Bakım
Regular maintenance ensures the longevity and optimal performance of your RIDGID brad nailer. Always remove the battery pack before performing any maintenance.
6.1 Genel Temizlik
- Keep the tool's air vents clear and free of debris to prevent overheating.
- Wipe the tool with a clean, dry cloth. Do not use solvents or harsh chemicals.
- Periodically inspect the magazine for dust or debris that could impede nail feeding.
6.2 Clearing Nail Jams
If a nail jam occurs, follow these steps:
- Pili Çıkarın: This is crucial to prevent accidental firing.
- Open the Jam Clearing Latch: Locate the jam clearing latch near the nosepiece (refer to Figure 4). Open it to expose the nail channel.
- Remove Jammed Nail: Carefully remove any jammed nails or debris using pliers or a similar tool. Do not use excessive force.
- Close Latch: Ensure the jam clearing latch is securely closed before re-inserting the battery and resuming operation.
6.3 Inspection of Wear Parts
Regularly inspect the nosepiece, driver blade, and seals for signs of wear or damage. Worn components can affect performance and safety. Refer to the warranty section for information on service for these parts.
7. Sorun Giderme
If you encounter issues with your brad nailer, consult the following common troubleshooting steps:
| Sorun | Olası Neden | Çözüm |
|---|---|---|
| Alet ateşlenmiyor | Battery not charged or installed correctly; No nails in magazine; Nosepiece not fully depressed; Firing mode incorrect. | Charge and re-install battery; Load nails; Ensure nosepiece is firmly against workpiece; Check firing mode selection. |
| Çiviler tam derinliğe kadar çakılmamış. | Depth adjustment too shallow; Low battery charge; Incorrect nail length for material. | Adjust depth setting deeper; Recharge battery; Ensure appropriate nail length is used. |
| Tırnak sıkışması | Bent or incorrect nails; Debris in magazine/nosepiece; Worn driver blade. | Clear jam as per Section 6.2; Use only recommended nails; Inspect driver blade for wear. |
| Alet aralıklı olarak çalışıyor | Loose battery connection; Overheating; Internal fault. | Re-seat battery; Allow tool to cool down; If problem persists, contact customer support. |
If these steps do not resolve the issue, please contact RIDGID customer support for further assistance.
8. Özellikler
| Özellik | Şartname |
|---|---|
| Model Numarası | R09890B |
| Marka | SERT |
| Cilttage | 18 Volt |
| Pil Türü | Lityum İyon (1 gerekli) |
| Tırnak Ölçer | 18-ölçer |
| Tırnak Uzunluğu Kapasitesi | 5/8 in. to 2-1/8 in. |
| Estimated Nails Per Charge | Up to 2,600 linear feet (application dependent) |
| Ürün Boyutları (U x G x Y) | 12.4 x 5.2 x 14.2 inç |
| UPC | 648846065038 |
9. Garanti ve Destek
9.1 RIDGID Lifetime Service Agreement
The RIDGID HyperDrive Brushless 18V 2-1/8 in. Brad Nailer is backed by the RIDGID Lifetime Service Agreement. This agreement provides free seals, free pistons, and free driver blades for the life of the tool. Registration is typically required to activate this service agreement. Please refer to the official RIDGID website or product packaging for detailed registration instructions and terms and conditions.
9.2 Müşteri Desteği
For technical assistance, service, or warranty claims, please contact RIDGID customer support. Contact information can typically be found on the official RIDGID webSitede veya ürününüzle birlikte gelen belgelerde bulabilirsiniz.