
1. Giriş
This manual provides detailed instructions for the installation, operation, and maintenance of your ASRock AB350M-HDV MicroATX Motherboard. The ASRock AB350M-HDV is designed to support AMD Socket AM4 A-Series APUs (Bristol Ridge) and Ryzen Series CPUs (Summit Ridge), featuring a Digi Power design and 7 Power Phase design for stable performance. It supports DDR4 memory and offers various connectivity options including SATA3, USB 3.0, and an Ultra M.2 slot.
2. Ürün Bittiview
The ASRock AB350M-HDV motherboard is a MicroATX form factor board, ideal for compact PC builds. It features essential components for a modern computing system.

Şekil 2.1: Açısal view of the ASRock AB350M-HDV Motherboard, showcasing its compact MicroATX design and various components.
Temel Özellikler:
- Supports AMD Socket AM4 A-Series APUs (Bristol Ridge) and Ryzen Series CPUs (Summit Ridge).
- DDR4 memory support up to 3200+ (OC) for Ryzen CPUs and 2400 for A-series APUs.
- 1 PCIe 3.0 x16 slot and 1 PCIe 2.0 x1 slot for expansion cards.
- 4 SATA3 ports and 1 Ultra M.2 (PCIe Gen3 x4 & SATA3) slot for storage.
- 6 USB 3.0 ports (2 front, 4 rear) and 2 USB 2.0 ports for peripheral connectivity.
- Integrated Gigabit Ethernet for network connectivity.
- Video outputs: VGA, DVI, HDMI.

Şekil 2.2: Yukarıdan aşağıya view of the ASRock AB350M-HDV Motherboard, highlighting the CPU socket, RAM slots, M.2 slot, and PCIe slots.
3. Kurulum ve Kurulum
Follow these steps carefully to install your ASRock AB350M-HDV motherboard and its components.
3.1 CPU Kurulumu
- Anakart üzerinde AM4 CPU soketini bulun.
- Soketin yan tarafındaki yük kolunu kaldırın.
- İşlemci üzerindeki üçgen işareti, soket üzerindeki karşılık gelen işaretle hizalayın. İşlemciyi zorlamadan dikkatlice sokete yerleştirin.
- İşlemciyi yerine sabitlemek için yük kolunu aşağı indirin.
- CPU soğutucusunu üreticinin talimatlarına göre takın.
3.2 RAM (Bellek) Kurulumu
- Locate the DDR4 DIMM slots. This motherboard has 4 slots.
- DIMM yuvasının her iki ucundaki klipsleri açın.
- RAM modülündeki çentiği DIMM yuvasındaki anahtarla hizalayın.
- RAM modülünü, klipsler yerine oturana kadar yuvaya sıkıca yerleştirin. Her iki klipsin de kapalı olduğundan emin olun.
3.3 Storage Device Installation (SATA & M.2)
SATA Sürücüler:
- SATA veri kablosunun bir ucunu anakart üzerindeki SATA3 portuna bağlayın.
- SATA veri kablosunun diğer ucunu sabit diskinize veya SSD'nize bağlayın.
- Güç kaynağınızdan (PSU) depolama aygıtına bir SATA güç kablosu bağlayın.
M.2 SSD:
- Anakart üzerindeki Ultra M.2 yuvasını bulun.
- Remove the M.2 screw and standoff from the slot.
- M.2 SSD'yi yuvaya 30 derecelik bir açıyla yerleştirin.
- Push the M.2 SSD down and secure it with the screw and standoff.
3.4 Güç Bağlantıları
- Güç kaynağınızdaki 24 pinli ATX güç konektörünü anakart üzerindeki 24 pinli güç soketine bağlayın.
- Connect the 8-pin (or 4-pin) ATX 12V power connector from your PSU to the corresponding socket near the CPU.
3.5 Ön Panel Bağlantıları
Connect the cables from your PC case (Power Button, Reset Button, HDD LED, Power LED, USB, Audio) to the corresponding headers on the motherboard. Refer to the motherboard layout diagram in your physical manual for exact header locations.
3.6 Grafik Kartı Kurulumu
- PCIe 3.0 x16 yuvasını bulun.
- PC kasanızdan ilgili genişletme yuvası kapağını çıkarın.
- Align the graphics card with the PCIe slot and press it down firmly until it clicks into place.
- Ekran kartını bir vidayla kasaya sabitleyin.
- Connect any required PCIe power cables from your PSU to the graphics card.
4. Kullanım Talimatları
4.1 İlk Önyükleme ve BIOS/UEFI Kurulumu
- Tüm bileşenleri birleştirdikten sonra monitörünüzü, klavyenizi ve farenizi bağlayın.
- Sisteminizi açın.
- Başlatma sırasında, art arda basın. SİL or F2 BIOS/UEFI kurulum yardımcı programına girmek için tuşa basın.
- In the BIOS, you can configure boot order, system time, and other advanced settings. Save changes and exit to boot into your operating system installation media.
4.2 Sürücü Kurulumu
After installing your operating system, install the necessary drivers for the motherboard components. These typically include chipset drivers, audio drivers, LAN drivers, and any specific utility drivers. Drivers can be found on the ASRock official webAnakart modelinize özel site.
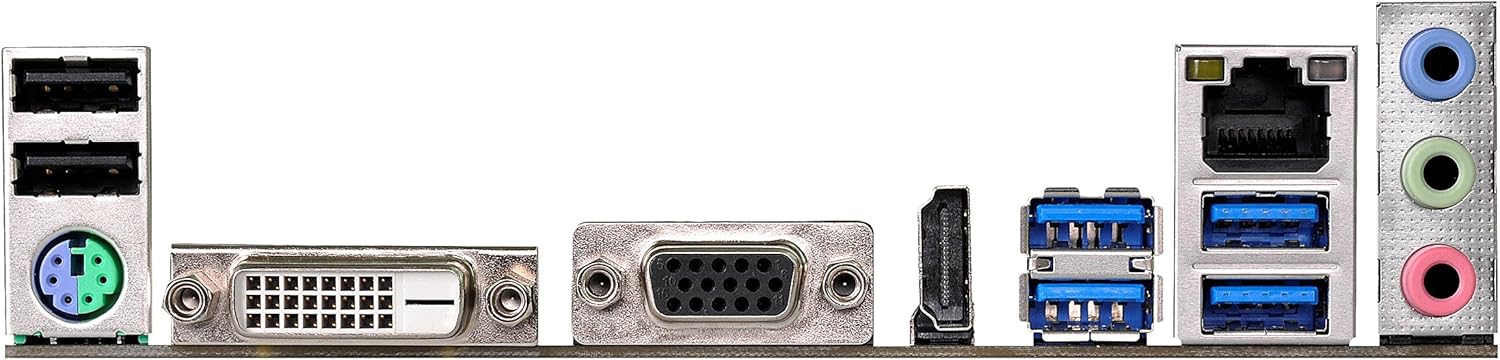
Figure 4.1: Rear I/O panel of the ASRock AB350M-HDV Motherboard, showing USB ports, video outputs (VGA, DVI, HDMI), LAN port, and audio jacks.
5. Bakım
Doğru bakım anakartınızın uzun ömürlü olmasını ve optimum performans göstermesini sağlar.
5.1 Temizlik
- Anakart ve bileşenlerin tozunu düzenli olarak basınçlı hava kullanarak temizleyin.
- Temizlemeden önce sistemin kapalı ve fişinin çekilmiş olduğundan emin olun.
- Sıvı temizleyicileri doğrudan bileşenler üzerinde kullanmaktan kaçının.
5.2 BIOS/UEFI Güncellemeleri
ASRock'ı periyodik olarak kontrol edin. website for BIOS/UEFI updates. Updates can improve compatibility, stability, and performance. Follow the instructions provided by ASRock carefully when performing a BIOS update to avoid system damage.
6. Sorun Giderme
Bu bölümde karşılaşabileceğiniz yaygın sorunlara çözümler sunulmaktadır.
6.1 Güç Yok / POST (Açılışta Kendi Kendini Test Etme) Yok
- Güç Bağlantılarını Kontrol Edin: Ensure the 24-pin and 8-pin (or 4-pin) CPU power connectors are securely seated.
- Güç kaynağını doğrulayın: Test your power supply unit (PSU) to ensure it is functional and providing adequate power.
- Yeniden Yerleştirme Bileşenleri: Remove and re-install the CPU, RAM, and graphics card to ensure they are properly seated.
- CMOS'u temizle: Refer to your physical manual for instructions on how to clear the CMOS (Complementary Metal-Oxide-Semiconductor) settings, which can resolve boot issues.
6.2 Görüntü Çıkışı Yok
- Monitör Bağlantısı: Ensure your monitor is correctly connected to the graphics card or motherboard (if using an APU with integrated graphics).
- Grafik Kartı: If using a dedicated graphics card, ensure it is properly installed and has sufficient power. Test with another graphics card if possible.
- APU Compatibility: If using an AMD A-Series APU, ensure your monitor is connected to the motherboard's video outputs (VGA, DVI, HDMI). Ryzen CPUs without integrated graphics require a dedicated graphics card.
6.3 Operating System Not Booting
- Önyükleme Sırası: Check the BIOS/UEFI settings to ensure the correct boot device (e.g., SSD/HDD with OS) is prioritized.
- Depolama Aygıtı: Verify that your storage device is detected in the BIOS.
- İşletim Sistemi Kurulumu: If the OS is newly installed, ensure the installation process completed successfully.
7. Özellikler
| Marka | ASR kaya |
| Model Adı | AB350M-HDV |
| CPU Soketi | Soket AM4 |
| Yonga Seti Türü | AMD Burun B350 |
| Uyumlu İşlemciler | AMD A-Series APUs (Bristol Ridge), Ryzen Series CPUs (Summit Ridge) |
| RAM Bellek Teknolojisi | DDR4 |
| Bellek Saat Hızı | 2133 MHz (Base), up to 3200+ (OC) for Ryzen CPU |
| Mevcut Bellek Yuvaları | 4 |
| Grafik Kartı Arayüzü | PCI Express (1x PCIe 3.0 x16, 1x PCIe 2.0 x1) |
| Toplam SATA Bağlantı Noktası Sayısı | 4 (SATA3) |
| M.2 Yuvası | 1 (Ultra M.2, PCIe Gen3 x4 & SATA3) |
| Toplam USB Bağlantı Noktaları | 8 (6x USB 3.0, 2x USB 2.0) |
| Video Çıkışları | VGA, DVI, HDMI |
| Ana Güç Konektörü Türü | 24 Pinli ATX |
| Form Faktörü | MikroATX |
| Ürün Ağırlığı | 1.3 Pound |
8. Garanti Bilgileri
The ASRock AB350M-HDV Motherboard comes with a 1 Yıl Garanti. For specific terms and conditions, please refer to the warranty card included with your product or visit the official ASRock webalan.
9. Destek
Daha fazla yardım, teknik destek veya sürücü indirme işlemleri için lütfen resmi ASRock web sitesini ziyaret edin. webalan:
You can also find contact information for customer service and support resources on their webalan.