
1. Ürün Bittiview
This manual provides detailed instructions for installing the EHO 2 DIN Radio Mounting Kit in Citroën Jumpy G9/X vehicles manufactured from January 2007 onwards. This kit facilitates the installation of a standard 2 DIN aftermarket car radio, integrating it seamlessly into your vehicle's dashboard. The kit includes a mounting frame, a fascia panel, a radio connection cable, an antenna adapter, and a CAN bus interface.
2. Paket İçeriği
Please verify that all components listed below are present in your kit before beginning installation:
- 2 DIN Metal Mounting Frame
- 2 DIN Fascia Panel (Black)
- Radio Connection Cable (Wiring Harness)
- Anten Adaptörü
- CAN Bus Arayüzü
- Mounting Screws and Brackets

Resim 1: Üzeriview of the 2 DIN metal mounting frame, plastic fascia, and various small brackets and screws included in the kit.
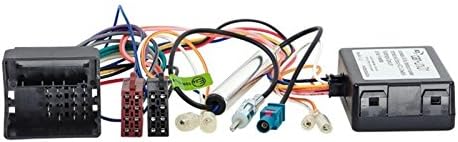
Resim 2: Ayrıntılı view of the radio connection cable (wiring harness), CAN bus interface module, and antenna adapter, which are essential for electrical connectivity.
3. Uyumluluk
This EHO 2 DIN Radio Mounting Kit is specifically designed for the following vehicle:
- Araç Modeli: Citroën Jumpy G9/X
- Üretim Yılı: From January 2007 onwards
- Özellikler: Includes CAN bus support for vehicle integration.
Önemli Not:
Unless explicitly stated, this kit does not support active sound systems, steering wheel controls, original vehicle displays, or other complex vehicle systems. If you have specific requirements for these features, please ensure your aftermarket radio or additional adapters provide the necessary compatibility.
4. Kurulum ve Kurulum
Before starting the installation, ensure the vehicle's battery is disconnected to prevent electrical shorts. Professional installation is recommended if you are unfamiliar with car audio wiring.
- Remove Original Radio and Fascia: Carefully remove the existing factory radio and dashboard fascia panel from your Citroën Jumpy G9/X. Refer to your vehicle's service manual for specific removal procedures.
- Assemble the 2 DIN Mounting Frame: Assemble the metal 2 DIN mounting frame using the provided screws and brackets. Ensure it forms a secure cage for your new aftermarket radio.
- Mount Aftermarket Radio: Slide your new 2 DIN aftermarket radio into the assembled metal mounting frame until it clicks into place or can be secured with the radio's own mounting screws.
- Kablo Demetini Bağlayın: Connect the EHO radio connection cable (wiring harness) to your aftermarket radio's ISO connector. Then, connect the other end of the wiring harness to the vehicle's original wiring loom. Ensure all connections are firm.
- Integrate CAN Bus Interface: Connect the CAN bus interface module between the vehicle's wiring and the radio connection cable as per the diagram provided with the CAN bus module (if separate instructions are included). This module translates vehicle data for the aftermarket radio.
- Anten Adaptörünü Bağlayın: Connect the antenna adapter to the vehicle's antenna cable and then to the antenna input on your new aftermarket radio.
- Bağlantıları Test Edin: Before fully reassembling the dashboard, reconnect the vehicle's battery and briefly test the radio's functionality (power, audio, station tuning).
- Install Fascia Panel: Once confirmed working, carefully fit the black 2 DIN fascia panel around the installed radio, ensuring it aligns correctly with the dashboard opening.
- Güvenli Hale Getirin ve Tekrar Birleştirin: Secure the entire assembly back into the dashboard. Reassemble any removed dashboard components.
5. Operating Your New Radio
This mounting kit provides the physical and electrical interface for your aftermarket 2 DIN radio. For instructions on operating your specific radio, please refer to the instruction manual provided by the radio manufacturer.
6. Bakım
The EHO 2 DIN Radio Mounting Kit requires minimal maintenance. Keep the fascia panel clean using a soft, damp cloth. Avoid abrasive cleaners. Periodically check that the radio is securely seated within the mounting frame and that all connections remain firm, especially if you experience any audio or power interruptions.
7. Sorun Giderme
- Radyo Açılmıyor:
- Check all wiring harness connections, especially the power and ground wires.
- Aracın aküsünün doğru şekilde bağlı ve şarj edilmiş olduğundan emin olun.
- Verify the radio's fuse and the vehicle's relevant fuses are intact.
- Ses Yok:
- Check speaker wire connections from the radio to the wiring harness.
- Ensure the radio's volume is not muted or set to zero.
- Confirm the correct audio source is selected on the radio.
- Zayıf Radyo Sinyali:
- Verify the antenna adapter is securely connected to both the vehicle's antenna cable and the radio.
- Check for any damage to the antenna cable or adapter.
- Steering Wheel Controls / Other Vehicle Functions Not Working:
- As noted in the compatibility section, this kit primarily provides basic radio integration. Advanced vehicle functions like steering wheel controls typically require additional, specific interfaces not included in this standard kit.
- Ensure the CAN bus interface is correctly installed and functioning.
If you encounter issues not covered here, or if troubleshooting steps do not resolve the problem, please contact EHO customer support.
8. Özellikler
| Özellik | Detay |
|---|---|
| Marka | EHO |
| Model Numarası | 381040-02-1+1041-46-15_3 |
| Uyumluluk | Citroën Jumpy G9/X (from 01/2007) |
| Radio Size | 2 DİN |
| Fascia Color | Siyah |
| CAN Veri Yolu Desteği | Dahil |
9. Garanti ve Destek
For warranty information, please refer to the documentation provided with your purchase or contact your retailer. For technical support or assistance with installation, you may contact EHO customer service:
- Telefon: 0281-1647397
- Çalışma Saatleri: 10:00 - 12:30 and 14:30 - 18:00 (local time)
Please have your product model number (381040-02-1+1041-46-15_3) and purchase details ready when contacting support.