
1. Giriş
This manual provides essential information for the safe and efficient operation of your KitchenAid 5KMT223GER 2-Slot Automatic Toaster. Please read all instructions carefully before first use and retain for future reference.

Resim 1.1: Ön view of the KitchenAid 5KMT223GER 2-Slot Automatic Toaster.
2. Önemli Güvenlik Talimatları
Elektrikli aletleri kullanırken, aşağıdakiler de dahil olmak üzere temel güvenlik önlemlerine her zaman uyulmalıdır:
- Tüm talimatları okuyun.
- Sıcak yüzeylere dokunmayın. Kulp veya düğmeleri kullanın.
- Elektrik çarpmasına karşı korunmak için kabloyu, fişleri veya tost makinesini suya veya başka bir sıvıya batırmayın.
- Herhangi bir cihazın çocuklar tarafından veya çocukların yakınında kullanılması durumunda yakın gözetim gereklidir.
- Kullanılmadığında ve temizlemeden önce fişini prizden çekin. Parçaları takıp çıkarmadan önce soğumasını bekleyin.
- Hasarlı kablo veya fişle veya cihaz arızalandıktan, düşürüldükten veya herhangi bir şekilde hasar gördükten sonra cihazı çalıştırmayın. Cihazı inceleme, onarım veya ayarlama için en yakın yetkili servis merkezine götürün.
- Cihaz üreticisi tarafından önerilmeyen aksesuar aparatlarının kullanımı yaralanmalara sebep olabilir.
- Açık havada kullanmayınız.
- Kablonun masa veya tezgah kenarından sarkmasına veya sıcak yüzeylere temas etmesine izin vermeyin.
- Sıcak gazlı veya elektrikli ocakların üzerine veya yakınına, ya da ısıtılmış fırına koymayın.
- Bağlantıyı kesmek için, herhangi bir kontrol düğmesini "kapalı" konumuna getirin, ardından fişi duvar prizinden çıkarın.
- Cihazı kullanım amacı dışında kullanmayınız.
- Yangın veya elektrik çarpması riski oluşturabileceğinden, büyük boyutlu yiyecekler, metal folyo paketler veya mutfak eşyaları tost makinesine konulmamalıdır.
- Tost makineleri çalışırken perde, drape, duvar vb. yanıcı maddelerle örtülürse veya temas ederse yangın çıkabilir.
- Tost makinesi fişe takılıyken yiyecekleri çıkarmaya çalışmayın.
- Gözetimsiz çalıştırmayın.
- Always remove the crumb tray for cleaning. Do not operate the toaster without the crumb tray in place.
3. Parçalar ve Özellikler
Familiarize yourself with the components of your KitchenAid 2-Slot Automatic Toaster:
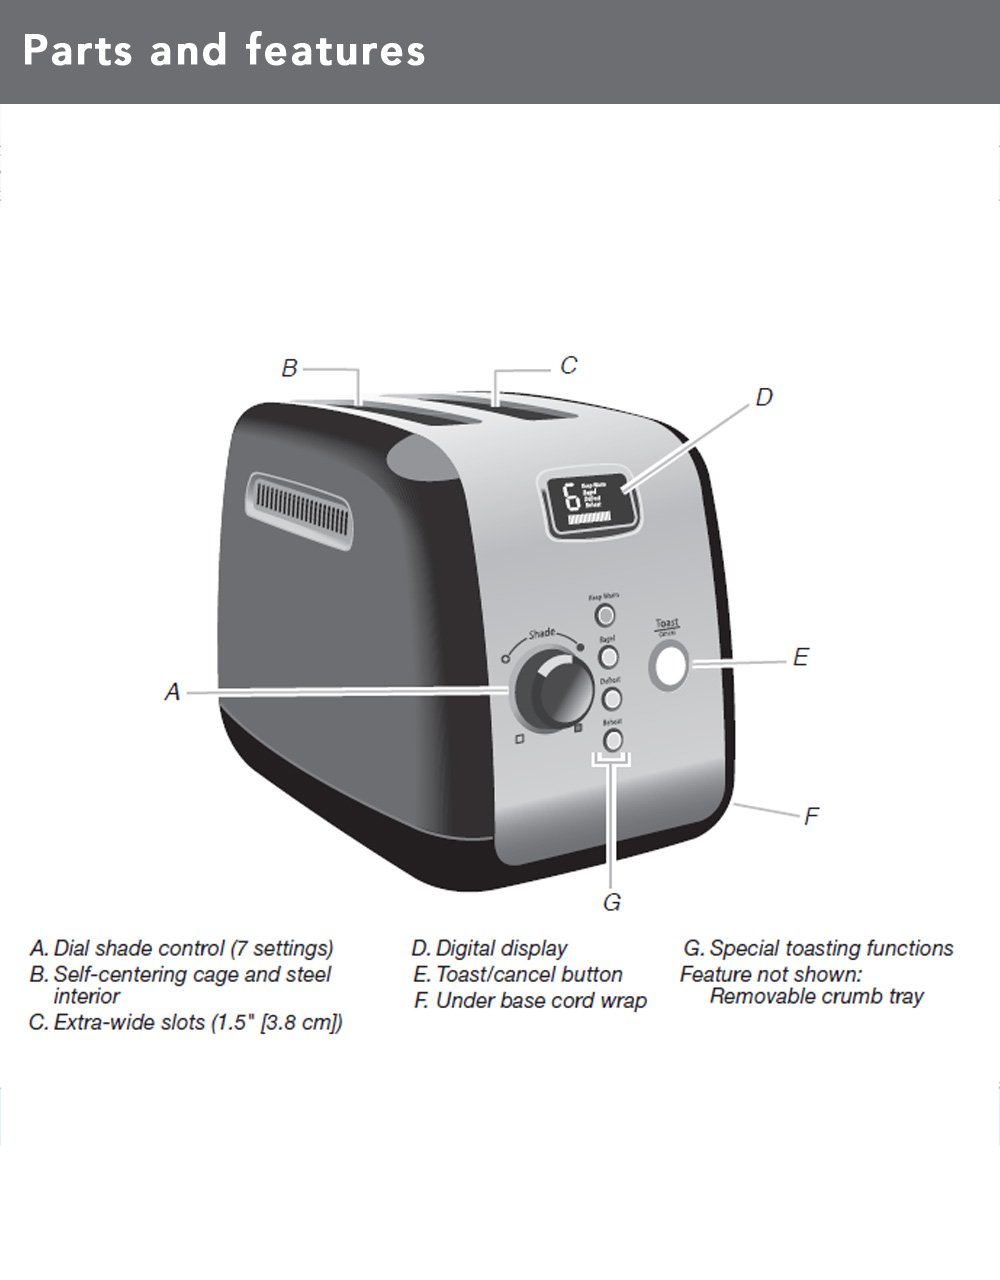
Image 3.1: Diagram illustrating the main parts and features of the toaster.
- Shade Control Dial (A): Adjusts the browning level with 7 settings.
- Self-Centering Bread Racks (B): Automatically centers bread for even toasting.
- Extra-Wide Slots (C): 3.8 cm (1.5 inches) wide slots accommodate various bread types.
- Digital Display (D): Shows selected shade setting and a countdown timer for toasting progress.
- Toast/Cancel Button (E): Initiates or cancels the toasting cycle. Features motorized lift.
- Under Base Cord Wrap (F): For convenient cord storage.
- Special Toasting Functions (G): Includes Keep Warm, Bagel, Defrost, and Reheat buttons.
- Çıkarılabilir Kırıntı Tepsisi: Located at the back for easy cleaning (not shown in diagram).
4. Kurulum
Before using your toaster for the first time:
- Tost makinesinin ambalajını açın ve tüm ambalaj malzemelerini çıkarın.
- Tost makinesinin dışını bir bezle silinamp cloth. Ensure it is completely dry before plugging in.
- Place the toaster on a stable, flat, heat-resistant surface, away from flammable materials.
- Ensure the crumb tray is properly inserted at the back of the toaster.
- For the first use, operate the toaster without bread on the highest shade setting (7) to burn off any manufacturing residues. A slight odor or smoke may be present; this is normal. Allow the toaster to cool completely.
5. Kullanım Talimatları
Follow these steps to toast bread and use the special functions:

Image 5.1: Bread slices inserted into the toaster's extra-wide slots.
5.1 Temel Kızartma Teknikleri
- Ekmek kızartma makinesini topraklı bir elektrik prizine takın.
- Place bread slices into the toasting slots. The self-centering racks will automatically adjust.
- Çevir Gölge Kontrol Kadranı to select your desired browning level (1 for lightest, 7 for darkest). The digital display will show the selected shade.
- Basın Toast/Cancel Button. The motorized lift will lower the bread into the slots, and the toasting cycle will begin. The digital display will show a countdown.
- Once the cycle is complete, the toaster will automatically raise the toasted bread.
- Kızartma döngüsünü istediğiniz zaman durdurmak için, Toast/Cancel Button. The bread will be raised.
5.2 Özel Fonksiyonlar
Your toaster includes dedicated buttons for specialized toasting needs:
- SICAK TUTUN: Press this button after a toasting cycle to keep toasted food warm for up to one minute. The toaster will gently lower and raise the bread after the warming period.
- simit: This function toasts the cut-side of a bagel while gently warming the outer surfaces. Insert bagels with the cut side facing inwards. Select your desired shade, then press the SİMİT ardından gelen düğme Toast/Cancel Button.
- BUZ ÇÖZME: Use this function to defrost and toast frozen food. Select your desired shade, then press the BUZ ÇÖZME ardından gelen düğme Toast/Cancel Button. The toaster will automatically adjust the toasting time.
- YENİDEN ISITMA: This function quickly reheats previously toasted food without further browning. Press the YENİDEN ISITMA ardından gelen düğme Toast/Cancel Button.
6. Temizlik ve Bakım
Düzenli temizlik, tost makinenizin optimum performansını sağlar ve ömrünü uzatır.
6.1 Kırıntı Tepsisi

Image 6.1: The removable crumb tray for easy cleaning.
- Temizlemeden önce mutlaka tost makinesinin fişini çekin ve tamamen soğumasını bekleyin.
- Pull out the removable crumb tray located at the back of the toaster.
- Discard crumbs. The crumb tray can be washed in the top rack of a dishwasher or by hand with warm, soapy water. Rinse thoroughly and dry completely before reinserting.
- Never operate the toaster without the crumb tray properly inserted.
6.2 Dış
- Tost makinesinin dışını bir bezle silinamp bezle silin ve iyice kurulayın.
- Yüzeyi çizebileceğinden aşındırıcı temizleyiciler veya ovma telleri kullanmayın.
- Ekmek kızartma makinesini asla suya veya başka bir sıvıya batırmayın.
7. Sorun Giderme
If you experience issues with your toaster, refer to the following table for common problems and solutions:
| Sorun | Olası Neden | Çözüm |
|---|---|---|
| Tost makinesi çalışmıyor. | Fişe takılı değil; güç çıkışıtage; devre kesici devre dışı kaldı. | Ekmek kızartma makinesinin çalışan bir prize güvenli bir şekilde takılı olduğundan emin olun. Evdeki devre kesiciyi kontrol edin. |
| Bread does not lower or raise. | Toaster not powered; Toast/Cancel button not pressed; food jammed. | Ensure power is on. Press Toast/Cancel button. Unplug toaster and carefully remove any jammed food. |
| Eşit olmayan kızartma. | Ekmeğin kalınlığının tutarsız olması; ekmek kırıntılarının birikmesi. | Ensure bread slices are of similar thickness. Clean crumb tray regularly. |
| Duman veya yanık kokusu. | Food jammed; crumb buildup; high shade setting. | Immediately press Cancel. Unplug and allow to cool. Remove jammed food or clean crumb tray. Reduce shade setting for next use. |
If the problem persists after attempting these solutions, please contact KitchenAid customer support.
8. Özellikler
| Özellik | Detay |
|---|---|
| Model Numarası | 5KMT223GER |
| Netage | 1100 Watt |
| Cilttage | 220 Volt |
| Slot Count | 2 |
| Gölge Ayarları | 7 |
| Özel Fonksiyonlar | Keep Warm, Bagel, Defrost, Reheat, Cancel |
| Malzeme | Metal |
| Ürün Boyutları (D x G x Y) | 25D x 34G x 25.5Y Santimetre |
| Ürün Ağırlığı | 2200 Gram |
| Dahil Bileşenler | Pop-up Toaster, Removable Crumb Tray |
9. Garanti ve Destek
Your KitchenAid 5KMT223GER 2-Slot Automatic Toaster is covered by a 2 yıllık sınırlı garanti Satın alma tarihinden itibaren geçerlidir. Bu garanti, normal ev kullanımında malzeme ve işçilik kusurlarını kapsar.
For warranty service, technical support, or to order replacement parts, please contact KitchenAid customer service. Keep your purchase receipt as proof of purchase for warranty claims.