
1. Önemli Güvenlik Önlemleri
Elektrikli aletleri kullanırken yangın, elektrik çarpması ve kişilerin yaralanma riskini azaltmak için her zaman aşağıdakiler de dahil olmak üzere temel güvenlik önlemlerine uyulmalıdır:
- Su ısıtıcısını çalıştırmadan önce tüm talimatları okuyun.
- Sıcak yüzeylere dokunmayın. Kulp veya düğmeleri kullanın.
- Yangın, elektrik çarpması ve kişisel yaralanmalara karşı korunmak için, kabloyu, fişleri veya su ısıtıcısının tabanını suya veya başka bir sıvıya batırmayın.
- Herhangi bir cihazın çocuklar tarafından veya çocukların yakınında kullanılması durumunda yakın gözetim gereklidir.
- Kullanılmadığında ve temizlemeden önce fişini prizden çekin. Parçaları takıp çıkarmadan ve cihazı temizlemeden önce soğumasını bekleyin.
- Hasarlı bir kablo veya fişle veya cihaz arızalandıktan ya da herhangi bir şekilde hasar gördükten sonra hiçbir cihazı çalıştırmayın. İnceleme, onarım veya ayar için müşteri hizmetleriyle iletişime geçin.
- Cihaz üreticisi tarafından önerilmeyen aksesuar bağlantılarının kullanılması yangına, elektrik çarpmasına veya kişilerin yaralanmasına neden olabilir.
- Açık havada kullanmayınız.
- Kablonun masa veya tezgah kenarından sarkmasına veya sıcak yüzeylere temas etmesine izin vermeyin.
- Sıcak gazlı veya elektrikli ocakların üzerine veya yakınına, ya da ısıtılmış fırına koymayın.
- Fişi her zaman önce cihaza takın, ardından kabloyu prize takın. Bağlantıyı kesmek için herhangi bir kontrolü "kapalı" konumuna getirin ve ardından fişi prizden çekin.
- Cihazı kullanım amacı dışında kullanmayınız.
- Bu cihaz şu şekilde çalışır: 120 Volt. Ensure your power supply matches this requirement to prevent damage or malfunction.
- Do not overfill the kettle. Fill only to the maximum fill line to prevent boiling water from overflowing.
2. Ürün Bittiview
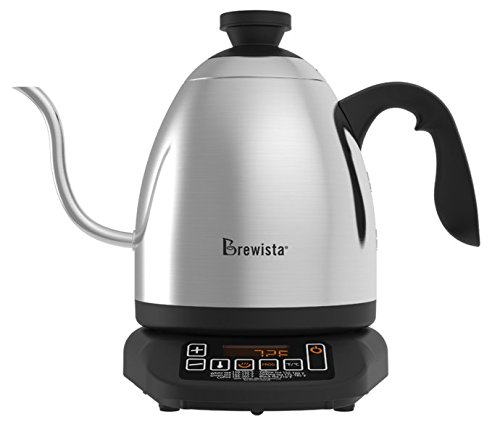
The Brewista SmartPour Variable Digital Kettle is designed for precise temperature control, ideal for brewing coffee and tea. It features a gooseneck spout for controlled pouring and a digital display for accurate temperature readings.

Şekil 2.1: Ön view of the Brewista SmartPour Variable Digital Kettle. This image shows the stainless steel kettle body, the gooseneck spout, the handle, and the digital control base.
2.1 Bileşenler
- Su Isıtıcısı Gövdesi: Stainless steel construction with a 1.2-liter capacity.
- Kazboynu şeklinde musluk: Designed for precise pouring control.
- Kapak: Removable lid with a handle.
- Halletmek: Rahat tutuş için ergonomik olarak tasarlanmıştır.
- Güç Tabanı: Contains the heating element and digital controls.
- Dijital gösterge: Shows current and target temperatures, and timer settings.
- Kontrol Düğmeleri: Power, Temperature Up/Down, Set Temperature, Keep Warm, Auto-Start.
Şekil 2.2: Close-up of the control panel on the Brewista SmartPour Kettle base. This image highlights the digital display and various control buttons for temperature adjustment and function selection.
3. Kurulum
3.1 İlk Temizlik
- Remove all packaging materials and labels from the kettle and base.
- Su ısıtıcısının dışını ve tabanını reklamla silinamp Kumaş.
- Wash the interior of the kettle and the lid with warm, soapy water. Rinse thoroughly.
- Fill the kettle with water to the maximum fill line and boil. Discard this water. Repeat this process two to three times to ensure the kettle is clean and free of manufacturing residues.
3.2 Yerleştirme
- Place the power base on a dry, flat, stable, and heat-resistant surface.
- Güç kablosunun sarkmadığından veya sıcak yüzeylerle temas etmediğinden emin olun.
- Güç kablosunu topraklı 120V AC elektrik prizine takın.
4. Kullanım Talimatları
4.1 Su Isıtıcısının Doldurulması
- Su ısıtıcısını güç tabanından çıkarın.
- Remove the lid and fill the kettle with fresh, cold water. Do not fill below the minimum or above the maximum fill lines. The capacity is 1.2 liters.
- Kapağı güvenli bir şekilde değiştirin.
- Su ısıtıcısını tekrar güç tabanına yerleştirin.
4.2 Cihazı Açma ve Sıcaklık Ayarı
- Basın GÜÇ button to turn on the kettle. The digital display will illuminate.
- To select a preset temperature, press the ISIYI AYARLA button repeatedly to cycle through common brewing temperatures (e.g., 175°F, 195°F, 205°F, 212°F).
- To set a custom temperature, use the + Ve - buttons to adjust the desired temperature in 1-degree increments.
- The kettle will automatically begin heating to the selected temperature. The display will show the current water temperature as it heats.
4.3 Sıcaklık Birimlerinin Değiştirilmesi (°F/°C)
Fahrenheit (°F) ve Celsius (°C) arasında geçiş yapmak için, düğmeye basılı tutun. + Ve - buttons simultaneously for a few seconds until the unit changes on the display.
4.4 Sıcak Tutma Fonksiyonu
- After setting your desired temperature, press the SICAK TUTUN düğme.
- The kettle will heat to the set temperature and then maintain that temperature for up to one hour.
- Sıcak Tutma özelliğini devre dışı bırakmak için, tuşuna basın. SICAK TUTUN button again or turn off the kettle.
4.5 Auto-Start Timer
The auto-start timer allows you to program the kettle to begin heating at a specific time.
- Ensure the kettle is filled with water and placed on the base.
- Set your desired target temperature using the ISIYI AYARLA or +/- düğmeler.
- Basılı tutun OTOMATİK BAŞLATMA Buton. Ekranda geçerli saat gösterilecektir.
- Kullanın + Ve - düğmelerine basarak istediğiniz başlangıç saatini ayarlayın.
- Basın OTOMATİK BAŞLATMA button again to confirm. The kettle will now display the current time and a small timer icon, indicating the auto-start is active.
- The kettle will begin heating at the programmed time.
Note: The auto-start timer can typically be set for up to 24 hours in advance.
5. Bakım ve Temizlik
Regular cleaning and maintenance will extend the life of your kettle.
5.1 Günlük Temizlik
- Su ısıtıcısını elektrik prizinden çıkarın ve temizlemeden önce tamamen soğumasını bekleyin.
- Su ısıtıcısının dış yüzeyini ve güç tabanını yumuşak bir bezle silin.amp bez. Aşındırıcı temizleyiciler veya ovma süngerleri kullanmayın.
- The kettle body and lid can be hand washed with warm, soapy water. Rinse thoroughly and dry completely before returning to the base.
- Güç tabanını, kabloyu veya fişi suya veya başka bir sıvıya batırmayın.
5.2 Kireç çözme
Mineral deposits (limescale) can build up inside the kettle over time, affecting performance. Descale your kettle regularly, depending on water hardness and frequency of use.
- Fill the kettle with a solution of equal parts white vinegar and water, or use a commercial descaling solution according to its instructions. Ensure the solution covers the mineral deposits.
- Allow the solution to soak for at least 30 minutes, or longer for heavy buildup. For stubborn deposits, you may heat the solution to just below boiling (do not boil vinegar).
- Su ısıtıcısını boşaltın ve bol su ile birkaç kez iyice durulayın.
- Boil a full kettle of fresh water and discard it to remove any residual descaling agent.
6. Sorun Giderme
| Sorun | Olası Neden | Çözüm |
|---|---|---|
| Su ısıtıcısı açılmıyor. | Not plugged in; power outlet not working; kettle not properly seated on base. | Ensure the power cord is securely plugged into a working 120V outlet. Check if the kettle is correctly placed on the power base. |
| Su ısınmıyor. | Kettle not powered on; temperature not set; insufficient water. | Press the POWER button. Set a desired temperature. Ensure water level is between MIN and MAX lines. |
| Sıcaklık gösterimi yanlış. | Mineral buildup on temperature sensor; internal sensor malfunction. | Descale the kettle thoroughly. If the problem persists, contact customer support. |
| Kettle leaks or rusts. | Overfilling; manufacturing defect; hard water corrosion. | Do not overfill past the MAX line. Regular descaling can prevent corrosion from hard water. If a defect is suspected, contact customer support. |
| Kettle is slow to heat. | Mineral buildup; low voltage. | Descale the kettle. Ensure the kettle is connected to a stable 120V power supply. |
| Auto-start timer does not activate. | Timer not set correctly; power interruption. | Review the auto-start timer setting process. Ensure continuous power supply. |
For issues not listed here, or if solutions do not resolve the problem, please contact Brewista customer support.
7. Özellikler
| Model Numarası | BKV12S02 |
| Marka | Brewista |
| Kapasite | 1.2 Litre |
| Malzeme | Paslanmaz çelik |
| Cilttage | 120 Volt |
| Özel Özellikler | Concealed Heating, Indicator Light, Variable Temperature Control, Gooseneck Spout, Keep Warm Function, Auto-Start Timer |
| Ürün Bakımı | Elde yıkayın, silin |
| Ürün Ağırlığı | 3 Pound (yaklaşık 1.36 kg) |
| Boyutlar (UxGxY) | 27.3 x 21.1 x 30.4 Santimetre |
| UPC | 735343350429, 645240812855 |
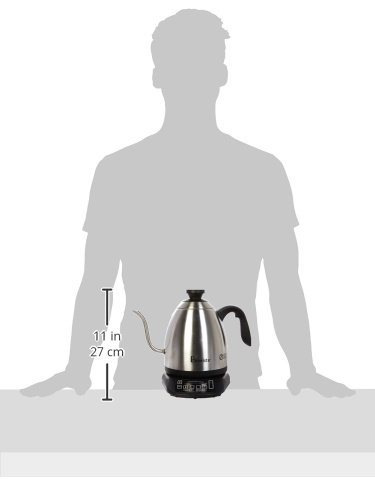
Şekil 7.1: Image illustrating the approximate size of the Brewista SmartPour Kettle in relation to a person, showing its compact countertop footprint.
8. Garanti ve Destek
For warranty information, product registration, or technical support, please refer to the official Brewista webSite üzerinden veya müşteri hizmetleri departmanıyla iletişime geçin. Garanti talepleriniz için satın alma belgenizi saklayın.
You may also find additional resources and product information by scanning the QR code provided on the product packaging or by visiting the link below: