1. Giriş
This manual provides detailed instructions for the installation, operation, maintenance, and troubleshooting of your Gateway SX2865 SFF Desktop Motherboard H61 (Model DB.U7411.001). This motherboard is designed for Small Form Factor (SFF) desktop systems, featuring the Intel H61 Express chipset and supporting LGA 1155/1156 CPUs and DDR3 RAM. Please read this manual thoroughly before proceeding with any installation or configuration to ensure proper functionality and safety.
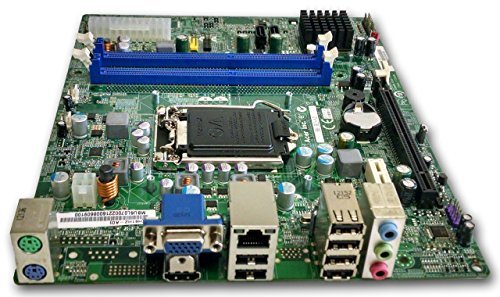
Şekil 1: Üzerindeview of the Gateway SX2865 SFF Desktop Motherboard H61. This image displays the main components and layout of the motherboard, including the CPU socket, RAM slots, and various connectors.
2. Güvenlik Bilgileri
Always observe the following safety precautions when handling and installing computer components:
- Herhangi bir parçayı takmadan veya çıkarmadan önce güç kablosunu duvardaki prizden çıkarın.
- Hassas bileşenlerin elektrostatik deşarj (ESD) hasarından korunması için antistatik bileklik takın.
- Hassas bileşenlere veya devrelere dokunmaktan kaçınmak için anakartı kenarlarından tutun.
- Aşırı ısınmayı önlemek için bilgisayar kasasının içinde uygun havalandırmanın olduğundan emin olun.
- Anakartı neme veya aşırı sıcaklıklara maruz bırakmayın.
- If you are unsure about any installation step, consult a qualified technician.
3. Kurulum ve Kurulum
Follow these steps to properly install the Gateway SX2865 SFF Desktop Motherboard into your system:
3.1. Şasinin Hazırlanması
- Open your computer chassis and ensure it is clean and free of dust.
- Install the I/O shield provided with your chassis or motherboard into the rear panel opening.
- Verify that the standoffs in the chassis align with the mounting holes on the motherboard. Adjust if necessary.
3.2. CPU Kurulumu
- Locate the CPU socket (LGA 1155/1156) on the motherboard.
- Yükleme kolunu yavaşça kaldırın ve CPU soket kapağını açın.
- İşlemciyi sokete dikkatlice yerleştirin, işlemci üzerindeki altın üçgeni soket üzerindeki üçgen işaretiyle eşleştirin. İşlemciyi sokete zorla sokmayın.
- Soket kapağını kapatın ve yük kolunu yerine kilitlenene kadar aşağı doğru bastırın.
- Apply a thin layer of thermal paste to the CPU surface (if not pre-applied on the cooler).
- Install the CPU cooler according to its manufacturer's instructions, ensuring it is securely fastened.
3.3. RAM Kurulumu
- Anakart üzerindeki DDR3 DIMM yuvalarını bulun.
- DIMM yuvasının her iki ucundaki klipsleri açın.
- RAM modülündeki çentiği DIMM yuvasındaki anahtarla hizalayın.
- RAM modülünün her iki ucuna klipsler yerine oturana kadar sıkıca bastırın.
3.4. Anakart Montajı
- Carefully place the motherboard into the chassis, aligning the mounting holes with the standoffs.
- Anakartı vidalarla sabitleyin, ancak çok fazla sıkmamaya dikkat edin.
3.5. Çevre Birimlerini ve Gücü Bağlama
- Güç kaynağınızdan gelen 24 pinli ATX güç konektörünü ve 4 pinli CPU güç konektörünü anakartınıza bağlayın.
- Depolama aygıtlarınızdan (HDD/SSD) gelen SATA veri kablolarını anakart üzerindeki SATA portlarına bağlayın.
- Connect front panel connectors (power button, reset button, USB, audio) to their respective headers on the motherboard. Refer to the motherboard's silkscreen labels for correct orientation.
- Genişletme kartlarını (örneğin, ekran kartı) uygun PCIe yuvalarına takın ve sabitleyin.
- Connect all necessary cables to your power supply.
4. Çalıştırma ve Yapılandırma
4.1. İlk Başlatma
- After all components are installed and connected, close the chassis.
- Monitörünüzü, klavyenizi ve farenizi bağlayın.
- Güç kablosunu güç kaynağına ve duvardaki prize bağlayın.
- Bilgisayarınızdaki güç düğmesine basın.
4.2. BIOS/UEFI Kurulumu
The BIOS (Basic Input/Output System) or UEFI (Unified Extensible Firmware Interface) is firmware that initializes hardware during the booting process. To enter the BIOS/UEFI setup utility:
- During the initial boot-up sequence, repeatedly press the designated key (commonly Del, F2, veya F10). The exact key may vary; check the on-screen prompts.
- Within the BIOS/UEFI, you can configure settings such as:
- Sistem Tarihi ve Saati
- Boot Order (to install an operating system from a USB drive or DVD)
- SATA Mode (AHCI, IDE)
- CPU and Memory settings (advanced users)
- Değişiklikleri kaydedin ve önyüklemeye devam etmek için BIOS/UEFI'den çıkın.
4.3. İşletim Sistemi ve Sürücü Kurulumu
After configuring the BIOS/UEFI, proceed with installing your preferred operating system (e.g., Windows, Linux). Once the OS is installed, install the necessary drivers for the motherboard's components (chipset, audio, LAN, etc.). These drivers are typically available on the manufacturer's website (Acer/Gateway) or can be found through the operating system's update features.
5. Bakım
Düzenli bakım, anakartınızın uzun ömürlü olmasını ve istikrarlı performans göstermesini sağlamaya yardımcı olur:
- Toz Giderimi: Periodically clean the inside of your computer case, including the motherboard, CPU cooler, and fan vents, using compressed air. Ensure the system is powered off and unplugged before cleaning.
- BIOS Güncellemeleri: Üreticinin kontrol edin website (Acer/Gateway) for BIOS/UEFI updates. Updates can improve stability, add support for new hardware, or fix bugs. Follow the update instructions carefully to avoid damaging the motherboard.
- Sürücü Güncellemeleri: Keep your system drivers updated to ensure optimal performance and compatibility.
- Fiziksel Muayene: Anakartı zaman zaman hasar belirtileri, gevşek bağlantılar veya şişmiş kondansatörler açısından kontrol edin.
6. Sorun Giderme
Anakartınızda sorunlarla karşılaşırsanız, aşağıdaki genel sorun giderme adımlarına bakın:
- Güç Yok:
- Ensure the power supply is connected correctly to the motherboard (24-pin ATX and 4-pin CPU).
- Check that the power supply switch is in the 'ON' position.
- Verify the power cord is securely plugged into both the power supply and the wall outlet.
- Confirm the front panel power button connector is correctly attached to the motherboard.
- Görüntü yok:
- Ensure the monitor is powered on and connected to the correct video output (either integrated graphics or a dedicated graphics card).
- RAM modüllerini yeniden takın. Sadece bir RAM modülü takılıyken önyükleme yapmayı deneyin.
- (Gerekirse) ekran kartını yeniden takın.
- Check if the CPU cooler is properly installed and the CPU power connector is secure.
- System Fails to Boot / POST Errors:
- Listen for beep codes from the motherboard's speaker (if installed). Consult the motherboard's documentation for beep code meanings.
- Clear the CMOS (Complementary Metal-Oxide-Semiconductor) by removing the CMOS battery for a few minutes or using the clear CMOS jumper (refer to motherboard layout).
- Ensure all essential components (CPU, RAM, GPU) are correctly installed.
- İşletim Sistemi Sorunları:
- Verify that all necessary drivers are installed and up to date.
- Check SATA cable connections for storage devices.
- Run diagnostic tools for hard drives/SSDs and RAM.
7. Özellikler
Key technical specifications for the Gateway SX2865 SFF Desktop Motherboard H61 (Model DB.U7411.001):
| Özellik | Detay |
|---|---|
| Marka | Geçit |
| Model Adı | SX2865 |
| Ürün Model Numarası | DB.U7411.001 |
| Üretici | Acer |
| Yonga Seti Türü | Intel H61 Ekspres |
| CPU Soketi | LGA 1155 or LGA 1156 |
| Uyumlu İşlemciler | Intel Xeon (and other compatible LGA 1155/1156 CPUs) |
| RAM Bellek Teknolojisi | DDR3 |
| Bellek Saat Hızı | 2133 MHz (Max supported, actual speed depends on CPU and RAM) |
| Bellek Depolama Kapasitesi | 16 GB (Maximum supported) |
| Uyumlu Cihazlar | Kişisel Bilgisayar |
| Platform | Linux (and other compatible operating systems) |
| Form Faktörü | uATX (Micro-ATX) |
8. Garanti ve Destek
For warranty information and technical support regarding your Gateway SX2865 SFF Desktop Motherboard H61 (Model DB.U7411.001), please refer to the documentation provided with your original system or contact the manufacturer directly.
- Üretici: Acer (as per product specifications)
- Marka: Geçit
- Resmi ziyaret edin Ağ Geçidi Desteği webalan or Acer Desteği webalan Sürücüler için, sıkça sorulan sorular ve iletişim bilgileri.
- Garanti talepleri için satın alma belgenizi saklayın.