
1. Giriş
Satın aldığınız için teşekkür ederizasing the Mastech MS8230B Digital Multimeter. This device is a compact, battery-operated, handheld digital multimeter designed for measuring DC and AC voltage, DC current, resistance, diode, and transistor (hFE) tests. It features a large LCD display for easy reading and is built to international safety standards.
Please read this instruction manual thoroughly before using the multimeter to ensure safe and proper operation. Keep this manual for future reference.
2. Güvenlik Bilgileri
This multimeter is designed according to IEC 1010-1 international safety standards for electronic measuring instruments. It complies with CAT III 600V and CAT II 1000V overvoltage categories. Always adhere to the following safety precautions:
- Never exceed the maximum input limits for any function.
- Do not use the meter if the case is damaged or open.
- Test uçlarının iyi durumda olduğundan ve izolasyonunda herhangi bir hasar olmadığından emin olun.
- Devre gücünü daima kapatın ve tüm yüksek voltajlı kabloları boşaltın.tage capacitors before measuring resistance, diodes, or hFE.
- vol ile çalışırken çok dikkatli oluntag60V DC veya 30V AC RMS'nin üzerindeki voltajlardan kaçının, çünkü bunlar elektrik çarpması tehlikesi oluşturur.
- Fonksiyonları veya aralıkları değiştirmeden önce test uçlarını devreden çıkarın.
- Doğru okumalar sağlamak için düşük pil göstergesi göründüğünde pili hemen değiştirin.
- Ölçüm cihazını patlayıcı gaz, buhar veya toz ortamlarında çalıştırmayın.
3. Paket İçeriği
Verify that all items listed below are present and undamaged:
- Mastech MS8230B Digital Multimeter
- Test Kabloları (bir çift)
- 9V Pil (önceden takılı veya ayrı olarak dahil)
- Kullanıcı Kılavuzu
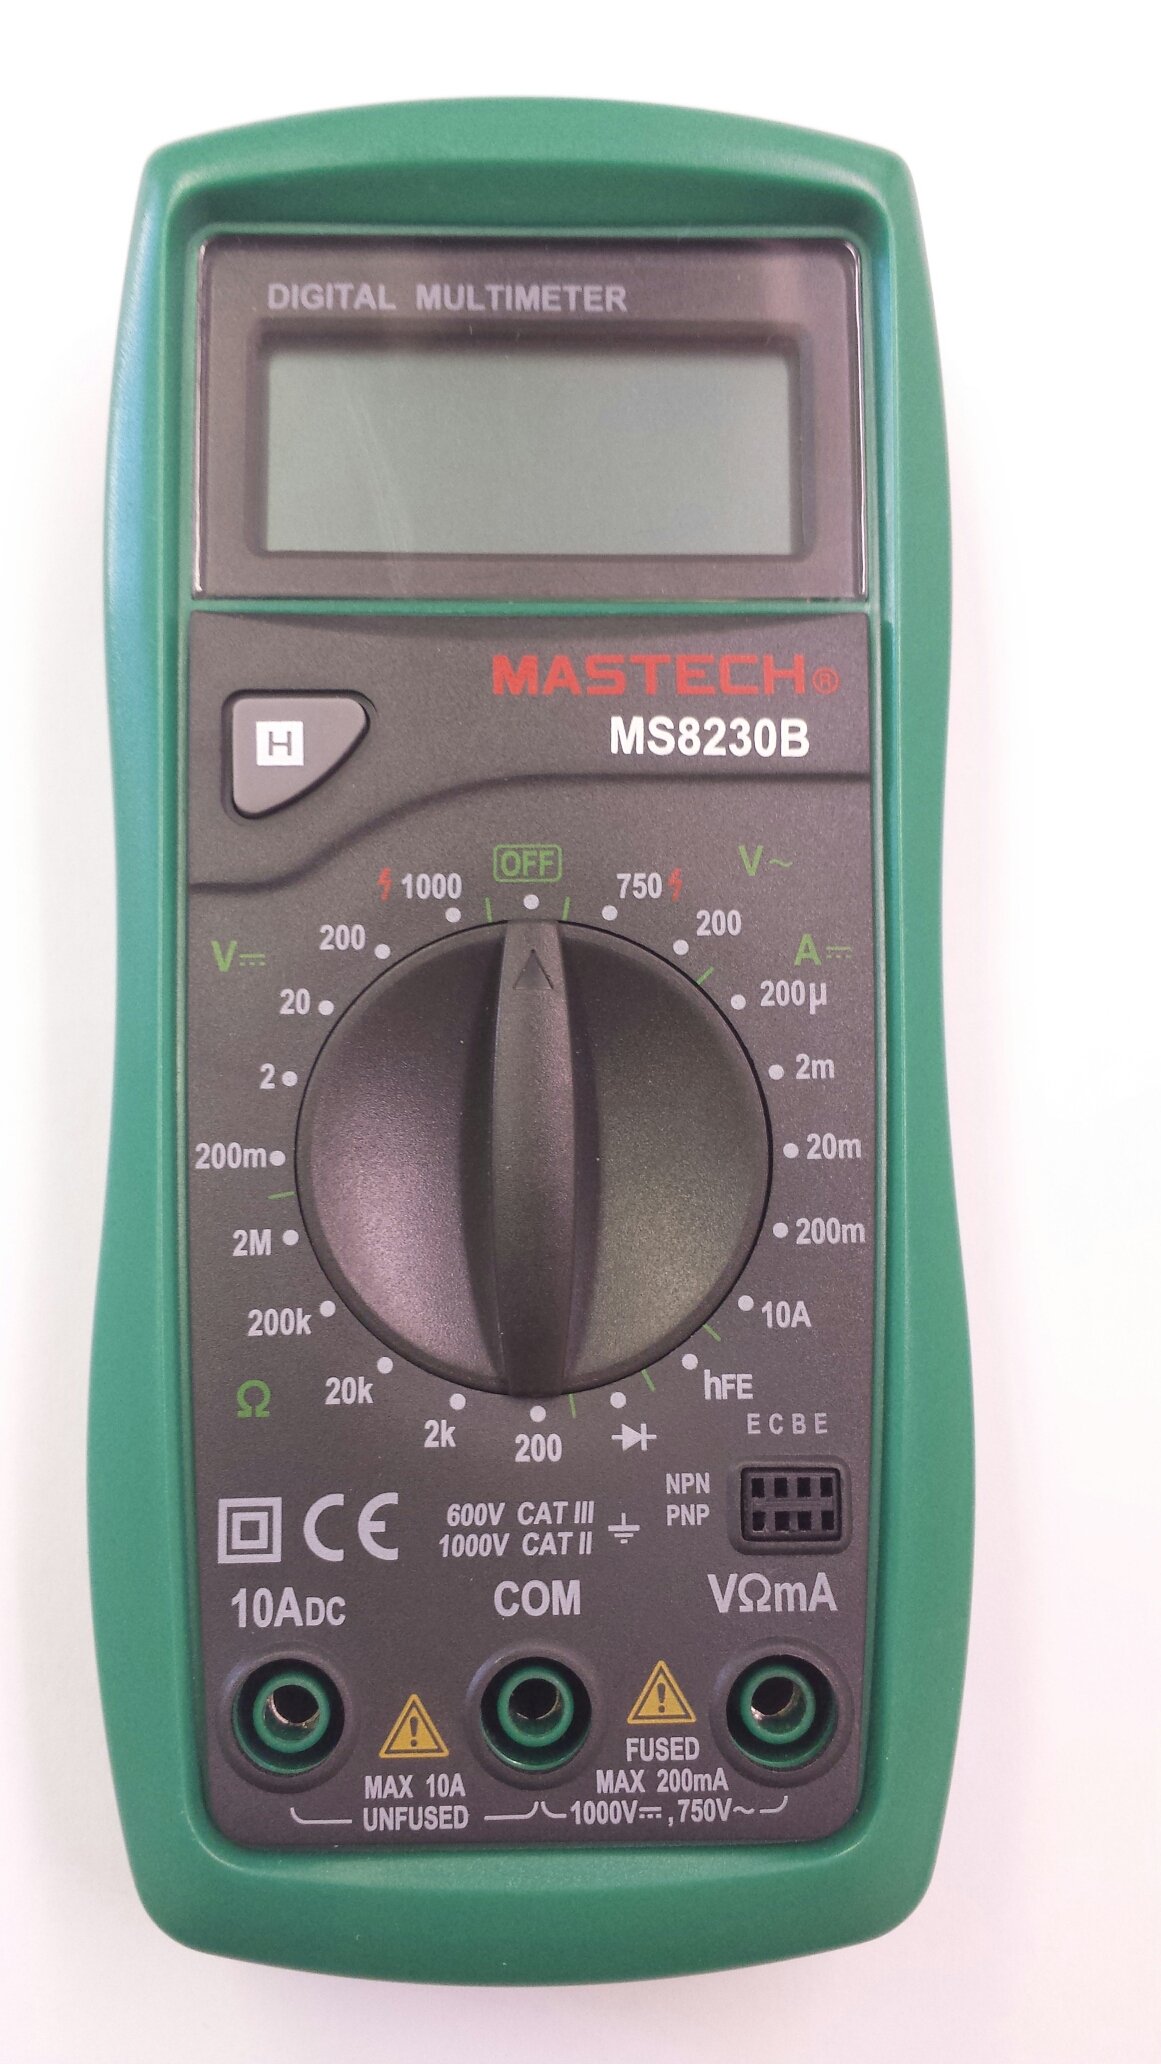
Image 1: Contents of the Mastech MS8230B package, including the multimeter, test leads, batteries, and user manual.
4. Kurulum
4.1 Pil Kurulumu
The MS8230B multimeter requires one 9V battery for operation. If the battery is not pre-installed or needs replacement:
- Multimetrenin KAPALI olduğundan emin olun ve tüm test uçlarını çıkarın.
- Ünitenin arkasındaki pil bölmesi kapağını bulun.
- Loosen the screw(s) on the battery cover and remove the cover.
- Connect the 9V battery to the battery connector, observing correct polarity.
- Pili bölmeye yerleştirin ve kapağı vida(lar)la sabitleyerek yerine takın.
4.2 Test Uçlarının Bağlanması
Always connect the test leads correctly for the desired measurement:
- Kırmızı test ucunu ses seviyesi için "VΩmA" girişine takın.tage, direnç ve düşük akım ölçümleri.
- Insert the red test lead into the "10ADC" jack for high DC current measurements (up to 10A).
- Always insert the black test lead into the "COM" (common) jack.
5. Kullanım Talimatları
Before taking any measurement, ensure the test leads are correctly connected and the function switch is set to the appropriate range.
5.1 DC Hacmitage Ölçümü (DCV)
- Kırmızı test kablosunu "VΩmA" jakına, siyah test kablosunu ise "COM" jakına bağlayın.
- Set the rotary switch to the desired DCV range (e.g., 200mV, 2V, 20V, 200V, 1000V). If the voltage değeri bilinmiyor, en yüksek aralıktan başlayıp gerektiği gibi azaltın.
- Test uçlarını ölçülecek bileşene veya devreye bağlayın.
- Cildi okutage value on the LCD display. Observe the polarity indication.
5.2 AC Hacmitage Ölçümü (ACV)
- Kırmızı test kablosunu "VΩmA" jakına, siyah test kablosunu ise "COM" jakına bağlayın.
- Set the rotary switch to the desired ACV range (e.g., 200V, 750V). Start with the highest range if the voltage bilinmiyor.
- Test uçlarını ölçülecek bileşene veya devreye bağlayın.
- Cildi okutagLCD ekranda e değeri.
5.3 DC Current Measurement (DCA)
Dikkat: Never attempt to measure current on a circuit with voltage present by connecting the meter in parallel. Always connect the meter in series with the load.
- Determine the expected current. For currents up to 200mA, connect the red lead to "VΩmA". For currents up to 10A, connect the red lead to "10ADC". The black lead always goes to "COM".
- Set the rotary switch to the appropriate DCA range (e.g., 200µA, 2mA, 20mA, 200mA, 10A).
- Turn off the power to the circuit. Open the circuit where the current is to be measured.
- Multimetreyi devreye seri olarak bağlayın.
- Devreye güç verin ve LCD ekranda akım değerini okuyun.
5.4 Direnç Ölçümü
Dikkat: Ensure the circuit under test is completely de-energized and all capacitors are discharged before measuring resistance.
- Kırmızı test kablosunu "VΩmA" jakına, siyah test kablosunu ise "COM" jakına bağlayın.
- Set the rotary switch to the desired Resistance (Ω) range (e.g., 200Ω, 2kΩ, 20kΩ, 200kΩ, 2MΩ).
- Ölçümü yapılacak bileşenin üzerine test uçlarını bağlayın.
- LCD ekranda direnç değerini okuyun.
5.5 Diyot Testi
Dikkat: Ensure the circuit under test is completely de-energized and all capacitors are discharged before performing a diode test.
- Kırmızı test kablosunu "VΩmA" jakına, siyah test kablosunu ise "COM" jakına bağlayın.
- Set the rotary switch to the Diode symbol (→|).
- Kırmızı test ucunu diyotun anot ucuna, siyah test ucunu ise diyotun katot ucuna bağlayın. Ekranda ileri-geri akım (Voltaj) gösterilecektir.tage düşüşü (silikon diyotlar için tipik olarak 0.5V ila 0.8V).
- Reverse the test leads. The display should show "OL" (Open Loop) for a good diode. A reading in both directions or "0" indicates a shorted diode.
5.6 Transistör hFE Testi
Dikkat: Ensure the transistor is not connected to a live circuit.
- Döner anahtarı "hFE" konumuna getirin.
- Transistörün NPN mi yoksa PNP mi olduğunu belirleyin.
- Insert the transistor's emitter, base, and collector leads into the corresponding holes in the hFE socket on the multimeter.
- LCD ekranda hFE (DC akım kazancı) değerini okuyun.
5.7 Veri Tutma Fonksiyonu
Press the "H" button to hold the current reading on the display. Press it again to release the hold function and resume live readings.
6. Bakım
6.1 Temizlik
Davayı reklamla silinamp Bez ve hafif deterjan kullanın. Aşındırıcı veya çözücü maddeler kullanmayın. Krikoları toz ve kirden uzak tutun.
6.2 Pil Değişimi
When the battery symbol appears on the LCD, the 9V battery needs to be replaced. Refer to section 4.1 for battery installation instructions.
6.3 Sigorta Değişimi
The multimeter is protected by a fuse. If the current measurement function stops working, the fuse may need replacement. This should only be performed by qualified personnel. The fuse specifications are typically printed near the fuse holder or in the specifications section.
7. Sorun Giderme
If the multimeter does not function correctly, check the following:
- Ekranda görüntü yok veya çok silik görüntü var: Pili kontrol edin. Gerekirse değiştirin.
- Yanlış okumalar: Ensure the test leads are properly connected, the function switch is on the correct range, and the battery is not low.
- "OL" (Aşırı Yük) mesajı görüntülendi: Ölçülen değer seçilen aralığı aşıyor. Daha yüksek bir aralığa geçin.
- Akım ölçümü çalışmıyor: Sigortayı kontrol edin.
Sorun devam ederse, müşteri desteği ile iletişime geçin.
8. Özellikler
The Mastech MS8230B Digital Multimeter offers the following technical specifications:

Image 2: Detailed specifications for the Mastech MS8230B Multimeter, including display, range, and accuracy.
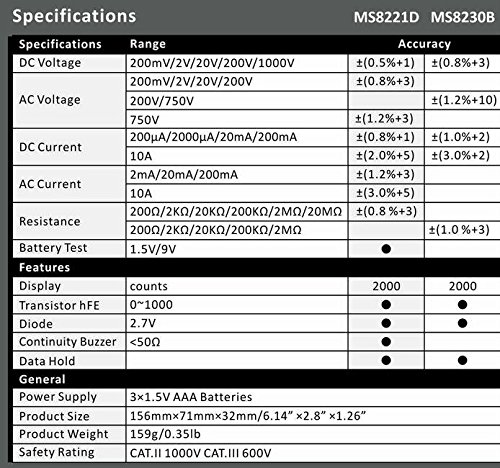
Image 3: Comparison table of specifications for Mastech MS8230B and MS8221D multimeters.
| Şartname | Değer |
|---|---|
| Görüntülemek | 1999 counts, 15mm digit height |
| DC Hacmitage (DCV) | 200mV, 2V, 20V, 200V, 1000V (Accuracy: 0.5% to 0.8%) |
| AC Hacmitage (ACV) | 200V, 750V (Accuracy: 1.2%) |
| DC Akımı (DCA) | 200µA, 2mA, 20mA, 200mA, 10A (Accuracy: 1.0% to 2.0%) |
| Direnç (Ω) | 200Ω, 2kΩ, 20kΩ, 200kΩ, 2MΩ (Accuracy: 0.8% to 1.0%) |
| Diyot Testi | ileri sestage damla |
| Transistör hFE Testi | 1 ila 1000 |
| Veri Tutma | Evet |
| Düşük Pil Göstergesi | Evet |
| Aşırı Yük Koruması | Evet |
| Güç Kaynağı | 1 adet 9V pil |
| Boyutlar (U x G x Y) | 15.2 x 7.6 x 2.5 cm (yaklaşık 6 x 3 x 1 inç) |
| Ağırlık | Yaklaşık. 158.76 gr (5.6 ons) |
| Güvenlik Derecelendirmesi | IEC 1010-1 CAT III 600V, CAT II 1000V |
| Çalışma Sıcaklığı | 0°C ila 40°C (32°F ila 104°F) |
| Depolama Sıcaklığı | -10°C ila 50°C (14°F ila 122°F) |
9. Garanti ve Destek
Mastech products are designed for reliability and performance. For specific warranty details, please refer to the warranty card included with your product or contact your local Mastech distributor.
For technical support or service inquiries, please contact Mastech customer service through their official websatın alma belgelerinizle birlikte verilen site veya iletişim bilgileri.


