
giriiş
Thank you for choosing the Magnasonic EAAC470 Alarm Clock Radio. This manual provides essential instructions for setting up, operating, and maintaining your device. Please read it thoroughly to ensure proper use and to maximize the features of your alarm clock radio.
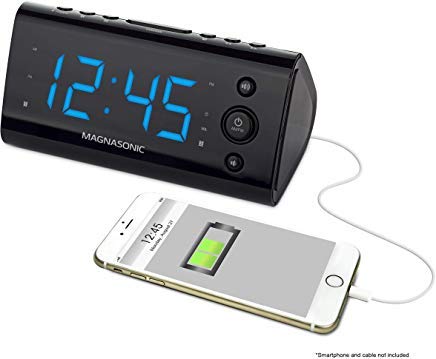
Şekil 1: Ön view of the Magnasonic EAAC470 Alarm Clock Radio.
Paket İçeriği
- Magnasonic EAAC470 Alarm Clock Radio
- Güç Adaptörü
- Kullanım Kılavuzu (bu belge)
- CR2032 Lithium Battery (for backup)
Kurmak
1. Güç Bağlantısı
- Connect the power adapter to the DC input jack on the back of the alarm clock.
- Plug the power adapter into a standard wall outlet. The display will illuminate.
2. Pil Yedekleme Kurulumu
The EAAC470 includes a CR2032 lithium battery for backup power. This ensures that time and alarm settings are maintained during a power outage, and the alarm will still sound.
- Cihazın alt kısmında bulunan pil bölmesini bulun.
- Pil bölmesinin kapağını açın.
- Insert one CR2032 lithium battery, observing the correct polarity (+/-).
- Pil bölmesi kapağını sıkıca kapatın.
3. Automatic Time Setting (SelfSet Technology)
The alarm clock is equipped with SelfSet technology, which automatically displays the correct time upon initial power-up. You only need to set your time zone.
- Upon first power-up, the clock will display a default time.
- Basın SAAT DİLİMİ button (location may vary, refer to device buttons).
- Kullanın SAAT or DAKİKA buttons to select your correct time zone.
- The clock will automatically adjust to the correct time for your selected zone.
- Not: If the time is incorrect after setting the time zone, manual adjustment may be required.
4. Manual Time and Date Adjustment
If the automatic time setting is inaccurate or if you need to adjust the time manually:
- Basılı tutun SAAT AYARI Ekran yanıp sönene kadar düğmeye basın.
- Kullanın SAAT Ve DAKİKA Geçerli saati ayarlamak için düğmelere basın.
- Basmak SAAT AYARI Saati onaylamak için tekrar basın.
- Follow similar steps to adjust the year, month, and day if necessary, using the appropriate buttons.
5. FM Antenna Setup
For optimal FM radio reception, fully extend the wire antenna located on the back of the unit. Position it for the best signal.
Kullanım Talimatları
1. Alarmların Ayarlanması (Alarm 1 ve Alarm 2)
The EAAC470 features dual alarms that can be set independently.
- Herhangi birini basılı tutun ALARM 1 or ALARM 2 Alarm saati yanıp sönene kadar düğmeye basın.
- Kullanın SAAT Ve DAKİKA İstediğiniz alarm saatini ayarlamak için butonlara basın.
- İlgili düğmeye basın. ALARM button again to select the alarm source (Buzzer or Radio).
- Basın ALARM button a third time to select the alarm schedule (Every Day, Weekdays, Weekends).
- Basın ALARM button a fourth time to confirm and activate the alarm. An alarm indicator will appear on the display.
- To disable an alarm, repeatedly press its ALARM button until the alarm indicator disappears.
2. Radyo Kullanımı (AM/FM)
The clock radio includes a digital AM/FM tuner with station presets.
- Basın RADYO AÇIK/KAPALI radyoyu açmak için düğmesine basın.
- Basın Sabah/FM button to switch between bands.
- Kullanın AYAR +/- İstasyona manuel olarak geçmek için düğmeler veya bir sonraki müsait istasyonu otomatik olarak taramak için basılı tutma özelliği.
- Ön ayarı kaydetmek için:
- İstediğiniz istasyonu ayarlayın.
- Basılı tutun ÖN AYAR Önceden ayarlanmış sayı yanıp sönene kadar düğmeye basın.
- Kullanın ÖN AYAR +/- Önceden belirlenmiş bir sayıyı (1-20) seçmek için düğmeler.
- Basmak ÖN AYAR İstasyonu kurtarmak için tekrar.
- Önceden ayarlanmış bir ayarı geri çağırmak için: Kısa bir süre basılı tutun. ÖN AYAR düğme ve kullanım ÖN AYAR +/- Kaydedilmiş istasyonlar arasında geçiş yapmak için.
- Kullanarak ses seviyesini ayarlayın. HACİM +/- düğmeler.
Note on Radio Quality: The built-in speaker is designed for alarm clock functionality. Sound quality may not match dedicated audio systems. AM reception can be directional; adjust the unit's position for better clarity.
3. USB Şarj Bağlantı Noktası
A convenient USB charging port is located on the front of the unit.

Şekil 2: Ön view highlighting the USB charging port.
Plug your smartphone, tablet, or other USB-powered device into this port to charge. This port provides power for charging and does not transfer data.
4. Display Dimming Options
The 1.2" LED display offers four brightness settings (High, Medium, Low, Off).

Figure 3: Close-up of the LED display.
Basın DİMMER button (often integrated with the SNOOZE button) repeatedly to cycle through the brightness levels: High → Medium → Low → Off.
Note on Brightness: Even the lowest setting may appear bright in a completely dark room. The "Off" setting allows for a completely dark display if preferred.
5. Snooze and Sleep Functions
- Uyuklama: Alarm çaldığında, tuşuna basın. UYUKLAMA Alarmı belirli bir süre (örneğin, 9 dakika) için geçici olarak susturmak için bu düğmeyi kullanın. Alarm, erteleme süresi sona erdikten sonra tekrar çalacaktır.
- Uyku Zamanlayıcısı: Radyo çalarken, tuşuna basın. UYUMAK button repeatedly to set a sleep timer (e.g., 90, 60, 30, 15 minutes). The radio will play for the selected duration and then automatically turn off.
6. Sıcaklık Göstergesi
The unit can display the indoor temperature. Press the SICAKLIK button (or a multi-function button) to cycle between time and temperature display.
Bakım
Temizlik
- Temizlemeden önce güç adaptörünün bağlantısını kesin.
- Ünitenin dış yüzeyini silmek için yumuşak, kuru bir bez kullanın.
- Cilaya zarar verebileceğinden aşındırıcı temizleyiciler, cilalar veya çözücüler kullanmayın.
- Herhangi bir açıklıktan içeriye nem girmesini önleyin.
Pil Değişimi
The CR2032 backup battery typically lasts for several years. If the time or settings are lost during a power outage, it may be time to replace the battery.
- Güç adaptörünü çıkarın.
- Ünitenin altındaki pil bölmesini açın.
- Eski CR2032 pili çıkarın.
- Yeni bir CR2032 lityum pili, doğru kutuplara dikkat ederek takın.
- Pil bölmesini kapatın.
- Reconnect power. You may need to reset the time zone and any manual time adjustments.
Sorun giderme
| Sorun | Olası Neden / Çözüm |
|---|---|
| Clock display is blank or not working. |
|
| Alarm çalmıyor. |
|
| Radio reception is poor or static. |
|
| USB şarjı çalışmıyor. |
|
| Time is incorrect after power-up. |
|
| Display is too bright even on the lowest setting. |
|
Özellikler
| Özellik | Detay |
|---|---|
| Marka | Manyetik ses |
| Model Numarası | EAAC470 |
| Görüntü Türü | Dijital LED (1.2") |
| Ekran Karartma | 4 Options (High, Medium, Low, Off) |
| Güç Kaynağı | AC Güç Adaptörü |
| Pil Yedekleme | 1 adet CR2032 Lityum Pil (dahil) |
| Bağlantı | USB (for charging only) |
| Radyo Tuner | Digital AM/FM (20 programmable stations) |
| Alarmlar | Dual Alarm with selectable source (Buzzer/Radio) and schedule |
| Özel Özellikler | Auto Time Set (SelfSet), Indoor Temperature Display |
| Ürün Boyutları | 6 x 3.1 x 3 inç |
| Ürün Ağırlığı | 12 ons (0.75 Pound) |
| Malzeme | Akrilonitril Bütadien Stiren |
Garanti Bilgileri
The Magnasonic EAAC470 Alarm Clock Radio is covered by a 1 Year Manufacturer's Direct Warranty. This warranty covers defects in materials and workmanship under normal use. Please retain your proof of purchase for warranty claims. For specific terms and conditions, refer to the warranty card included with your product or visit the Magnasonic official webalan.
Destek
For further assistance, technical support, or warranty inquiries, please contact Magnasonic customer service. Contact information can typically be found on the manufacturer's websitede veya ürün ambalajında yer almamaktadır.
Webalan: www.magnasonic.com (Not: Bu bir yer tutucudur URL, please refer to official product documentation for the correct support webalan.)