
1. Ürün Bittiview
The HP ProDisplay P17A is a 17-inch LED-backlit LCD monitor designed for general computing tasks. It features a 5:4 aspect ratio with a maximum resolution of 1280 x 1024 pixels, providing clear and consistent visuals. This monitor is equipped with both VGA and HDMI connectivity options, offering versatility for various system configurations. Its compact design and energy-efficient LED backlighting make it suitable for a range of environments.

Şekil 1: Ön view of the HP ProDisplay P17A monitor, showcasing, teşhir standı ve standı.
2. Kurulum Talimatları
2.1 Monitörün Paketini Açma
Tüm bileşenleri ambalajından dikkatlice çıkarın. Aşağıdaki öğelerin mevcut olduğundan emin olun:
- HP ProDisplay P17A Monitor
- Monitor Stand (base and neck)
- Güç kablosu
- VGA Cable (may vary by region/package)
- HDMI Kablosu (bölgeye/pakete göre değişiklik gösterebilir)
2.2 Standın Montajı
- Çizilmeleri önlemek için monitörü yumuşak ve temiz bir yüzeye yüzü aşağı bakacak şekilde yerleştirin.
- Attach the stand neck to the back of the monitor, aligning the tabs and pushing until it clicks into place.
- Attach the stand base to the bottom of the stand neck, securing it with the captive screw if present.
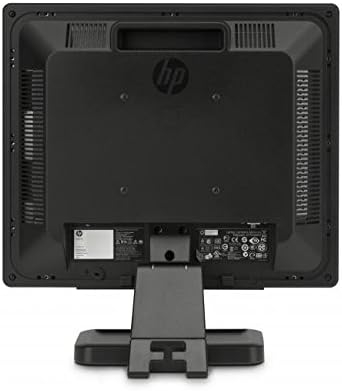
Şekil 2: Arka view of the monitor, illustrating the stand attachment point and various connectivity ports.
2.3 Bağlantı Kabloları
- Güç Bağlantısı: Güç kablosunu monitörün güç girişine ve ardından topraklı bir elektrik prizine bağlayın.
- Video Bağlantısı:
- For VGA: Connect one end of the VGA cable to the VGA port on the monitor and the other end to the VGA port on your computer. Tighten the screws on the VGA connector.
- For HDMI: Connect one end of the HDMI cable to the HDMI port on the monitor and the other end to the HDMI port on your computer.
- Tüm bağlantıların güvenli olduğundan emin olun.
3. Kullanım Talimatları
3.1 Açma/Kapatma
Monitörü açmak veya kapatmak için monitörün ön çerçevesinde bulunan güç düğmesine basın. Monitör açık olduğunda güç gösterge ışığı yanacaktır.
3.2 Adjusting Display Settings (OSD Menu)
The On-Screen Display (OSD) menu allows you to adjust various monitor settings. Use the buttons on the front bezel to navigate and select options.
- Menü Düğmesi: OSD menüsünü açar.
- Yön tuşları (+ / - or Up/Down): Move through menu options and adjust values.
- Seç/Tamam Düğmesi: Bir seçimi onaylar veya bir alt menüye girer.
- Çıkış Düğmesi: Mevcut menüden veya OSD'den çıkar.
Sık kullanılan ayarlanabilir ayarlar şunlardır:
- Parlaklık/Kontrast: Genel parlaklığı ve aydınlık-karanlık alanlar arasındaki farkı ayarlar.
- Renk Kontrolü: Allows adjustment of color temperature, RGB levels, or preset color modes.
- Giriş Seçimi: Manually switches between VGA and HDMI input sources.
- Görüntü Kontrolü: Adjusts sharpness, aspect ratio, and auto-adjustment for analog signals.
- Yönetmek: Power-saving options, OSD timeout, language selection.
4. Bakım
4.1 Monitörün Temizlenmesi
- Temizlemeden önce daima monitörü kapatın ve güç kablosunu çıkarın.
- Hafifçe yumuşak, tüy bırakmayan bir bez kullanın.ampSu veya aşındırıcı olmayan bir ekran temizleyicisi ile temizleyin.
- Do not spray cleaner directly onto the screen or monitor casing.
- Avoid using benzene, thinner, ammonia-based cleaners, or abrasive materials, as these can damage the surface.
4.2 Genel Bakım
- Monitörü doğrudan güneş ışığına veya ısı kaynaklarının yakınına yerleştirmekten kaçının.
- Monitörün etrafında yeterli havalandırma olduğundan emin olun.
- Havalandırma açıklıklarını kapatmayın.
- Ekranı keskin cisimlerden veya aşırı basınçtan koruyun.
5. Sorun Giderme
Destek ekibiyle iletişime geçmeden önce, aşağıdaki temel sorun giderme adımlarını deneyin:
5.1 Ekranda Görüntü Yok
- Ensure the monitor's power cable is securely connected to both the monitor and a working electrical outlet.
- Verify the power indicator light on the monitor is on. If not, press the power button.
- Check that the video cable (VGA or HDMI) is securely connected to both the monitor and the computer.
- Ensure the correct input source is selected on the monitor (use the OSD menu to switch inputs).
- Bilgisayarınızı yeniden başlatın.
5.2 Düşük Görüntü Kalitesi
- Fuzzy or Blurry Image: Bilgisayarınızdaki ekran çözünürlüğünün monitörün doğal çözünürlüğüne (1280 x 1024) ayarlandığından emin olun.
- Yanlış Renkler: Adjust color settings through the OSD menu or your computer's display settings.
- Image Off-Center/Incorrect Size (VGA only): Use the "Auto Adjust" function in the OSD menu.
- Titreyen: Check the refresh rate setting on your computer; ensure it is set to 60 Hz.
5.3 Monitor Not Responding to Buttons
- Unplug the monitor's power cable, wait 10 seconds, then plug it back in and try again.
- Hiçbir tuşun takılı kalmadığından emin olun.
6. Teknik Özellikler
| Özellik | Şartname |
|---|---|
| Marka | HEWLETT PACKARD |
| Model Adı | HP P17A |
| Model Numarası | F4M97AAABA |
| Ekran Boyutu | 17 inç |
| Görüntü Türü | LED Arkadan Aydınlatmalı LCD |
| Yerel Çözünürlük | 1280x1024 (SXGA) |
| En Boy Oranı | 5:4 |
| Kontrast Oranı | 1000:1 |
| Yenileme Hızı | 60 Hz |
| Tepki Süresi | 5 Milisaniye |
| ViewAçı | 170 Derece |
| Bağlantı | 1x VGA, 1x HDMI |
| Güç Tüketimi | 25 Watt (Maksimum) |
| Ürün Boyutları (D x G x Y) | 8.12"D x 14.85"G x 15.24"Y |
| Ürün Ağırlığı | 8.2 Pound |
| Montaj Tipi | Wall Mount (VESA compatible) |
| Ek Özellikler | Anti Glare Screen |

Figure 3: Dimensions of the HP ProDisplay P17A monitor.
7. Garanti ve Destek
7.1 Garanti Bilgileri
This product is often sold as a refurbished item. Refurbished products typically come with a limited warranty provided by the refurbisher or seller. Please refer to your purchase documentation for specific warranty terms and conditions, including duration and coverage details.
7.2 Teknik Destek
For technical assistance, troubleshooting beyond this manual, or warranty claims, please contact the vendor or HP customer support. Have your monitor's model number (F4M97AAABA) and serial number ready when contacting support.
You can find additional support resources, drivers, and documentation on the official HP support webalan.


