
1. Giriş
This manual provides detailed instructions for the installation, operation, and maintenance of the Supermicro MBD-X10SLH-F-O uATX Server Motherboard. Please read this manual thoroughly before beginning installation to ensure proper setup and to maximize the performance and longevity of your system. This motherboard is designed for server applications, supporting Intel LGA1150 processors and DDR3 memory.
2. Ürün Bittiview
The Supermicro MBD-X10SLH-F-O is a high-performance uATX server motherboard featuring the Intel C226 chipset. It is engineered for reliability and efficiency in server environments.
Temel Özellikler:
- CPU Soketi: LGA1150, supporting Intel Xeon E3-1200 v3/v4 series, 4th/5th Gen Core i3, Pentium, Celeron processors.
- Hafıza: 4x 204-pin DDR3-1600 SODIMM slots, supporting up to 32GB ECC/non-ECC Unbuffered memory.
- Genişleme Yuvaları: 1x PCI-Express 3.0 x16, 1x PCI-Express 2.0 x8, 1x PCI-Express 2.0 x4.
- Depolamak: 6x SATA3 (6Gbps) ports.
- Bağlantı: Dual Gigabit Ethernet LAN ports (2x RJ45) and 1x Dedicated IPMI LAN port (RJ45).
- USB Bağlantı Noktaları: 4x USB 3.0 ports, 6x USB 2.0 ports.
- Video Çıkışı: 1x VGA port.
- Form Faktörü: uATX (9.6" x 9.6").
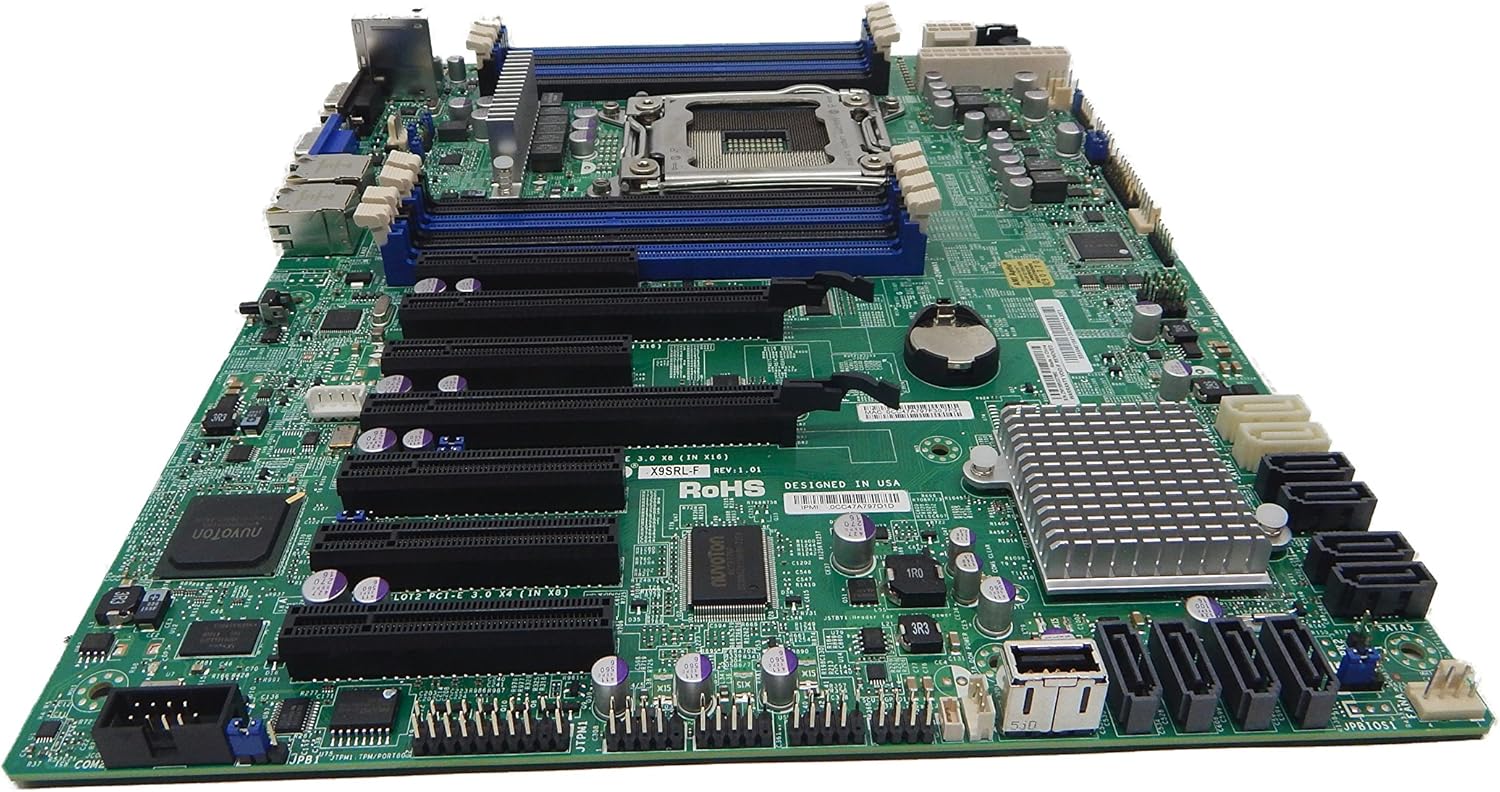
Şekil 2.1: Yukarıdan aşağıya view of the Supermicro MBD-X10SLH-F-O motherboard, showing the CPU socket, RAM slots, and various expansion slots.

Şekil 2.2: Açılı view of the motherboard, highlighting the LGA1150 CPU socket and the four DDR3 SODIMM memory slots.

Şekil 2.3: Arka view of the Supermicro MBD-X10SLH-F-O motherboard, displaying the I/O panel with USB, VGA, LAN, and IPMI ports.

Şekil 2.4: Kapatmak view of the motherboard, showing the six SATA3 ports and other onboard connectors.
3. Özellikler
| Özellik | Şartname |
|---|---|
| Marka | Süpermikro |
| Model Adı | MBD-X10SLH-F-O |
| CPU Soketi | LGA1150 |
| Yonga Seti Türü | Intel C226 |
| Uyumlu İşlemciler | Intel Core i3-4xxx, i5-4xxx, i7-4xxx, i3-5xxx, i5-5xxx, i7-5xxx, Intel Xeon E3-1200 v3/v4 series |
| RAM Bellek Teknolojisi | DDR3 |
| Bellek Hızı | 1600 MHz |
| Desteklenen Maksimum RAM | 32 GB |
| USB 2.0 Port Sayısı | 6 |
| USB 3.0 Port Sayısı | 4 |
| SATA Bağlantı Noktaları | 6x SATA3 (6Gbps) |
| Genişleme Yuvaları | 1x PCIe 3.0 x16, 1x PCIe 2.0 x8, 1x PCIe 2.0 x4 |
| Form Faktörü | uATX |
| Boyutlar (UxGxY) | 14 x 11 x 3.5 inç |
| Ürün Ağırlığı | 3.52 ons |
4. Kurulum
Before beginning installation, ensure your system is powered off and disconnected from the power source. Always handle the motherboard by its edges to avoid static discharge.
4.1. CPU Kurulumu
- İşlemci soketinin kolunu yavaşça kaldırın.
- İşlemciyi soketle hizalayın ve işlemci üzerindeki altın üçgenin soket üzerindeki üçgenle aynı hizada olduğundan emin olun.
- CPU'yu zorlamadan dikkatlice sokete yerleştirin.
- Lower the socket lever and secure it.
- Termal macunu uygulayın ve CPU soğutucusunu üreticinin talimatlarına göre takın.
4.2. Bellek Kurulumu
- DIMM yuvasının her iki ucundaki klipsleri açın.
- Bellek modülünün çentiğini DIMM yuvasındaki çıkıntıyla hizalayın.
- Klipsler yerine oturana kadar bellek modülünün her iki ucuna sıkıca bastırın.
4.3. Genişletme Kartı Kurulumu
- Remove the corresponding slot cover from your chassis.
- Genişletme kartını istediğiniz PCIe yuvasıyla hizalayın.
- Press down firmly until the card is fully seated.
- Kartı bir vida veya sabitleme klipsi ile sabitleyin.
4.4. Depolama Aygıtı Bağlantısı
- SATA veri kablosunun bir ucunu anakart üzerindeki bir SATA portuna bağlayın.
- SATA veri kablosunun diğer ucunu depolama aygıtınıza (HDD/SSD) bağlayın.
- Güç kaynağınızdan depolama aygıtınıza bir SATA güç kablosu bağlayın.
4.5. Güç Bağlantıları
- Güç kaynağınızdan gelen 24-pin ATX ana güç konektörünü anakartınıza bağlayın.
- 8 pinli (veya 4 pinli) ATX 12V CPU güç konektörünü anakarta bağlayın.
4.6. Ön Panel Bağlantıları
Connect the front panel headers (Power LED, HDD LED, Power Switch, Reset Switch, USB, Audio) to the corresponding pins on the motherboard. Refer to the motherboard's silkscreen labels for correct pin orientation.
5. Kullanım Talimatları
5.1. İlk Başlatma
- After all components are installed and connected, connect the power cord to your power supply and turn on the power switch.
- Kasanın üzerindeki güç düğmesine basın.
- Sistem açılmalı ve monitörünüzde bir görüntü görmelisiniz.
5.2. BIOS/UEFI Erişimi
To enter the BIOS/UEFI setup utility, press the designated key (commonly SİL or F2) during the initial boot sequence. The exact key may vary; observe the on-screen prompts.
5.3. IPMI Uzaktan Yönetimi
This motherboard features a dedicated IPMI LAN port for remote management. To access the IPMI interface, connect the IPMI LAN port to your network. Obtain the IP address assigned to the IPMI interface (either from BIOS or a network scan) and access it via a web browser from another computer on the same network. Java may be required for remote console functionality.
6. Bakım
Düzenli bakım, anakartınızın ve sisteminizin kararlılığını ve uzun ömrünü sağlamaya yardımcı olur.
- Toz Giderimi: Anakart ve bileşenlerin tozunu basınçlı hava kullanarak düzenli olarak temizleyin. Temizlemeden önce sistemin kapalı ve fişinin çekilmiş olduğundan emin olun.
- Kablo yönetimi: Ensure all cables are neatly routed and secured to prevent obstruction of airflow and accidental disconnections.
- BIOS/Yazılım Güncellemeleri: Supermicro'yu kontrol edin website for the latest BIOS and IPMI firmware updates. Follow the provided instructions carefully. Note that IPMI BIOS upgrades may require a separate license. Always update BIOS before IPMI firmware.
- Bileşen Kontrolleri: Occasionally inspect all connections (power, data, expansion cards) to ensure they are securely seated.
7. Sorun Giderme
Bu bölümde karşılaşabileceğiniz yaygın sorunlar ele alınmaktadır.
7.1. Sistem Başlatılamıyor
- Güç Bağlantılarını Kontrol Edin: Ensure the 24-pin ATX and 8-pin CPU power connectors are securely attached.
- Yeniden Yerleştirme Bileşenleri: Remove and re-install the CPU, memory modules, and any expansion cards to ensure they are properly seated.
- CMOS'u temizle: Refer to your motherboard's detailed manual for instructions on how to clear the CMOS, which can resolve boot issues caused by incorrect BIOS settings.
- Minimum Yapılandırma: Try booting with only essential components (CPU, one RAM stick, power supply, and display) to isolate the problem.
7.2. Fan Speed Issues
Some low RPM, high-efficiency fans may not be accurately detected by the motherboard's fan controller, leading to erratic fan speed behavior (e.g., fans spinning up to max RPM). This is often due to the controller expecting server-grade fans with higher RPM ranges.
- BIOS Ayarları: Check BIOS settings for fan control options. Adjust fan curves or modes if available.
- 3-Pin vs. 4-Pin Fans: If using 4-pin PWM fans that exhibit this behavior, consider using 3-pin adapters if available with your fans. This can sometimes provide a more stable, albeit less precise, fan control.
- IPMI Fan Control: While IPMI offers fan control, it may have limitations for low RPM fans.
7.3. SATA Port Obstruction
When installing a full-size graphics processing unit (GPU), some SATA ports may become physically blocked or difficult to access.
- Önceden Planlayın: Connect SATA cables to the necessary ports before installing large expansion cards.
- Angled SATA Cables: Use SATA cables with angled connectors if straight connectors are obstructed.
- Alternative Ports: Utilize any unblocked SATA ports first.
8. Garanti ve Destek Bilgileri
For detailed warranty information, including terms, conditions, and duration, please refer to the official Supermicro website or the warranty card included with your product. For technical support, driver downloads, and additional documentation, visit the Supermicro support portal.
Supermicro Official Webalan: www.supermicro.com