Önemli Güvenlik Talimatları
Lütfen cihazı kullanmadan önce bu talimatları dikkatlice okuyun ve ileride başvurmak üzere saklayın. Bu güvenlik talimatlarına uyulmaması yangına, elektrik çarpmasına veya yaralanmaya neden olabilir.
- Ses seviyesini garantileyintage cihaz üzerinde belirtilen yerel şebeke hacminize karşılık gelir.tage bağlanmadan önce.
- Cihazı, kablosunu veya fişini suya veya başka bir sıvıya batırmayın.
- Cihaz kullanımdayken daima çocukları gözetim altında tutun.
- Cihazı hasarlı bir kablo veya fişle veya cihaz arızalandıktan veya herhangi bir şekilde hasar gördükten sonra çalıştırmayın.
- Place the oven on a stable, heat-resistant surface, away from walls and other appliances to ensure proper ventilation.
- Çalışma sırasında havalandırma deliklerini kapatmayın.
- The exterior surfaces of the oven become very hot during use. Use oven mitts when handling hot parts.
- Fırını kullanmadığınızda ve temizlemeden önce fişini prizden çekiniz.
- Do not use abrasive cleaners or sharp objects to clean the oven.
- Bu cihaz yalnızca evlerde kullanım için tasarlanmıştır.
Ürün Bittiview ve Paket İçeriği
The Trisa 10L Mini Oven is designed for baking, grilling, and warming various food items. It features a compact design suitable for small kitchens or limited spaces.
Paket İçeriği:
- Trisa 10L Mini Oven unit
- ızgara rafı
- Fırın tepsisi
- Handle for pan and rack
- Kullanım Kılavuzu

Resim: Included accessories for the Trisa 10L Mini Oven, showing the grill rack, baking tray, and a handle designed for safe removal of hot trays and racks.
Özellikler
| Marka | TRISA |
| Model Adı | Backofen "Snack Star" 10 L |
| Model Numarası | 7332.4712 |
| Kapasite | 10 Litre |
| Netage | 800 Watt |
| Sıcaklık Aralığı | 100°C - 230°C |
| Zamanlayıcı | Up to 60 minutes with audible signal |
| Kontrol Türü | Topuz |
| Ürün Boyutları (D x G x Y) | 34D x 39G x 23.5Y cm |
| Max. Baking Plate Diameter | 23 cm |
| Ağırlık | 4.06 Kilogram |
| Kapı Stili | Door opens downwards |
| Malzeme | Plastic (exterior), Tempered glass (door) |
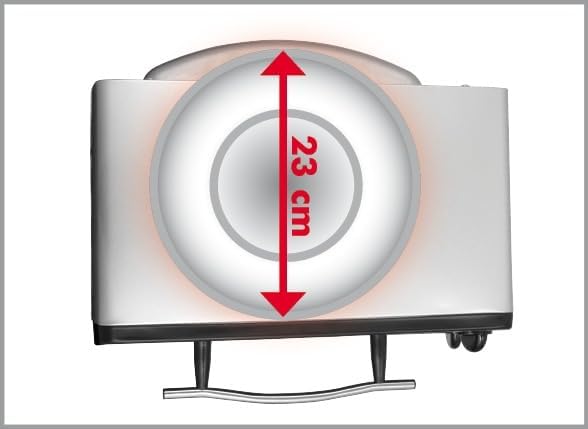
Resim: The Trisa 10L Mini Oven, illustrating the maximum internal diameter for a baking plate or dish, which is 23 cm.
Kurmak
- Paketin açılması: Fırını ve tüm aksesuarları ambalajından dikkatlice çıkarın. İlerideki taşıma veya saklama için ambalajı saklayın.
- Atama: Place the oven on a flat, stable, and heat-resistant surface. Ensure there is at least 10-15 cm of clear space around all sides of the oven for adequate ventilation. Do not place it near flammable materials or under cabinets.
- İlk Temizlik: İlk kullanımdan önce iç ve dış yüzeyleri ad ile silin.amp cloth. Wash the grill rack, baking tray, and handle with warm, soapy water, then rinse and dry thoroughly.
- Güç Bağlantısı: Güç kablosunu topraklı bir elektrik prizine takın. Prizin voltajını doğru şekilde ayarladığınızdan emin olun.tage matches the oven's requirements (220-240V, 50/60Hz).
- İlk Kullanımda Yanma: It is recommended to run the oven empty for about 15 minutes at the maximum temperature (230°C) with the timer set. This helps to burn off any manufacturing residues and odors. A slight smoke or odor is normal during this process. Ensure the area is well-ventilated.
Kullanım Talimatları
The Trisa Mini Oven features simple knob controls for temperature and timer settings.
Kontrol Düğmeleri:
- Sıcaklık Düğmesi: Pişirme sıcaklığını 100°C ile 230°C arasında ayarlar.
- Zamanlayıcı Düğmesi: Sets the cooking time up to 60 minutes. The oven will automatically turn off and emit an audible signal when the timer reaches zero.
Pişirme Fonksiyonları:
- Pişirme: Suitable for cakes, pastries, and general oven cooking. Place food on the baking tray or an oven-safe dish on the grill rack.
- Izgara: Ideal for browning, toasting, or cooking items like sandwiches and small cuts of meat. Place food directly on the grill rack.
- Isınma: Use lower temperatures to keep food warm or gently reheat.
Genel İşlem Adımları:
- Yemek hazırla: Yiyeceklerinizi fırın tepsisine veya ızgara teline yerleştirin.
- Insert Tray/Rack: Open the oven door and slide the baking tray or grill rack into the desired position. The oven has variable height settings.
- Kapıyı Kapat: Fırın kapağının tamamen kapalı olduğundan emin olun.
- Sıcaklığı Ayarla: Turn the Temperature Knob to your desired cooking temperature (100°C - 230°C).
- Zamanlayıcıyı Kur: Turn the Timer Knob to the desired cooking time (up to 60 minutes). The oven will begin heating immediately, and the LED indicator light will illuminate.
- Pişirmeyi İzleme: You can observe the cooking process through the viewpencere.
- Tamamlama: When the set time elapses, the oven will automatically switch off, and an audible signal will sound. The LED indicator light will turn off.
- Yiyecekleri Kaldırın: Carefully open the oven door. Use the provided handle or oven mitts to remove the hot baking tray or grill rack.
- Sakin ol: Allow the oven to cool down completely before cleaning or storing.
Not: En iyi sonuçlar için, özellikle fırınlama yapacaksanız, yiyecekleri fırına koymadan önce 5-10 dakika önceden ısıtın.
Bakım ve Temizlik
Regular cleaning ensures optimal performance and extends the life of your Trisa Mini Oven.
- Temizlemeden Önce: Always unplug the oven from the power outlet and allow it to cool down completely before cleaning.
- Dış Temizlik: Dış yüzeyleri yumuşak, damp Bez kullanın. Aşındırıcı temizleyiciler, ovma pedleri veya sert kimyasallar kullanmayın, çünkü bunlar yüzeye zarar verebilir.
- İç Temizlik: İç kısım için, reklamla silin.amp cloth and mild detergent. For stubborn stains, a non-abrasive oven cleaner designed for conventional ovens can be used, but ensure to follow the cleaner's instructions and rinse thoroughly. Avoid spraying cleaner directly onto heating elements.
- Aksesuarlar: The grill rack, baking tray, and handle can be washed in warm, soapy water. Rinse thoroughly and dry completely before storing or reusing.
- Cam kapı: Cam kapıyı cam temizleyici veya reklamla temizleyinamp cloth. Avoid scratching the glass.
- Depolamak: Kullanılmadığı zamanlarda fırının temiz ve kuru olduğundan emin olun. Serin ve kuru bir yerde saklayın.
Dikkat: Never immerse the oven unit, power cord, or plug in water or any other liquid.
Sorun giderme
If you encounter issues with your Trisa Mini Oven, refer to the following common problems and solutions:
| Sorun | Olası Neden | Çözüm |
|---|---|---|
| Fırın açılmıyor. | Fişe takılı değil; güç çıkışıtage; arızalı çıkış. | Fırının çalışan bir elektrik prizine güvenli bir şekilde takılı olduğundan emin olun. Devre kesicinizi kontrol edin. |
| Yiyecekler eşit şekilde pişmiyor. | Incorrect temperature/time setting; food placed too close to heating elements; oven not preheated. | Adjust temperature and time settings. Ensure food is centered and not touching heating elements. Preheat the oven before cooking. Rotate food halfway through cooking. |
| Yemek pişirme sırasında aşırı duman veya koku oluşması. | Food spills or grease buildup inside the oven; first use burn-off. | Clean the oven interior thoroughly. Ensure the oven is clean before each use. If it's the first use, this is normal; ensure ventilation. |
| Zamanlayıcı çalışmıyor. | Zamanlayıcı düğmesi doğru ayarlanmamış. | Ensure the timer knob is turned past the "OFF" position to activate the timer. |
Bu çözümleri denedikten sonra sorun devam ederse lütfen müşteri desteğiyle iletişime geçin.
Garanti ve Destek
This Trisa Mini Oven is covered by a manufacturer's warranty against defects in materials and workmanship. The specific terms and duration of the warranty may vary by region. Please refer to the warranty card included with your product or contact Trisa customer support for detailed information.
For technical assistance, spare parts, or warranty claims, please contact your local Trisa service center or visit the official Trisa webiletişim bilgileri için site.
- Üretici: TrisaGUOTWOGAtzin69Wincase
- Model Numarası: 7332.4712
- ASIN: B008H1KBPS