
1. Giriş
The InFocus IN1112 Ultra Mobile Widescreen DLP Projector is designed for professionals requiring a portable and high-performance display solution. Its combination of high brightness, lightweight design, and compact size makes it suitable for various environments, from brightly lit rooms to limited spaces. This manual provides essential information for setting up, operating, maintaining, and troubleshooting your projector.
Temel Özellikler:
- Compact and lightweight (approximately 2.7 lbs / 1.2 kg) for easy portability.
- 2200 lumens of brightness for clear projection in various lighting conditions.
- HDMI input for versatile connectivity with modern devices including laptops, smartphones, and gaming consoles.
- Durable design built for frequent travel.
- Widescreen (WXGA) resolution to match contemporary laptop displays.
2. Güvenlik Bilgileri
Yaralanmaları veya cihaza zarar gelmesini önlemek için lütfen projektörü çalıştırmadan önce tüm güvenlik talimatlarını okuyun.
- Do not look directly into the projector lens ne zaman lamp Açık durumda. Yoğun ışık gözlere zarar verebilir.
- Ensure proper ventilation. Do not block ventilation openings, as this can lead to overheating and damage.
- Düşmesini önlemek için projektörü sabit ve düz bir yüzeye yerleştirin.
- Yalnızca projektörle birlikte verilen güç kablosunu kullanın.
- Projeksiyon cihazını yağmur, nem veya aşırı rutubete maruz bırakmayın.
- Tüm servis işlemlerini yetkili servis personeline yaptırın. Projektörü kendiniz açmaya veya onarmaya çalışmayın.
- Projeksiyon cihazını ısı kaynaklarından ve doğrudan güneş ışığından uzak tutun.
3. Paket İçeriği
Paketin içinde tüm öğelerin mevcut olduğundan emin olun:
- InFocus IN1112 Projector
- Güç kablosu
- Uzaktan Kumanda (pilli)
- VGA Kablosu
- HDMI Kablosu
- Kullanım Kılavuzu (bu belge)
- Taşıma Çantası (bölgeye göre değişiklik gösterebilir)
4. Ürün Bittiview
Familiarize yourself with the main components of your InFocus IN1112 projector.
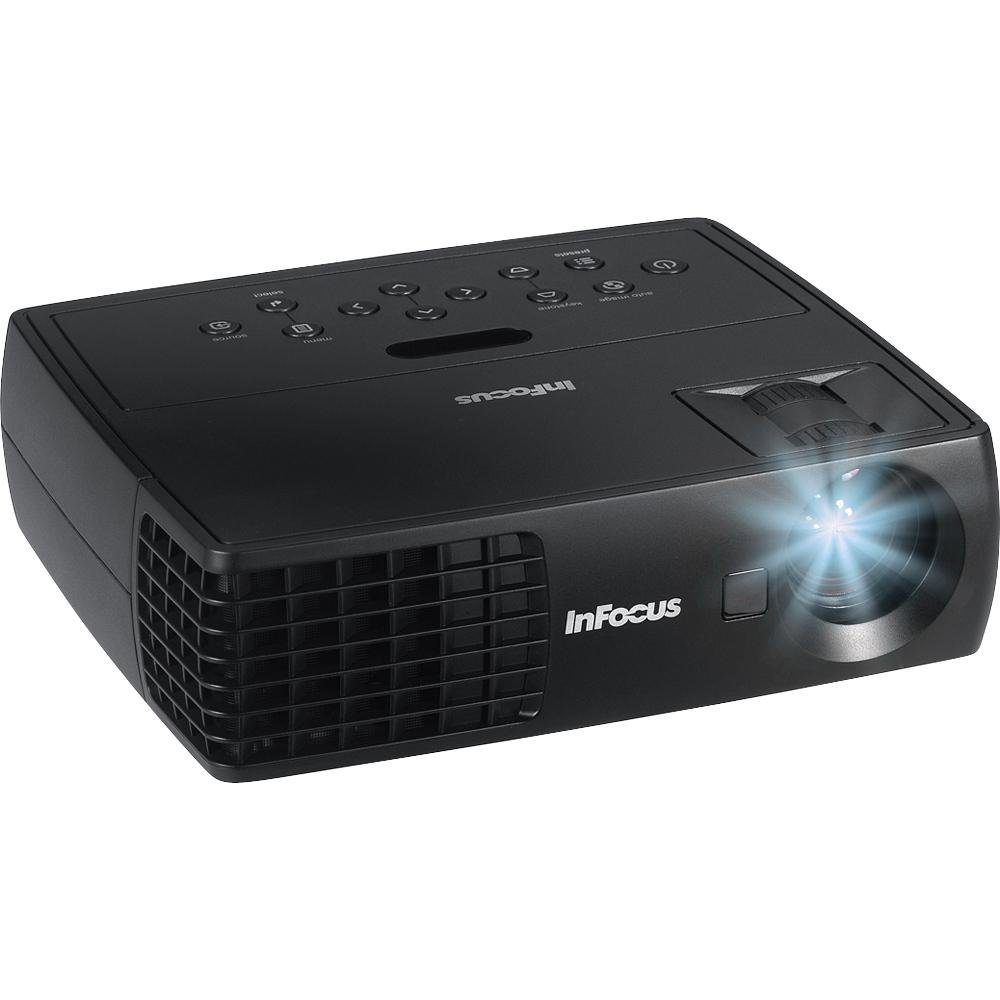
Şekil 4.1: Ön view of the InFocus IN1112 Projector. This image displays the projector's lens, ventilation, and part of the control panel.

Şekil 4.2: Yan view of an InFocus projector, illustrating typical connectivity ports such as HDMI and VGA.
4.1. Ön panel
- Projeksiyon Merceği: Görüntüyü ekrana yansıtır.
- Odak Halkası: Yansıtılan görüntünün keskinliğini ayarlar.
- Yakınlaştırma Kolu: Yansıtılan görüntünün boyutunu ayarlar.
4.2. Top Panel (Control Panel)
- Güç Düğmesi: Projektörü açar veya kapatır.
- Menü Düğmesi: Ekran Üzeri Görüntüleme (OSD) menüsüne erişim sağlar.
- Gezinme Düğmeleri (Yukarı/Aşağı/Sol/Sağ): Menü seçenekleri arasında gezinmeyi sağlar.
- Giriş Düğmesi: Menüdeki seçimleri onaylar.
- Kaynak Düğmesi: Selects the input source (HDMI, VGA, USB).
4.3. Rear Panel (Connectivity)
- HDMI Bağlantı Noktası: Connects to devices with HDMI output (laptops, media players).
- VGA Bağlantı Noktası: VGA çıkışı olan bilgisayarlara bağlanır.
- USB Bağlantı Noktası: For service or connecting compatible USB devices.
- Güç Girişi: Güç kablosunu bağlar.
5. Kurulum
5.1. Yerleşim
- Projektörü düz ve sabit bir yüzeye yerleştirin.
- Ensure there is adequate space around the projector for ventilation (at least 30 cm / 12 inches).
- Position the projector at an appropriate distance from the screen to achieve the desired image size.
5.2. Güç Bağlantısı
- Güç kablosunu projektörün güç giriş portuna bağlayın.
- Güç kablosunun diğer ucunu topraklı bir elektrik prizine takın.
5.3. Connecting a Source Device
Choose the appropriate cable for your source device:
- HDMI: Connect one end of the HDMI cable to the projector's HDMI port and the other end to your laptop, media player, or other HDMI-enabled device.
- VGA: Connect one end of the VGA cable to the projector's VGA port and the other end to your computer's VGA output. Secure the screws on the VGA connector if available.
6. Çalıştırma
6.1. Açma/Kapama
- Açmak İçin: Press the Power button on the projector's control panel or the remote control. The power indicator light will turn steady blue.
- Kapatmak İçin: Press the Power button again. A confirmation message may appear. Press Power again to confirm shutdown. The projector will enter a cooling cycle, and the power indicator will flash before turning off.
6.2. Selecting an Input Source
Basın Kaynak button on the projector or remote control repeatedly to cycle through available input sources (e.g., HDMI, VGA). The projector will automatically detect an active signal if connected.
6.3. Görüntüyü Ayarlamak
- Odak: Görüntü net ve berrak görünene kadar objektif üzerindeki odak halkasını çevirin.
- Yakınlaştır: Use the zoom lever on the lens to adjust the size of the projected image.
- Keystone Düzeltmesi: If the image appears trapezoidal, use the Keystone Correction function in the OSD menu to square the image.
6.4. Using the On-Screen Display (OSD) Menu
- Basın Menü button on the projector or remote control to open the OSD menu.
- Kullanın Navigasyon buttons (Up/Down/Left/Right) to move through menu options.
- Basın Girmek Bir seçeneği seçmek veya bir ayarı onaylamak için düğmeye basın.
- Kullanın Navigasyon Değerleri ayarlamak veya alt seçenekleri seçmek için düğmeler.
- Basın Menü button again to exit the OSD menu.
Common OSD settings include Brightness, Contrast, Color Temperature, Aspect Ratio, and Advanced Settings.
7. Bakım
7.1. Projektörün Temizlenmesi
- Casing: Yumuşak, tiftiksiz bir bez kullanın ve hafifçe kurulayın.ampened with water or a mild cleaner. Do not use abrasive cleaners or solvents.
- Mercek: Use a professional lens cleaning cloth and lens cleaning solution. Gently wipe the lens in a circular motion. Avoid touching the lens with your fingers.
- Havalandırma Açıklıkları: Periodically clean the ventilation openings with a soft brush or compressed air to prevent dust buildup.
7.2.Lamp Bakım
projektör lamp has an operating life of approximately 5000 hours. When the lamp reaches the end of its life, the image brightness may decrease, or the lamp indicator may illuminate. Refer to the full service manual for lamp replacement procedures, which should be performed by qualified personnel.
8. Sorun Giderme
Bu bölümde, projektörünüzle ilgili karşılaşabileceğiniz yaygın sorunlar ele alınmaktadır.
| Sorun | Olası Neden | Çözüm |
|---|---|---|
| Görüntü yansıtılmıyor. | Power cable loose; Source not selected; Input device off; Lamp sorun. | Check power connection; Select correct input source; Ensure input device is on; Contact support if lamp indicator is active. |
| Görüntü bulanık | Objektif odak dışında; Projektör ekrana çok yakın/uzak. | Lens üzerindeki odaklama halkasını ayarlayın; Projektör uzaklığını veya yakınlaştırmayı ayarlayın. |
| Görüntü yamuk şeklindedir. | Projeksiyon cihazı ekrana dik açıda değil. | Use Keystone Correction in the OSD menu; Reposition the projector. |
| Uzaktan kumanda çalışmıyor | Batteries dead; Obstruction between remote and projector; Remote sensor blocked. | Replace batteries; Remove obstructions; Ensure remote is pointed at the projector's sensor. |
| Projektör aşırı ısınıyor ve kapanıyor | Havalandırmanın engellenmesi; Yüksek ortam sıcaklığı. | Ensure ventilation openings are clear; Operate in a well-ventilated area. |
9. Özellikler
Detailed technical specifications for the InFocus IN1112 Projector.
| Özellik | Şartname |
|---|---|
| Marka | Odakta |
| Model Adı | IN1112 Ultra |
| Görüntü Türü | DLP |
| Parlaklık | 2200 Lümen (2100 ANSI Lümen) |
| Yerel Çözünürlük | 1920 x 1080 (Full HD, though WXGA is mentioned in title, 1920x1080 is in specs) |
| Ekran Çözünürlüğü Maksimum | 1920x1080 |
| Kontrast Oranı | 2600:1 |
| Bağlantı Teknolojisi | HDMI, VGA, USB |
| Işık Kaynağı Çalışma Ömrü | 5000 saat |
| Ürün Ağırlığı | 1.2 kg (2.65 lbs) |
| Netage | 185 watts (Lamp Netage: 165 watts) |
| Renk | Black (Note: Product images may show white units for illustration) |
| Önerilen Kullanımlar | Business, Traveling |
| Montaj Tipi | Masa Üstü Montaj |
| Kontrol Yöntemi | Uzaktan Kumanda, Düğme Kontrolü |
10. Garanti ve Destek
10.1. Garanti Bilgileri
The InFocus IN1112 Projector typically comes with a manufacturer's limited warranty. Please refer to the warranty card included with your product or visit the official InFocus webGaranti süresi ve kapsamı da dahil olmak üzere, garanti şartları ve koşulları için lütfen ilgili siteyi ziyaret edin. Garanti talepleri için satın alma belgenizi saklayın.
10.2. Müşteri Desteği
For technical assistance, troubleshooting beyond this manual, or service inquiries, please contact InFocus customer support. You can find contact information, FAQs, and additional resources on the official InFocus webalan: www.infocus.com


