
1. Giriş
This manual provides detailed instructions for the installation, operation, and maintenance of your Foxconn TSAA725 ATX Tower Case. Please read this manual thoroughly before beginning installation to ensure proper setup and safe use of the product. Keep this manual for future reference.
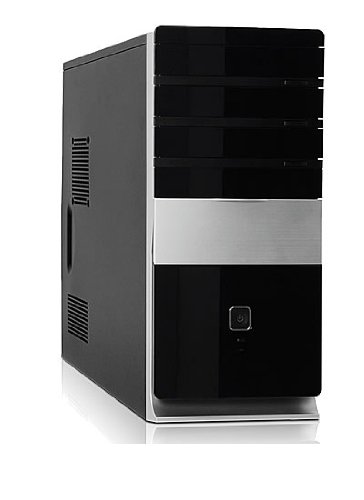
Resim: Ön view of the Foxconn TSAA725 ATX Tower Case, showcasing its design and front panel ports.
2. Güvenlik Bilgileri
Ürüne zarar gelmesini veya kendinize zarar gelmesini önlemek için aşağıdaki güvenlik önlemlerine uyun:
- Always disconnect the power supply from the wall outlet before opening the computer case or performing any installation/maintenance.
- Handle internal components with care to avoid electrostatic discharge (ESD) damage. Use an anti-static wrist strap if available.
- Aşırı ısınmayı önlemek için kasanın etrafında yeterli havalandırma olduğundan emin olun.
- Do not expose the case to moisture or extreme temperatures.
- Küçük parçaları çocuklardan uzak tutun.
3. Paket İçeriği
Paketin içinde tüm öğelerin mevcut olduğundan emin olun:
- Foxconn TSAA725 ATX Tower Case
- 350W Power Supply (pre-installed)
- Accessory kit (screws, standoffs, cable ties)
- Bu kullanım kılavuzu
4. Temel Özellikler
The Foxconn TSAA725 ATX Tower Case offers the following features:
- Malzeme: 0.5mm SGCC Alloy Steel construction for durability.
- Anakart Desteği: Compatible with ATX and Micro ATX motherboards.
- Sürücü bölmeleri:
- 3x 5.25" External Bays
- 2x 3.5" External Bays
- 4x 3.5" Internal Bays
- Soğutma Sistemi:
- 1x 80/92/120mm rear fan support (fan not included)
- Optional 1x 80/92/120mm front fan support (fan not included)
- 80mm Air Duct for CPU cooling.
- Ön G/Ç Paneli:
- 2x USB 2.0 portu
- 1x Headphone jack
- 1x Microphone jack
- Güç Kaynağı: Integrated 350W Power Supply.
5. Kurulum ve Bileşen Montajı
Follow these steps to install your computer components into the Foxconn TSAA725 case:
- Davayı Hazırlayın:
Place the case on a flat, stable surface. Remove the side panel(s) by unscrewing the thumbscrews at the rear of the case and sliding the panel backward.
- Anakartı Takın:
Install the necessary standoffs onto the motherboard tray according to your motherboard's form factor (ATX or Micro ATX). Carefully place the motherboard onto the standoffs, aligning the screw holes. Secure the motherboard with screws provided in the accessory kit.
- Install Drives (HDD/SSD):
For 3.5" internal drives, slide the drive into an available 3.5" internal bay and secure it with screws from the side. For 5.25" external drives (e.g., optical drives), remove the front panel bay cover, slide the drive in from the front, and secure it with screws.
- Genişletme Kartlarını Takın:
Remove the appropriate expansion slot covers at the rear of the case. Insert your graphics card or other expansion cards into the PCIe/PCI slots on the motherboard and secure them with screws.
- Kabloları Bağlayın:
Connect the power supply cables to the motherboard (24-pin ATX, 4/8-pin CPU), graphics card (if applicable), and drives (SATA power). Connect the front panel cables (USB, audio, power switch, reset switch, LED indicators) to the corresponding headers on the motherboard. Refer to your motherboard manual for header locations.
- Kablo yönetimi:
Route cables neatly to improve airflow and aesthetics. Use cable ties from the accessory kit if needed.
- Davayı Kapat:
Once all components are installed and cables are connected, reattach the side panel(s) and secure them with the thumbscrews.
6. Kullanım Talimatları
After successful assembly, connect your peripherals (monitor, keyboard, mouse) and power cable to the case. Press the power button on the front panel to start your computer.
Ön Panel G/Ç Bağlantı Noktaları:
- USB 2.0 Bağlantı Noktaları: For connecting USB devices such as keyboards, mice, and external storage.
- Kulaklık girişi: Kulaklık veya hoparlör bağlamak için.
- Mikrofon Jakı: Bir mikrofon bağlamak için.
- Güç Düğmesi: Bilgisayarı açmak veya kapatmak için.
- Sıfırlama Düğmesi: To restart the computer.
7. Bakım
Regular maintenance helps ensure optimal performance and longevity of your computer case:
- Toz Temizleme: Periodically clean dust from inside the case, especially from fans and heatsinks, using compressed air. Ensure the computer is powered off and unplugged before cleaning.
- Dış Temizlik: Kasanın dışını yumuşak bir bezle silin.amp Bez. Aşındırıcı temizleyicilerden veya çözücülerden kaçının.
- Kablo yönetimi: Kabloların hava akışını veya fan çalışmasını engellemediğinden emin olmak için kablo düzenini periyodik olarak kontrol edin.
8. Sorun Giderme
Sorunlarla karşılaşırsanız aşağıdaki yaygın çözümlere başvurun:
- Computer does not power on:
- Ensure the power cable is securely connected to both the case's power supply and the wall outlet.
- Check if the power supply switch (if present) is in the 'ON' position.
- Ön panel güç düğmesi kablosunun anakarta doğru şekilde bağlı olduğundan emin olun.
- Monitörde görüntü yok:
- Ensure the monitor is powered on and connected to the correct video output on your graphics card or motherboard.
- Ekran kartını ve RAM modüllerini yeniden yerleştirin.
- USB bağlantı noktaları çalışmıyor:
- Verify that the front panel USB cables are correctly connected to the motherboard's USB headers.
- Cihazı farklı bir USB bağlantı noktasına bağlamayı deneyin.
9. Özellikler
| Özellik | Detay |
|---|---|
| Marka | FOXCONN |
| Örnek | TSAA725-ISO450 |
| Malzeme | 0.5mm SGCC Alloy Steel |
| Anakart Uyumluluğu | ATX, Mikro ATX |
| Drive Bays (External) | 3x 5.25", 2x 3.5" |
| Sürücü Bölmeleri (İç) | 4x 3.5" |
| Soğutma Sistemi Desteği | 1x 80/92/120mm rear fan, 1x 80/92/120mm front fan (optional), 80mm Air Duct |
| Ön G / Ç Bağlantı Noktaları | 2x USB 2.0, 1x Kulaklık, 1x Mikrofon |
| Güç Kaynağı | 350W (Integrated) |
| Ürün Boyutları (UxGxY) | 50.17x24.13x54.61 cm |
| Ürün Ağırlığı | 6.96 kilo |
10. Garanti ve Destek
For warranty information and technical support, please refer to the official Foxconn webSatın alma belgenizi saklayın veya yerel perakendecinizle iletişime geçin. Garanti talepleriniz için satın alma belgenizi saklayın.
Çevrimiçi Kaynaklar: For additional support and updated drivers, visit the official Foxconn support page.
Not: Garanti koşulları bölgeye göre değişiklik gösterebilir.