
1. Giriş
Satın aldığınız için teşekkür ederizasing the Karcher KA 350 Compact Stereo System. This versatile audio system combines modern design with a wide range of playback options, including a 3-disc CD changer, dual cassette deck, turntable, USB port, SD card reader, and an integrated radio. This manual provides essential information for safe operation, setup, and maintenance of your device. Please read it thoroughly before use and retain it for future reference.
2. Önemli Güvenlik Talimatları
- Güç Kaynağı: Güç kaynağı hacmini sağlayıntage değeri, cihaz üzerindeki etikette belirtilen değerle eşleşir.
- Havalandırma: Havalandırma açıklıklarını hiçbir şekilde kapatmayın. Uygun hava akışı için ünitenin etrafında yeterli boşluk bırakın.
- Su ve Nem: Cihazı yağmur, nem, damlama veya sıçramaya maruz bırakmayın. Üzerine vazo gibi sıvı dolu nesneler koymayın.
- Sıcaklık: Üniteyi radyatörler, kalorifer ızgaraları, sobalar veya diğer cihazlar (dahil) gibi ısı kaynaklarından uzak tutun. amp(ısı üreten)
- Temizlik: Temizlemeden önce cihazı prizden çıkarın. Sadece yumuşak, kuru bir bez kullanın.
- Servis: Bu ürüne kendiniz servis vermeye çalışmayın. Tüm servis işlemleri için kalifiye servis personeline başvurun.
- Çocuklar: Cihazı ve aksesuarlarını çocukların erişemeyeceği yerde saklayın.
- Lazer Güvenliği: This product uses a laser. Use of controls or adjustments or performance of procedures other than those specified herein may result in hazardous radiation exposure.
3. Paket İçeriği
Lütfen tüm ürünlerin mevcut ve iyi durumda olduğundan emin olun:
- Karcher KA 350 Compact Stereo System (Main Unit)
- Uzaktan kumanda
- Kullanım Kılavuzu
- Stereo Speakers (2 units)
- Güç kablosu
- FM Anteni (kablolu tip)
4. Ürün Bittiview
4.1 Ön Panel Kontrolleri
The front panel provides access to all primary functions and controls for the KA 350 system.

Şekil 4.1: Ön Panel Kontrolleri
- AÇIK/BEKLEME Düğmesi: Üniteyi açar veya kapatır.
- FONKSİYON Düğmesi: Selects between CD, Tuner (Radio), Phono (Turntable), Tape (Cassette), and USB/SD modes.
- SES Düğmesi: Ana ses seviyesini ayarlar.
- CD Kontrolleri: Play/Pause, Stop, Skip/Search (Forward/Backward), Open/Close CD tray.
- Kaset Çalar Kontrolleri: Play, Record, Fast Forward, Rewind, Stop/Eject for Deck 1 and Deck 2.
- USB/SD Controls: Play/Pause, Stop, Skip/Search (Forward/Backward).
- Ayarlayıcı Kontrolleri: Band selection (AM/FM), Tuning Up/Down, Memory presets.
- Görüntülemek: Shows current mode, track information, radio frequency, and time.
4.2 Arka Panel Bağlantıları
The rear panel houses all necessary input and output connections for the system.
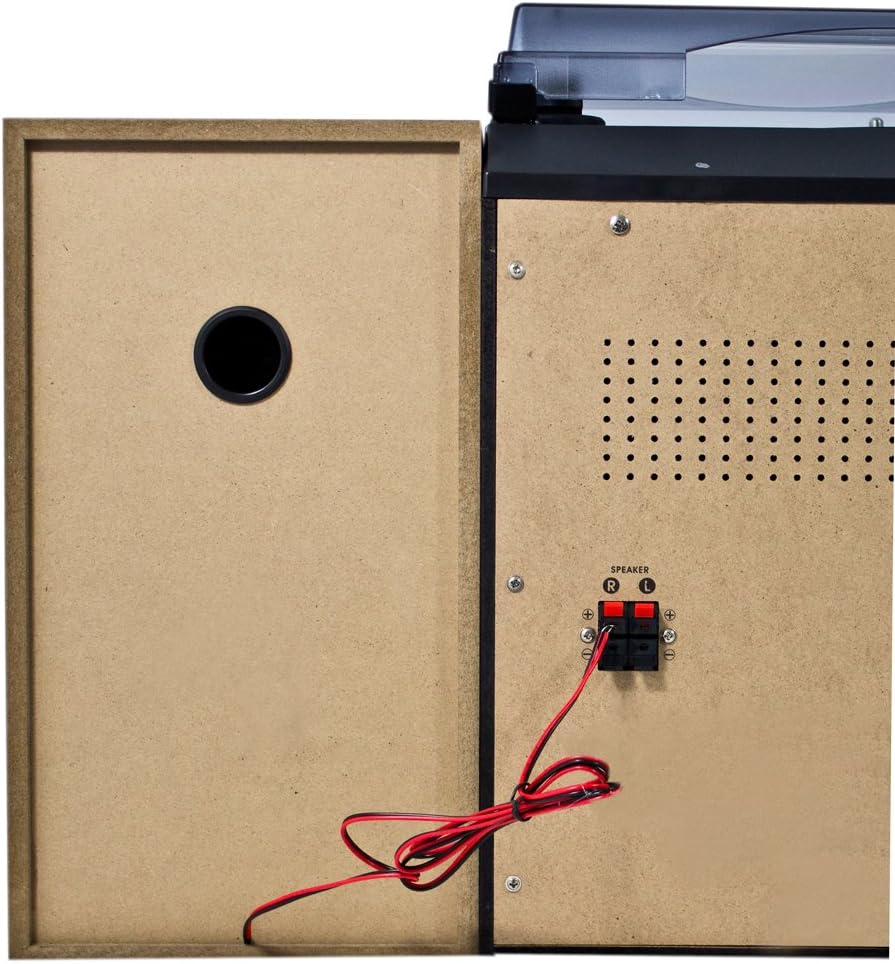
Şekil 4.2: Arka Panel Bağlantıları
- Speaker Terminals (R/L): Connect the included stereo speakers. Ensure correct polarity (+ to + and - to -).
- AC Güç Girişi: Güç kablosunu buraya bağlayın.
- FM Anten Terminali: Connect the supplied FM wire antenna for radio reception.
4.3 Ana Bileşenler

Figure 4.3: Karcher KA 350 Main Components
- Pikap: Located on top, for playing vinyl records.
- 3-Disc CD Changer: Front-loading tray for multiple CDs.
- Dual Cassette Deck: Çalma ve kayıt için iki kaset yuvası.
- USB Bağlantı Noktası: USB flash sürücüleri bağlamak için.
- SD Kart Yuvası: SD hafıza kartlarını takmak için.
- Stereo Hoparlörler: Two external speakers for audio output.
5. Kurulum
5.1 Paketten Çıkarma ve Yerleştirme
- Tüm bileşenleri dikkatlice ambalajından çıkarın.
- Ana üniteyi sabit ve düz bir yüzeye yerleştirin.
- Position the speakers on either side of the main unit, ensuring they are at an equal distance for optimal stereo sound.
- Ünitenin çevresinde yeterli havalandırma olduğundan emin olun.
5.2 Hoparlörlerin Bağlanması
Connect the supplied speakers to the speaker terminals on the rear of the main unit.

Figure 5.1: Speaker Unit
- Identify the speaker wires. Each wire typically has two strands, one marked for positive (+) and one for negative (-).
- Connect the positive (+) terminal of the left speaker to the 'L+' terminal on the main unit's rear panel.
- Connect the negative (-) terminal of the left speaker to the 'L-' terminal on the main unit's rear panel.
- Repeat the process for the right speaker, connecting it to the 'R+' and 'R-' terminals.
- Ensure all connections are secure to prevent sound distortion or damage.
5.3 FM Anteninin Bağlanması
For optimal radio reception, connect the supplied FM wire antenna.
- Insert the FM antenna plug into the FM antenna jack on the rear panel.
- Extend the wire antenna fully and position it for the best possible reception. You may need to experiment with its placement.
5.4 Güç Bağlantısı
- Plug the AC power cable into the AC power input on the rear of the main unit.
- Güç kablosunun diğer ucunu standart bir duvar prizine takın.
6. Kullanım Talimatları
6.1 Güç Açma/Kapatma
Basın BEKLEMEDE Cihazı açmak veya kapatmak için ön paneldeki düğmeyi veya uzaktan kumandayı kullanın.
6.2 Mod Seçimi
Basın İŞLEV button repeatedly to cycle through the available modes: CD, Tuner (Radio), Phono (Turntable), Tape (Cassette), and USB/SD.
6.3 CD Çaların Çalışması

Figure 6.1: CD Changer Tray
- Basın İŞLEV CD modunu seçmek için düğmesine basın.
- Basın AÇIK/KAPALI CD tepsisini açmak için düğmesine basın.
- Place up to three CDs onto the disc trays, label side up.
- Basın AÇIK/KAPALI tepsiyi kapatmak için tekrar düğmesine basın.
- Basın OYNAT/DURDUR oynatmayı başlatmak için düğmesine basın.
- Kullanın ATLA/ARA buttons to navigate between tracks or fast forward/rewind.
6.4 Kaset Çalar/Kaydedici Kullanımı
- Basın İŞLEV TAPE modunu seçmek için düğme.
- Basın DUR/ÇIKAR button on either Deck 1 or Deck 2 to open the cassette compartment.
- Bir kaset yerleştirin ve bölmeyi kapatın.
- Basın OYNAMAK oynatmayı başlatmak için düğmesine basın.
- To record, insert a blank tape into Deck 2 (for recording from Deck 1 or other sources) or Deck 1 (for recording from external sources if applicable). Press the KAYIT düğme.
6.5 Döner Tabla Çalışması
- Basın İŞLEV button to select PHONO mode.
- Toz kapağını açın.
- Plak tepsisine bir plak yerleştirin.
- Hız seçici düğmesini kullanarak uygun hızı (33, 45 veya 78 RPM) seçin.
- Carefully lift the tone arm and place the stylus onto the desired groove of the record.
- At the end of the record, manually return the tone arm to its rest.
6.6 USB/SD Oynatma
- Basın İŞLEV USB/SD modunu seçmek için kullanılan düğme.
- USB flash sürücüyü USB bağlantı noktasına veya SD kartı SD kart yuvasına takın.
- Cihaz, uyumlu ses dosyalarını otomatik olarak algılayacak ve çalmaya başlayacaktır. files (MP3, WMA, AAC).
- Kullanın OYNAT/DURDUR Ve ATLA/ARA oynatmayı kontrol etmek için düğmeler.
6.7 Telsiz Çalışması
- Basın İŞLEV button to select TUNER mode.
- Basın BANT button to select between FM and AM bands.
- Kullanın AYARLAMA buttons to manually tune to a station or press and hold for automatic scanning.
- Bir istasyonu kaydetmek için tuşuna basın. HAFIZA düğmesini kullanın, ardından ATLA/ARA Önceden ayarlanmış bir sayı seçmek için düğmelere basın ve ardından basın. HAFIZA Tekrar onaylamak için.
6.8 Uzaktan Kumanda
The included remote control allows convenient operation of all functions from a distance. Ensure batteries are correctly inserted.
7. Bakım
7.1 Ünitenin Temizlenmesi
- Temizlemeden önce daima ünitenin fişini elektrik prizinden çekin.
- Dış yüzeyleri silmek için yumuşak ve kuru bir bez kullanın.
- Cilaya zarar verebileceğinden aşındırıcı temizleyiciler, cilalar veya çözücüler kullanmayın.
7.2 Pikap İğnesi Bakımı
- Handle the stylus with extreme care. Only touch the tone arm, not the stylus itself.
- Kalemin ucunu düzenli aralıklarla yumuşak bir fırçayla, arkadan öne doğru fırçalayarak temizleyin.
- Replace the stylus when it shows signs of wear (e.g., distorted sound, skipping).
7.3 Kaset Çalar Bakımı
- Bant başlıklarını, makarayı ve sıkıştırma silindirini düzenli olarak pamuklu çubukla hafifçe temizleyin.ampİzopropil alkol ile yıkandı.
- Demagnetize the tape heads periodically to maintain sound quality.
8. Sorun Giderme
| Sorun | Olası Neden | Çözüm |
|---|---|---|
| Güç yok | Güç kablosu bağlı değil; Elektrik prizi aktif değil. | Güç kablosu bağlantısını kontrol edin; farklı bir priz deneyin. |
| Ses yok | Volume too low; Speakers not connected correctly; Incorrect function mode selected | Increase volume; Check speaker connections and polarity; Select correct function mode |
| CD atlıyor veya çalmıyor | CD is dirty or scratched; CD inserted incorrectly | Clean or replace CD; Insert CD label side up |
| Zayıf radyo alımı | Antenna not connected or poorly positioned; Weak signal | Connect and adjust FM antenna; Try repositioning the unit |
| Döner tabla hızı yanlış | Yanlış hız seçildi | Adjust the speed selector switch (33/45/78 RPM) |
| USB/SD oynatma sorunları | Uyumsuz file Biçimlendirme; USB/SD kart doğru takılmamış; Bozuk files | Emin olmak files are MP3, WMA, or AAC; Reinsert USB/SD card; Try a different USB/SD card |
9. Özellikler
| Özellik | Şartname |
|---|---|
| Marka | Karcher |
| Model Numarası | KA350 |
| Bağlantı Teknolojisi | FM/MW Tuner, USB, SD |
| Renk | Siyah |
| Hoparlör Tipi | Stereo (2 speakers included) |
| Ürün Boyutları (U x G x Y) | 70.5x41x37.3 cm |
| Güç Kaynağı | Kablolu Elektrik |
| Uyumlu Cihazlar | Smartphone, Tablet, MP3 Player, Personal Computer |
| Ürün Ağırlığı | 10.8 Kilogram |
| Güç Çıkışı (RMS) | 2 x 5 W (Total 50 W) |
| Supported Media Standards | MP3, CD, Cassette, USB, SD |
| Desteklenen Ses Biçimleri | CD-DA, MP3, WMA, AAC |
| Bluetooth Desteği | HAYIR |
| Konuşmacılar Sayısı | 2 |
| Ses Çıkışı Modu | Stereo |
| Çevresel Ses Yapılandırması | 2.0 |
| Dahil Bileşenler | Compact system, Remote control, Instruction manual |
10. Garanti ve Destek
Garanti bilgileri ve teknik destek için lütfen ürününüzle birlikte verilen garanti kartına bakın veya resmi Karcher web sitesini ziyaret edin. webSite. Satın alma belgenizi herhangi bir garanti talebi için saklayın.
Üretici: Karcher