
Mintcraft JL-45891-3L
ProSource JL-45891-3L Digital Electronic Safe User Manual
Model: JL-45891-3L
Brand: Mintcraft
1. Giriş
This manual provides detailed instructions for the safe and efficient operation, setup, and maintenance of your ProSource JL-45891-3L Digital Electronic Safe. Please read this manual thoroughly before using the product and retain it for future reference.
The ProSource JL-45891-3L Digital Electronic Safe is designed to provide secure storage for your valuables. It features a digital electronic keypad for access and is constructed from solid steel with a powder coating finish for durability.
2. Güvenlik Bilgileri
UYARI:
- This safe is NOT fireproof. Do not store highly flammable materials inside.
- Keep emergency backup keys in a secure location away from the safe.
- Yetkisiz kişilerin kasayı çıkarmasını önlemek için kasanın güvenli bir şekilde monte edildiğinden emin olun.
- Do not attempt to force the safe open if the electronic lock malfunctions. Refer to the troubleshooting section or contact support.
- Pilleri çocukların erişemeyeceği yerlerde saklayın.
3. Paket İçeriği
Aşağıda listelenen tüm öğelerin paketinizde bulunduğunu doğrulayın:
- 1 x Digital Electronic Safe (Model: JL-45891-3L)
- 4 x AA Pil
- 2 x Emergency Back-Up Keys
- 4 x Anchor Bolts
- 1 x Kullanım Kılavuzu (bu belge)
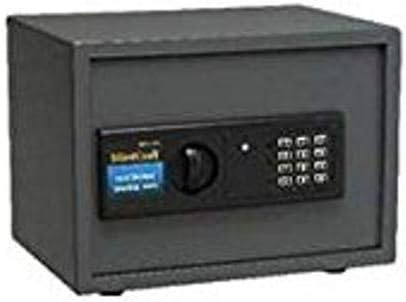
Figure 1: Mintcraft Digital Electronic Safe, showing the main unit with its electronic keypad and manual override knob.
4. Kurulum
4.1. Pil Kurulumu
- Kasanın iç kapağında bulunan pil bölmesini bulun.
- 4 adet AA pili, kutupların doğru olmasına dikkat ederek (+/-) takın.
- Pil bölmesinin kapağını kapatın.
4.2. Başlangıç Kod Ayarları
- With the safe door open, press the red reset button located on the inside of the door near the hinge. A beep will sound, and the indicator light will flash.
- Enter your desired 3 to 8 digit code on the keypad.
- Press the "E" or "#" button to confirm. The light will flash green, indicating the code is set.
- Kapıyı kapatmadan önce yeni kodu kapı açıkken test edin.
4.3. Kasanın Montajı
The safe can be mounted to a wall or floor using the provided anchor bolts. Choose a secure, discreet location.
- Mark the desired drilling points through the pre-drilled holes on the back or bottom of the safe.
- Drill pilot holes in the wall or floor using an appropriate drill bit.
- Align the safe with the drilled holes and secure it using the anchor bolts.
- Kasanın sağlam bir şekilde takıldığından ve kolayca çıkarılamayacağından emin olun.
5. Kullanım Talimatları
5.1. Opening the Safe with Digital Code
- Tuş takımına 3 ila 8 haneli kişisel kodunuzu girin.
- Press the "E" or "#" button.
- If the code is correct, the green light will illuminate. Within 5 seconds, turn the knob clockwise to open the door.
- If the code is incorrect, the yellow light will flash, and a beep will sound.
5.2. Opening the Safe with Emergency Key
In case of battery failure or forgotten code, the safe can be opened using the emergency key.
- Locate the keyhole cover, usually hidden behind the keypad or a removable panel.
- Kapağı çıkarın.
- Insert the emergency key and turn it counter-clockwise while simultaneously turning the knob clockwise to open the door.
- Once opened, replace the keyhole cover.
5.3. Kasanın Kapatılması ve Kilitlenmesi
To lock the safe, simply close the door and turn the knob counter-clockwise. The safe will automatically lock.
6. Bakım
- Pil Değişimi: Replace batteries annually or when the low battery indicator light (if present) illuminates. Always use 4 new AA batteries.
- Temizlik: Kasanın dışını yumuşak bir bezle silin.amp bezle silin. Aşındırıcı temizleyiciler veya çözücüler kullanmayın.
- Tuş Takımı Bakımı: Avoid pressing the keypad buttons with excessive force. Keep the keypad dry and free from dust.
- Yağlama: Periodically apply a small amount of lubricant to the door hinges and locking mechanism to ensure smooth operation.
7. Sorun Giderme
| Sorun | Olası Neden | Çözüm |
|---|---|---|
| Kasa şifreyle açılmıyor. | Incorrect code entered; Batteries are low or dead; Keypad malfunction. | Re-enter code carefully. Replace batteries. Use emergency key to open, then reset code. |
| Tuş takımı yanıt vermiyor. | Piller bitmiş; Pil bağlantısı gevşek. | Replace batteries. Ensure batteries are correctly inserted. |
| Door will not close or lock properly. | Obstruction in door frame; Locking bolts misaligned. | Check for obstructions. Gently push the door inward while turning the knob. |
| Emergency key does not work. | Key not fully inserted; Internal mechanism jammed. | Ensure key is fully inserted and turned correctly. Do not force. Contact support if issue persists. |
8. Özellikler
| Özellik | Detay |
|---|---|
| Model Numarası | JL-45891-3L |
| Dış Boyutlar (Y x G x D) | 9-7/8 in x 13-3/4 in x 9-7/8 in (25.08 cm x 34.93 cm x 25.08 cm) |
| Ürün Boyutları (U x G x Y) | 12.25 x 12.5 x 15.88 inç (31.12 x 31.75 x 40.34 cm) |
| Ağırlık | 30.8 lb (13.97 kg) |
| Kilit Tipi | Acil Durum Anahtarlı Dijital Elektronik |
| Kod Uzunluğu | 3 ila 8 haneli |
| Malzeme | Solid Steel with Powder Coating Finish |
| Güç Kaynağı | 4 x AA Pil (dahil) |
| Montaj Tipi | Duvara Montaj |
| Yangına dayanıklı | HAYIR |
| Su Direnç Seviyesi | Suya dayanıklı değil |
9. Garanti Bilgileri
Please refer to the product packaging or contact the manufacturer directly for specific warranty details. Typically, products are covered against defects in materials and workmanship for a limited period from the date of purchase.
10. Müşteri Desteği
For technical assistance, replacement parts, or any questions regarding your Mintcraft Digital Electronic Safe, please contact your retailer or the manufacturer directly.
Note: Specific contact information may be found on the product packaging or the manufacturer's official webalan.
İlgili Belgeler - JL-45891-3L
 |
DV8 Offroad RBJL-13 JL Full Width Rear Bumper Installation Manual Detailed installation manual for the DV8 Offroad RBJL-13 Full Width Rear Bumper designed for the 2018 and newer Jeep JL Wrangler. This guide covers required tools, skill level, time estimate, important safety warnings, and comprehensive step-by-step instructions with textual descriptions of visual aids. |
 |
JL Wrangler için Rugged Ridge Ön Boru Kapıları Kurulum Kılavuzu Jeep Wrangler JL için Rugged Ridge Ön Boru Kapıları (Parça No: 11509.13) için parça listesi, kurulum adımları ve isteğe bağlı ayna bilgileri dahil olmak üzere adım adım kurulum kılavuzu. |
 |
DV8 Offroad Bumper Mounted Tire Carrier Installation Manual for Jeep Wrangler JL (TCJL-13) Step-by-step installation guide for the DV8 Offroad Bumper Mounted Tire Carrier (TCJL-13) for 21+ Jeep Wrangler JL models. Includes tools required, hardware list, and detailed instructions. |
 |
2018-19 Jeep Wrangler JL için SUPERLIFT 2.5" Yükseltme Kiti Montaj Talimatları Detailed installation guide for the SUPERLIFT 2.5-inch suspension lift kit with shock extensions, designed for the 2018-2019 Jeep Wrangler JL models. Includes parts breakdown, tools required, step-by-step assembly for front and rear, final checks, maintenance, and warranty information. |
 |
5 Gallon Sandblaster Instruction Manual | JL Surface Treating Comprehensive instruction manual for the 5 Gallon Sandblaster (JLSBM mini pot) by JL Surface Treating, featuring a detailed parts list and equipment description. |
 |
2025 Topps Chrome Football Checklist Explore the complete player checklist for the 2025 Topps Chrome Football trading card set, featuring base cards, rookies, special inserts, and autographs from top NFL players. |
Ask a question about this manual
Ask about setup, troubleshooting, compatibility, parts, safety, or missing instructions. Manuals+ will review the question and use this page’s manual context to help answer it.