giriiş
This manual provides essential instructions for the installation, operation, maintenance, and troubleshooting of the IBM 49P1599 FRU System Board. This system board is designed for personal computers, featuring a 400/533 Front Side Bus, integrated 10/100 Ethernet, and support for DDR2 memory.
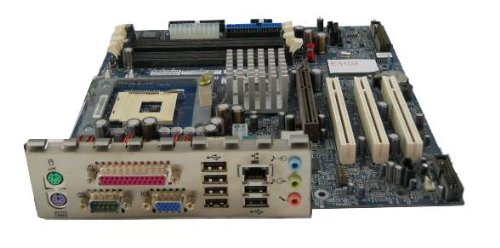
Image: The IBM 49P1599 FRU System Board. This image displays the main components and layout of the motherboard, including CPU socket, memory slots, and various connectors.
Kurulum ve Yükleme
Careful installation is crucial for the proper functioning of your system board. Always handle the board by its edges to avoid static discharge.
1. Kuruluma Hazırlık
- Ensure your computer case is compatible with the system board's form factor.
- Gerekli aletleri toplayın: Phillips tornavida, antistatik bileklik.
- Unplug the power supply from the wall outlet before beginning.
2. Installing the System Board
- G/Ç kalkanını bilgisayar kasanızın arka açıklığına takın.
- Carefully align the system board with the standoffs in the case.
- Secure the system board with screws, ensuring it is firmly seated.
3. Bileşenlerin Kurulumu
İşlemci (CPU)
This system board is supplied without a processor. Refer to your CPU's manual for specific installation instructions. Ensure the CPU is correctly oriented in the socket before securing the retention lever.
Bellek (RAM)
The board supports DDR2 RAM and has 2 memory slots.
- Bellek yuvasının her iki ucundaki klipsleri açın.
- Bellek modülünü yuvayla hizalayın ve modüldeki çentiğin yuvadaki anahtarla eşleştiğinden emin olun.
- Modülün her iki ucuna klipsler yerine oturana kadar sıkıca bastırın.
Grafik Kartı
The system board features an Integrated Graphics Card Interface and a PCI-Express x16 slot for dedicated graphics cards.
- Locate the PCI-Express x16 slot.
- Kasanızdan ilgili genişletme yuvası kapağını çıkarın.
- Insert the graphics card firmly into the slot until it clicks. Secure it with a screw to the case.
4. Bağlantı Kabloları
- Güç Konektörleri: Connect the main 24-pin ATX power connector and the 4-pin CPU power connector from your power supply to the system board.
- SATA Aygıtları: Connect SATA 3 data cables from your storage devices (hard drives, SSDs) to the SATA ports on the system board.
- Ön Panel Konektörleri: Connect the power button, reset button, HDD LED, power LED, and USB ports from your case to the corresponding headers on the system board. Refer to the board's silkscreen labels for correct orientation.
- Ethernet: The board has integrated 10/100 Ethernet. Connect your network cable to the RJ-45 port on the I/O panel.
Kullanım Talimatları
After completing the physical installation, you can proceed with the initial boot and operating system setup.
1. İlk Önyükleme
- Tüm bileşenlerin güvenli bir şekilde bağlandığından emin olun.
- Monitörünüzü, klavyenizi ve farenizi bağlayın.
- Plug in the power supply and turn on the system.
- Sistem açılmalı ve monitörünüzde bir görüntü görmelisiniz.
2. BIOS/UEFI Kurulumu
During the initial boot sequence, press the designated key (commonly DEL, F2, F10, or F12) to enter the BIOS/UEFI setup utility. Here you can configure boot order, system time, and other hardware settings. Save changes before exiting.
3. İşletim Sistemi Kurulumu
This system board is compatible with platforms such as Windows 10. Insert your operating system installation media (USB drive or DVD) and follow the on-screen prompts to install the operating system. Ensure all necessary drivers for the system board components are installed after the OS installation.
Bakım
Regular maintenance helps ensure the longevity and stable performance of your system board.
- Temizlik: Periodically clean dust from the system board and components using compressed air. Ensure the system is powered off and unplugged before cleaning.
- BIOS Güncellemeleri: Check the official IBM support website for BIOS updates. BIOS updates can improve compatibility, stability, and performance. Follow the provided instructions carefully when updating the BIOS.
- Bileşen Kontrolleri: Ensure all cables and components remain securely connected.
Sorun giderme
Sorunlarla karşılaşırsanız aşağıdaki genel sorun giderme adımlarına bakın:
Güç Yok
- Verify the power supply is connected to the wall outlet and turned on.
- Check that the 24-pin and 4-pin power connectors are securely attached to the system board.
- Ensure the front panel power button cable is correctly connected to the system board header.
Ekran Yok
- Confirm the monitor is powered on and connected to the correct video output (either integrated or dedicated graphics card).
- (Varsa) ekran kartını ve bellek modüllerini yeniden takın.
- Test with a different monitor or video cable if possible.
Sistem Başlatılamıyor
- Check for any loose cables or components.
- Ensure the CPU is properly seated and its cooler is installed correctly.
- Try booting with only one memory module installed, rotating through the modules and slots to identify a faulty one.
- Reset the BIOS to default settings (refer to your system board's specific instructions for clearing CMOS).
Özellikler
Garanti ve Destek
For warranty information and technical support, please refer to the official IBM website or contact your point of purchase. Keep your proof of purchase for warranty claims. IBM provides resources and support for its products to ensure customer satisfaction.
Daha fazla yardım için şu adresi ziyaret edin: IBM Desteği webalan.
| Özellik | Şartname |
|---|---|
| Model Numarası | 49P1599 FRU |
| Front Side Bus (FSB) | 400/533 MHz |
| RAM Bellek Teknolojisi | DDR2 |
| Bellek Saat Hızı | 2133 MHz |
| Mevcut Bellek Yuvaları | 2 |
| Grafik Kartı Arayüzü | Integrated, PCI-Express x16 |
| Sistem Veri Yolu Standardı Destekleniyor | SATA 3 |
| Integrated Ethernet | 10/100 Mb/sn |
| Uyumlu Cihazlar | Kişisel Bilgisayar |
| Platform Uyumluluğu | Windows 10 |
| Ürün Ağırlığı | 8 pound |