
1. Giriş ve Üzeriview
This manual provides essential information for the safe and efficient operation, maintenance, and troubleshooting of your JET JSG-6DC Benchtop Belt and Disc Sander. Please read and understand all instructions before operating the machine.

Figure 1: JET JSG-6DC Benchtop Belt and Disc Sander
The image displays the complete JET JSG-6DC Benchtop Belt and Disc Sander, showcasing its primary components including the belt sanding arm on the left, the disc sanding plate on the right, and the motor housing in the center with the power switch.
Temel Özellikler:
- Güçlü Motor: Equipped with a 1-1/2 HP motor for demanding sanding tasks.
- Dual Sanding Surfaces: Features a 6" x 48" belt and a 12" disc for versatile applications.
- Adjustable Belt Arm: The belt can be used horizontally, vertically, or at any angle in between.
- Precision Tables: Cast iron tables with miter gauge slots and positive stops at 90 and 45 degrees.
- Verimli Toz Toplama: Single 4" dust port for effective dust extraction from both sanding surfaces.
- Graphite Platen: Graphite-covered steel platen for cooler operation and extended belt life.
- Kolay Ayarlamalar: Dual thumbscrew belt tracking adjustment and quick-release belt tension lever.
2. Güvenlik Talimatları
Elektrikli aletleri kullanırken yangın, elektrik çarpması ve kişisel yaralanma riskini azaltmak için her zaman temel güvenlik önlemlerine uyun. Bu kılavuzu ileride başvurmak üzere saklayın.
Genel Güvenlik Kuralları:
- Çalışma Alanı: Çalışma alanınızı temiz ve iyi aydınlatılmış tutun. Dağınık veya karanlık alanlar kazalara davetiye çıkarır.
- Elektriksel Güvenlik: Do not expose power tools to rain or wet conditions. Avoid body contact with grounded surfaces.
- Kişisel Güvenlik: Always wear eye protection. Use hearing protection when operating the sander. Wear appropriate clothing; avoid loose clothing, jewelry, and long hair that can get caught in moving parts.
- Makine Çalışması: Do not force the tool. Use the correct tool for your application. Ensure the power switch is in the OFF position before connecting to power.
- Bakım: Herhangi bir ayarlama yapmadan, aksesuarları değiştirmeden veya aleti saklamadan önce fişi güç kaynağından çekin.
- Toz Toplama: Always connect the sander to a dust collection system to minimize airborne dust and maintain a clear workspace.
3. Bileşenler ve Kontroller
Familiarize yourself with the various parts of the sander before operation.
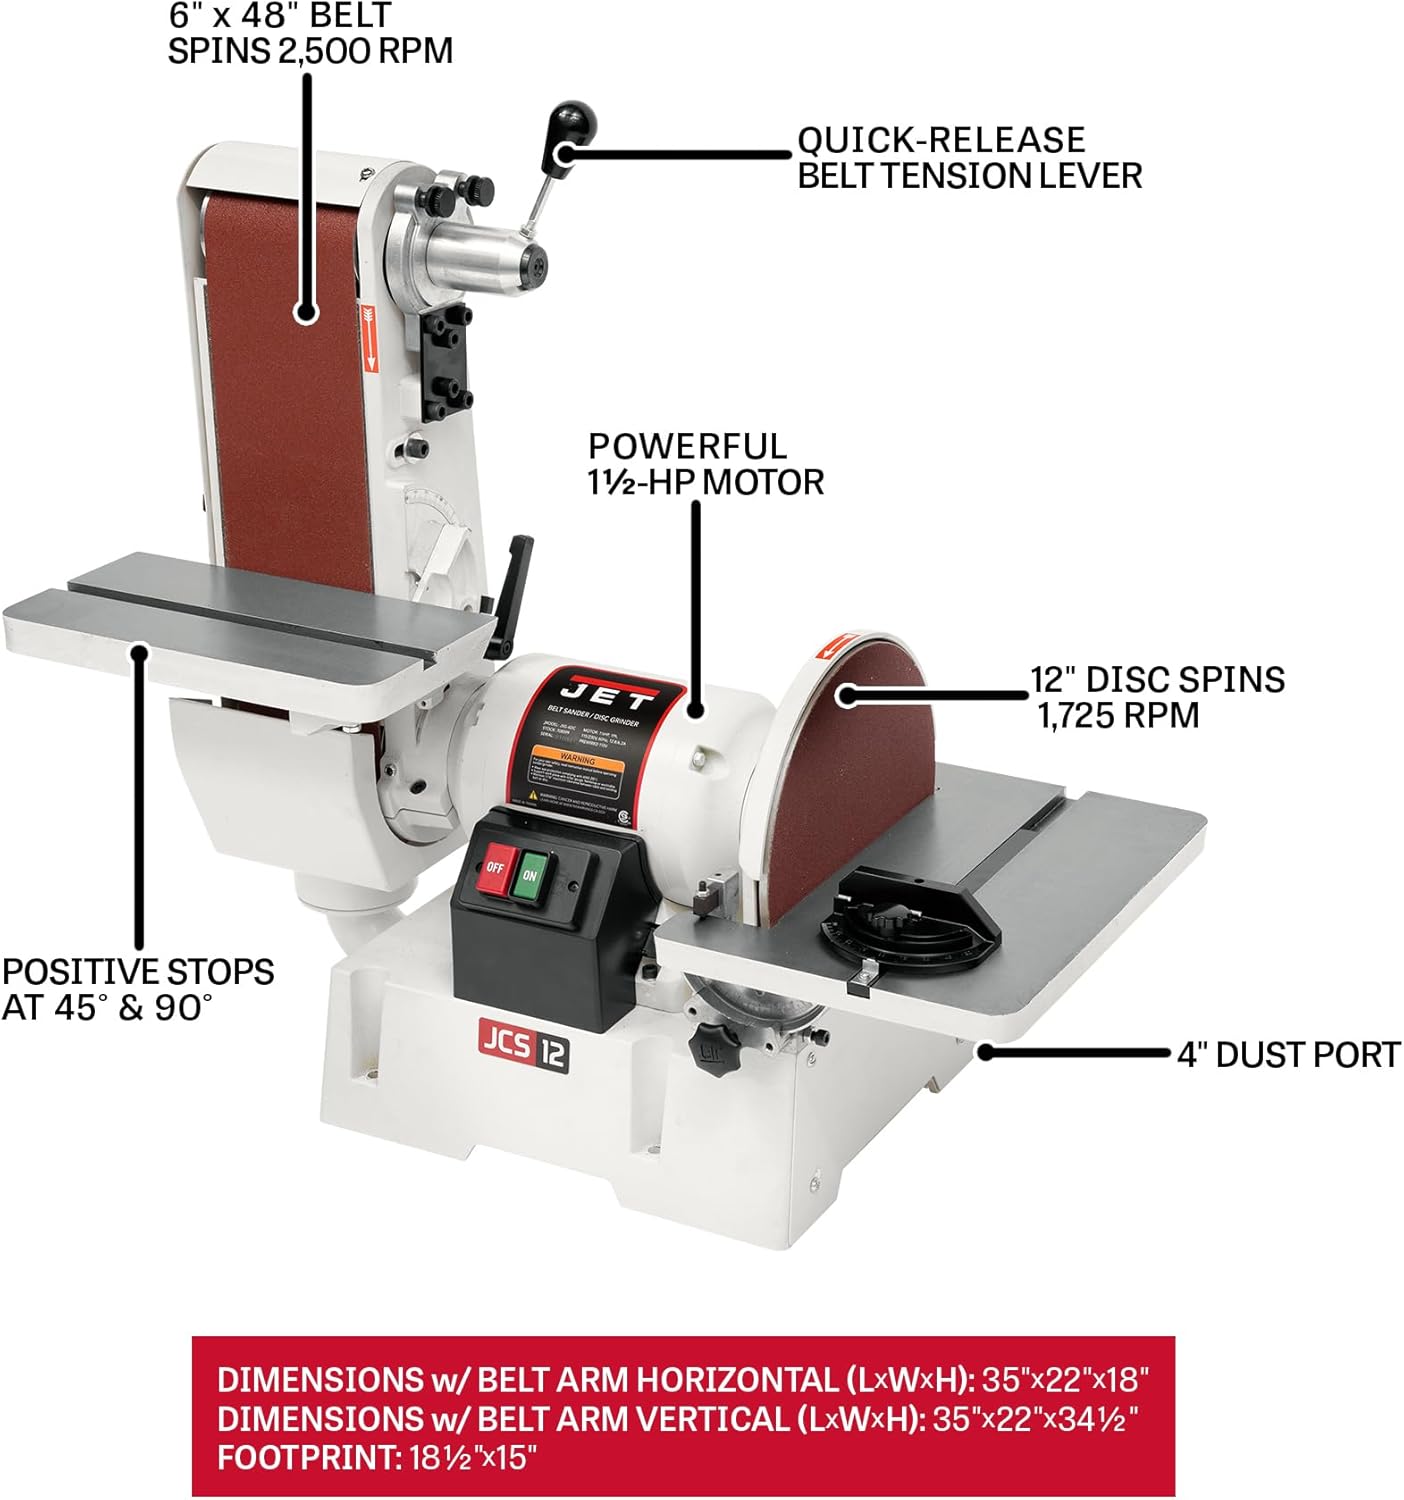
Figure 2: Key Components of the JSG-6DC Sander
This diagram illustrates the main components of the sander, including the 6" x 48" belt, 12" disc, 1-1/2 HP motor, quick-release belt tension lever, dual thumbscrew belt tracking adjustment, positive stops at 45° & 90°, and the 4" dust port.
- Belt Sanding Arm: Holds the 6" x 48" abrasive belt. Can be adjusted for horizontal, vertical, or angled sanding.
- Disc Sanding Plate: The 12" diameter disc for flat sanding operations.
- Çalışma Masaları: Two precision-ground cast iron tables, one for the belt and one for the disc, with miter gauge slots.
- Gönye Göstergesi: Used with the work tables for accurate angle sanding.
- Güç düğmesi: ON/OFF switch located on the motor housing.
- Toz Portu: 4-inch diameter port for connecting to a dust collection system.
- Bant Takip Ayarı: Dual thumbscrews for precise alignment of the sanding belt.
- Kayış Gerdirme Kolu: Quick-release lever for easy belt changes.
4. Kurulum ve Montaj
Ambalajın Açılması ve Muayene:
Carefully remove the sander and all components from the packaging. Inspect for any shipping damage. Report any damage immediately to your dealer.
Atama:
Place the sander on a sturdy, level workbench or an optional stand. Ensure adequate space around the machine for safe operation and material handling.
Elektrik Bağlantısı:
- The JSG-6DC is prewired for 115V operation. It can be rewired for 230V by a qualified electrician if needed.
- Güç kaynağının ses seviyesiyle eşleştiğinden emin oluntage requirements of the sander.
- Connect the sander to a grounded outlet.
Dust Collection System Connection:
Connect a 4-inch dust collection hose to the dust port located at the rear of the sander base. Proper dust collection is crucial for safety and machine longevity.

Figure 3: 4-Inch Dust Port
Yakın çekim view of the 4-inch dust port, designed for connecting to an external dust collection system to manage sanding debris.
5. Operasyon
Başlatma ve Durdurma:
- To start the sander, press the green "ON" button.
- To stop the sander, press the red "OFF" button.
Using the Belt Sander:
- Belt Arm Adjustment: The belt arm can be positioned from horizontal to vertical. Loosen the locking knob, adjust the arm to the desired angle, and tighten the knob securely.
- Kemer Takibi: Use the dual thumbscrew belt tracking adjustment to ensure the belt runs centrally on the rollers. Adjust while the sander is running (briefly) until the belt tracks correctly.
- İş Parçası Desteği: Utilize the belt work table for supporting your workpiece. The table can be adjusted for angle sanding.
- Zımparalama Tekniği: Apply light, even pressure. Move the workpiece smoothly across the belt to prevent uneven sanding and overheating.

Figure 4: Dual Thumbscrew Belt Tracking Adjustment
A close-up of the dual thumbscrews used for precise adjustment of the sanding belt's tracking, ensuring it stays centered during operation.

Figure 5: Preset Stops for Work Tables
This image shows the mechanism for setting the work tables with positive stops at 90 and 45 degrees, facilitating accurate angle sanding.
Using the Disc Sander:
- Work Table Adjustment: The disc work table can be tilted and locked at various angles, with positive stops at 90 and 45 degrees.
- Gönye Göstergesi: Insert the miter gauge into the table slot for precise angle sanding on the disc.
- Zımparalama Tekniği: Always sand on the downward-rotating side of the disc (left side when facing the disc) to prevent the workpiece from being thrown.

Figure 6: Precision-Ground Cast Iron Tables
A view of the robust cast iron work tables, highlighting their precision-ground surface for stable and accurate workpiece support during sanding.
6. Bakım
Regular maintenance ensures optimal performance and extends the life of your sander. Always disconnect power before performing any maintenance.
Temizlik:
- After each use, clean dust and debris from the machine, especially around the motor vents, belt, and disc areas.
- Use compressed air or a brush. Do not use solvents that may damage plastic parts.
Kayışın Değiştirilmesi:
- Gücü kesin.
- Release the quick-release belt tension lever.
- Remove the old belt and install the new 6" x 48" belt, ensuring the directional arrow on the belt matches the arrow on the machine.
- Re-engage the tension lever and adjust belt tracking.
Disk Değişimi:
- Gücü kesin.
- Remove the quick-lock dust cover for access to the disc.
- Peel off the old adhesive-backed 12" sanding disc.
- Clean the disc plate thoroughly before applying a new disc.
- Align and firmly press the new disc onto the plate.

Figure 7: Graphite-Covered Steel Platen
Yakın çekim view of the graphite-covered steel platen, which helps reduce friction and heat buildup, extending the life of the sanding belt.
7. Sorun Giderme
Bu bölümde zımpara makinenizle karşılaşabileceğiniz yaygın sorunlar ele alınmaktadır.
| Sorun | Olası Neden | Çözüm |
|---|---|---|
| Sander başlamıyor | Elektrik yok, şalter arızalı, sigorta atmış. | Check power connection, wall outlet, circuit breaker. Inspect switch for damage. |
| Belt tracks unevenly | Incorrect belt tracking adjustment, worn belt. | Adjust belt tracking using thumbscrews. Replace worn belt. |
| Aşırı titreşim | Loose components, unbalanced disc, worn bearings. | Check all fasteners. Ensure disc is properly seated. Contact service if bearings are suspected. |
| Zayıf toz toplama | Clogged dust port/hose, inadequate dust collector. | Clear obstructions from dust port and hose. Ensure dust collector is operating efficiently. |
| Sander bogs down under load | Overloading, dull abrasive, incorrect voltage. | Reduce pressure on workpiece. Replace abrasive belt/disc. Verify correct voltage tedarik. |
8. Özellikler
| Şartname | Detay |
|---|---|
| Model Numarası | JSG-6DC |
| Parça Numarası | 708599 |
| Motor | 1-1/2 HP, 115/230V, 1Ph (prewired 115V) |
| Amp(115V) | 12.8 Amps |
| Kemer Ölçüsü | 6" x 48" |
| Kayış Hızı | 2,500 SFPM (Dakikada Yüzey Ayağı) |
| Disk çapı | 12 inç |
| Disk Hızı | 1,725 RPM |
| Genel Boyutlar (U x G x Y) | 35" x 22" x 34.5" (with belt arm vertical) |
| Ağırlık | 215 kilo |
| Malzeme | Dökme Demir, Çelik |
| Included Abrasives | 60 Grit Belt, 60 Grit Disc |

Figure 8: Belt and Disc Speeds
This image highlights the operational speeds of the sander: the belt spins at 2,500 SFPM and the disc spins at 1,725 RPM.
9. Garanti ve Destek
Garanti Bilgileri:
The JET JSG-6DC Benchtop Belt and Disc Sander is covered by a 5 Yıllık GarantiBu garanti, normal kullanım ve servis koşulları altında malzeme ve işçilik kusurlarını kapsar.

Figure 9: JET 5-Year Warranty
The image displays the official JET 5-Year Warranty logo, indicating the product's coverage period.
For full warranty details, terms, and conditions, please refer to the official JET website veya müşteri desteği ile iletişime geçin.
Müşteri Desteği:
For technical assistance, parts, or service inquiries, please contact JET customer support. Have your model number (JSG-6DC) and serial number ready when contacting support.
Resmi ziyaret edin JET Store on Amazon Daha fazla bilgi ve ürün aksesuarları için.