
1. Giriş
The Korg microKORG is a compact analog modeling synthesizer featuring a vocoder, mini microphone, 4-voice polyphony, and a 6-step arpeggiator. It utilizes a dual-oscillator DSP synthesis engine, offering a wide range of waveforms and sound design capabilities. This manual provides essential information for setting up, operating, and maintaining your microKORG instrument.

Şekil 1.1: Ön view of the Korg microKORG Compact Analog Modeling Synthesizer with its gooseneck microphone attached. The instrument features a 37-key mini-keyboard, various control knobs, and a program selection interface.
2. Kurulum
2.1 Paketin Açılması ve İlk Muayene
Carefully remove the microKORG from its packaging. Verify that all components are present, including the synthesizer unit, gooseneck microphone, and power adapter (if included). Inspect the unit for any signs of damage during transit.
2.2 Güç Bağlantısı
- The microKORG can be powered by a DC 9V power adapter or by 6 AA batteries.
- To use batteries, open the battery compartment on the underside of the unit and insert 6 AA alkaline batteries, ensuring correct polarity.
- To use the power adapter, connect the adapter to the DC 9V input jack on the rear panel and then plug it into a standard AC outlet.
2.3 Ses Bağlantıları

Figure 2.1: Rear panel of the Korg microKORG, displaying the DC 9V power input, MIDI IN/OUT/THRU ports, AUDIO IN 1 and 2, OUTPUT (L/MONO, R), and HEADPHONES jack.
- Çıktı: Connect the OUTPUT L/MONO and R jacks to an amplifier, mixer, or audio interface using standard 1/4-inch TS cables. For mono output, use the L/MONO jack.
- Kulaklıklar: Connect stereo headphones to the HEADPHONES jack for private monitoring.
- Ses Girişi: The microKORG features AUDIO IN 1 and AUDIO IN 2.
- AUDIO IN 1, 2 (LINE): Use these 1/4-inch jacks for connecting line-level audio sources.
- AUDIO IN 2 (MIC): This 1/4-inch jack can also be used for a microphone input.
- Mikrofon: Attach the included gooseneck microphone to the dedicated MIC input for vocoder functions. Ensure the Level switch is set appropriately for LINE or MIC input.
2.4 MIDI Bağlantıları
The microKORG includes MIDI IN, OUT, and THRU ports for integration with other MIDI devices. Connect MIDI OUT of a master controller to microKORG's MIDI IN, and microKORG's MIDI OUT to other devices or a computer interface as needed.
3. Kullanım Talimatları
3.1 Temel Kontrollerview
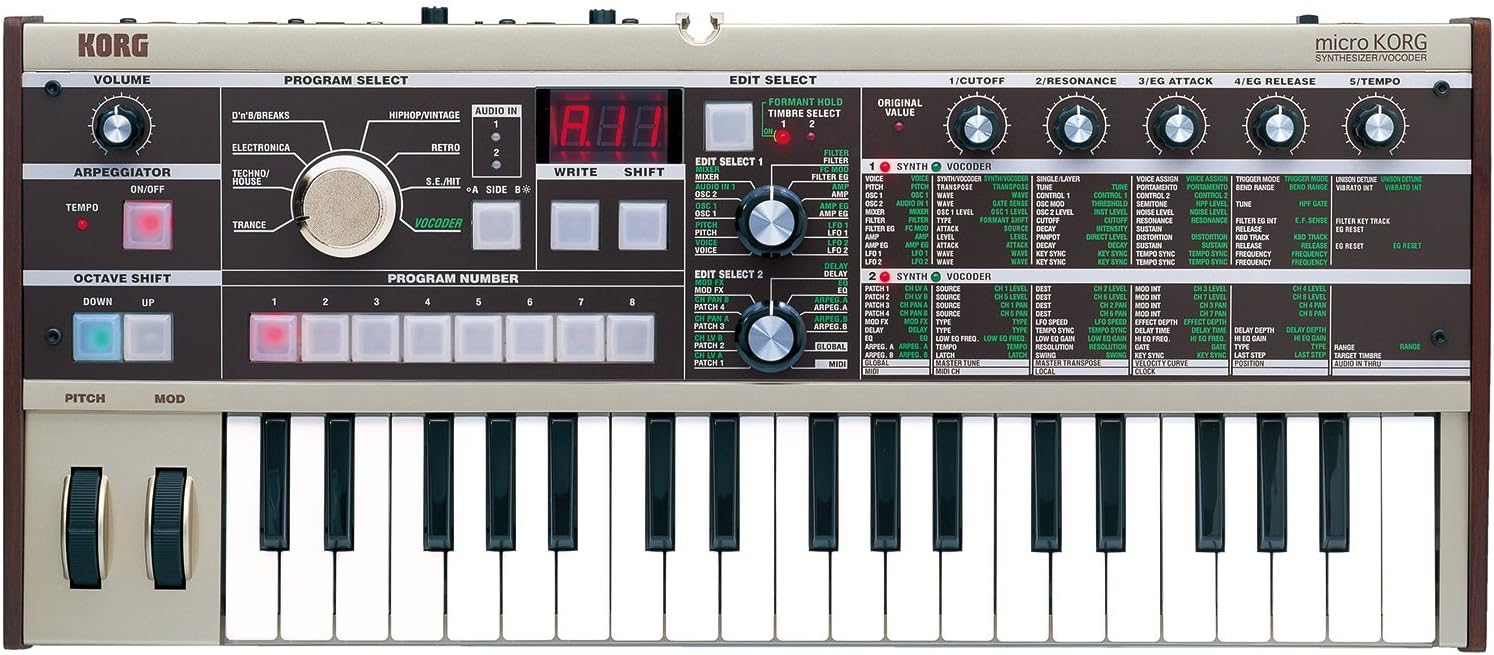
Şekil 3.1: Ayrıntılı yukarıdan aşağıya view of the Korg microKORG's control surface, highlighting the Program Select dial, Edit Select knobs, and various parameter controls for synthesis and effects.
The microKORG features an intuitive interface with dedicated knobs and buttons for sound editing and performance. The main controls are organized into sections for Volume, Program Select, Arpeggiator, Octave Shift, Pitch/Mod wheels, and Edit Select.
3.2 Program Seçimi
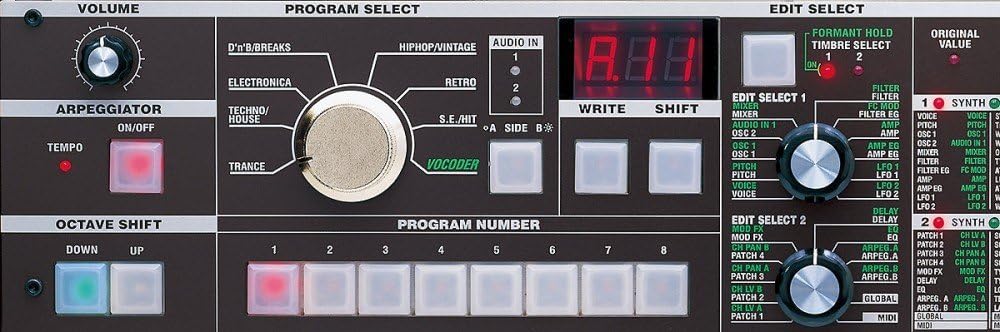
Figure 3.2: Close-up of the microKORG's central control panel, showing the Program Select rotary switch, the digital display, and the Edit Select 1 and 2 knobs with their corresponding parameter lists.
Büyük olanı kullanın PROGRAM SEÇİMİ dial to choose between different sound categories such as D'n'B/Breaks, HipHop/Vintage, Retro, Electronica, Techno/House, Trance, and Vocoder. Once a category is selected, use the numbered buttons (1-8) below the display to select a specific program within that category. The digital display will show the program number.
3.3 Sound Engine and Synthesis
The microKORG's XMT Sound Engine is based on a dual-oscillator DSP synthesis architecture. Oscillator 1 provides 71 waveforms, including traditional analog waves (Saw, Pulse, Sine, Noise) and unique options like Vox wave and Cross wave. It also includes 64 DWGS waveforms from the Korg DW-8000, allowing for a broad range of imitative sounds such as bells, electric pianos, and guitars.
- Oscillator Modulation: Ring and sync modulation can be applied from Oscillator 2 to create complex timbres.
- Filtreler: Four filter modes are available: -12 dB (2-pole) low pass, high pass, band pass, and a -24 dB (4-pole) low pass setting. All include resonance control.
- Zarflar ve LFO'lar: Two ADSR envelope generators and two MIDI-syncable LFOs are provided for shaping sounds.
- Virtual Patch Matrix: This feature allows for advanced modulation routing, such as controlling filter cutoff or pulse width with the Mod wheel, or using an LFO to control panning or ampdaha yaşamsal bir seviye.
3.4 Vocoder Function
The built-in vocoder allows for unique vocal effects and robotic voice transformations. Connect the included gooseneck microphone to the MIC input. Select a vocoder program using the PROGRAM SELECT dial. Adjust vocoder parameters using the EDIT SELECT knobs to modify timbre, formant, and other characteristics of the vocal sound.
3.5 Arpejleyici
The microKORG includes a 6-step arpeggiator. Activate it using the ARPEGGIATOR ON/OFF button. Adjust the tempo using the TEMPO knob and select different arpeggiator patterns and settings via the EDIT SELECT parameters.
3.6 Oktav Kaydırma
Use the OCTAVE SHIFT UP and DOWN buttons to transpose the keyboard's pitch range by octaves.
4. Bakım
4.1 Temizlik
Cihazı yumuşak, kuru bir bezle silin. İnatçı kirler için biraz daha yumuşak bir bez kullanın.amp Önce bir bezle silin ve ardından iyice kurulayın. Aşındırıcı temizleyicilerden, çözücülerden veya cilalardan kaçının, çünkü bunlar yüzeye zarar verebilir.
4.2 Depolama
Store the microKORG in a cool, dry place away from direct sunlight, extreme temperatures, and high humidity. If storing for an extended period, remove the batteries to prevent leakage.
4.3 Pil Değişimi
When the battery indicator (if present) shows low power, or if the unit behaves erratically when running on batteries, replace all 6 AA batteries with new ones. Ensure the unit is powered off before replacing batteries.
5. Sorun Giderme
- Ses Yok:
- Check volume knob position.
- Verify audio cable connections to amptemizleyici/karıştırıcı.
- Ensure headphones are properly connected if used.
- Check selected program and its parameters (e.g., filter cutoff, amplifier envelope).
- Güç Yok:
- If using AC adapter, ensure it is securely connected and the outlet is functional.
- If using batteries, check battery level and polarity, or replace with new batteries.
- MIDI Yanıt Vermiyor:
- Verify MIDI cable connections (IN to OUT, OUT to IN).
- Check MIDI channel settings on both the microKORG and the external device.
- Ensure MIDI functionality is enabled in the microKORG's global settings (refer to the detailed manual for specific steps).
- Vocoder Issues:
- Ensure microphone is securely connected and the input level switch is set to MIC.
- Adjust the input volume for the microphone.
- Check vocoder program settings.
6. Özellikler
| Özellik | Şartname |
|---|---|
| Model Adı | microKorg |
| Ürün Model Numarası | MICROKORG |
| Marka | KORG |
| Klavye Tuş Sayısı | 37 |
| Boyut | 37-Tuş |
| Ürün Boyutları | 26 x 6 x 12 inç |
| Ürün Ağırlığı | 4.84 pound (2.2 Kilogram) |
| Gövde Malzemesi | Bas Ağacı |
| Bitiş Türü | Painted, Wood |
| Renk | Beyaz |
| Güç Kaynağı | 6 AA batteries (included) or DC 9V power adapter |
| Pil Türü | Alkali |
| Bağlayıcı Türü | USB Type B (for MIDI) |
| Donanım Arayüzü | Bilinmeyen |
| Yeterlilik Seviyesi | Tüm |
| Üretici | Korg ABD A.Ş. |
7. Garanti ve Destek
For detailed warranty information, technical support, and service inquiries, please refer to the official Korg documentation included with your product or visit the official Korg webSite. Garanti şartları ve koşulları bölgeye ve perakendeciye göre değişiklik gösterebilir.